
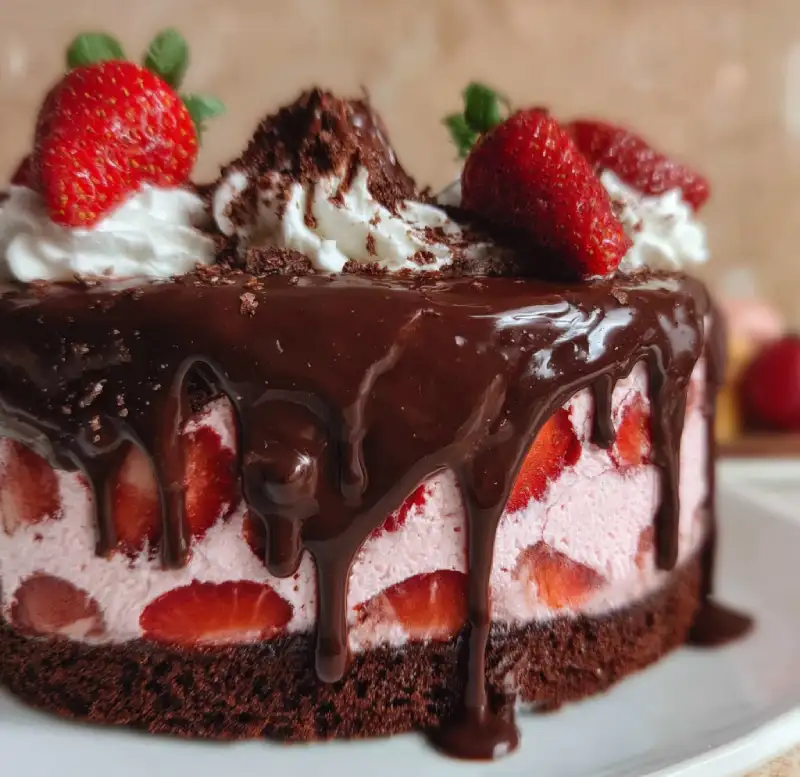
Prepare to fall head over heels for the most decadent, show-stopping dessert that’s easier to make than you think: the chocolate covered strawberry cake! Imagine layers of rich, moist chocolate cake infused with the delightful tang of fresh strawberries, all enveloped in a glossy, seductive chocolate ganache. Every bite is a harmonious blend of deep cocoa notes and bright, juicy strawberry sweetness, reminiscent of your favorite chocolate-dipped fruit but in glorious cake form. This isn’t just a cake; it’s an experience, a symphony of textures and flavors that will leave everyone begging for another slice. Get ready to bake a masterpiece that tastes as incredible as it looks!
Table of Contents
- Why This Chocolate Covered Strawberry Cake Recipe Will Be Your New Favorite
- Essential Ingredients & Smart Substitutions
- Step-by-Step: Baking Your Perfect Chocolate Covered Strawberry Cake
- Expert Tips for Chocolate Covered Strawberry Cake Success
- What to Serve With Your Chocolate Covered Strawberry Cake
- Storing and Reheating Your Chocolate Covered Strawberry Cake
- Chocolate Covered Strawberry Cake FAQ
Why This Chocolate Covered Strawberry Cake Recipe Will Be Your New Favorite
This isn’t just another chocolate cake; it’s the chocolate covered strawberry cake. Here’s why this recipe will earn a permanent spot in your baking repertoire:
- Achieving Moist, Tender Cake Every Time: Our recipe uses a careful balance of wet and dry ingredients, including buttermilk and a touch of oil, to guarantee an incredibly moist crumb that stays tender for days. No dry cakes here!
- The Perfect Balance of Chocolate and Fresh Strawberry Flavor: We’ve meticulously crafted the cake, filling, and frosting to ensure neither the rich chocolate nor the bright, fruity strawberry overpowers the other. It’s a delightful dance of flavors.
- Impressive Presentation with Minimal Fuss: While this cake looks incredibly elegant and professional, our detailed steps and simple ganache technique make it surprisingly achievable for home bakers of all skill levels. You’ll wow your guests without the stress!
- Flour Choices for Texture Perfection: Whether you opt for all-purpose or cake flour, we guide you to achieve the ideal texture – sturdy enough to layer, yet wonderfully delicate.
Essential Ingredients & Smart Substitutions
Here’s what you’ll need to create this show-stopping chocolate covered strawberry cake, along with some expert insights into why each ingredient matters:
Flour Choices: All-Purpose vs. Cake Flour for Texture: For our chocolate cake, I typically use all-purpose flour (unbleached is often my preference). It provides a good balance of structure and tenderness. However, for an even lighter, more delicate crumb, you can absolutely substitute cake flour. If using cake flour, you might need a tiny bit more liquid, as it absorbs slightly differently. Simply reduce the amount of cake flour by two tablespoons per cup compared to all-purpose if you want to be extra precise.
The Role of Sugars: Granulated for Structure, Brown for Moisture: We use both! Granulated sugar contributes to the cake’s structure and helps tenderize the gluten, resulting in a fine, even crumb. Light brown sugar, with its molasses content, adds incredible moisture and a subtle caramel note that complements the chocolate beautifully. This dual sugar approach is key to a moist and flavorful cake.
Understanding Fats: Butter vs. Oil for Flavor and Crumb: This recipe utilizes melted unsalted butter for its rich, dairy flavor, which is essential for a truly delicious chocolate cake. A touch of neutral vegetable oil (like canola or sunflower) is also added. Oil helps keep the cake extra moist and tender, even when chilled, because it remains liquid at room temperature, while butter solids can firm up a cake’s texture. Together, they offer the best of both worlds.
Dairy Decisions: Buttermilk for Tenderness and Tang: Buttermilk is a secret weapon in baking! Its acidity reacts with baking soda to create a beautifully tender crumb and helps activate the cocoa powder for a deeper chocolate flavor, especially with natural cocoa. If you don’t have buttermilk, you can easily make a substitute: add 1 tablespoon of white vinegar or lemon juice to a liquid measuring cup, then fill the rest with whole milk until it reaches 1 cup. Let it sit for 5-10 minutes until it curdles.
Cocoa Powder: Natural vs. Dutch-Processed for Color and Flavor Depth: For this cake, I recommend using Dutch-processed cocoa powder. Dutch-processed cocoa has been treated to reduce its acidity, resulting in a darker color and a smoother, less bitter chocolate flavor. This pairs wonderfully with the tang of the strawberries and the richness of the ganache. If you only have natural cocoa, you can use it, but be aware the cake will be lighter in color and have a slightly sharper chocolate taste. Just ensure your leavening agents are balanced for natural cocoa (more baking soda).
Fresh Strawberries: Selection and Preparation for Best Results: Quality matters here! Choose bright red, firm, fragrant fresh strawberries. Avoid any that are bruised, mushy, or pale. For the best flavor and texture in your filling and decoration, wash them gently, hull them (remove the green leafy top), and pat them completely dry before slicing or chopping. Moisture is the enemy of cake stability, especially for decoration.
Chocolate for Ganache: Quality Matters for Shine and Snappiness: For the ganache, using high-quality dark chocolate (60-70% cocoa solids) is paramount. Choose a brand you enjoy eating on its own! Good quality chocolate melts smoothly, creates a stable, glossy ganache, and has a superior flavor profile. Chocolate chips often contain stabilizers that can make ganache grainy; opt for a good bar of chocolate, finely chopped, for the best results.
How to Make Your Perfect Chocolate Covered Strawberry Cake
Get ready to create some kitchen magic! Follow these step-by-step instructions (and imagine some beautiful photos guiding you along the way!)
1. Prep Your Pans and Oven Like a Pro
Start by preheating your oven to 350°F (175°C). This ensures a consistent baking temperature from the moment your cake goes in. Generously grease and flour two 8-inch round cake pans, or line them with parchment paper circles and spray with baking spray. This crucial step prevents sticking and guarantees your beautiful cake layers release easily. Having your oven and pans ready before you start mixing means your batter won’t sit around, preserving its leavening power.
2. Mix the Dry Ingredients: Why Sifting is Key
In a large bowl, whisk together your sifted flour, both sugars, cocoa powder, baking soda, baking powder, and salt. Sifting isn’t just for lumps; it aerates the flour, which leads to a lighter cake texture, and ensures all the leavening agents and flavorings are evenly distributed. A well-mixed dry base is the foundation of a consistent crumb. You want it to be perfectly combined before adding any wet ingredients.
3. Combine Wet Ingredients: Emulsification for a Smooth Batter
In a separate medium bowl, combine the buttermilk, melted butter, vegetable oil, eggs, and vanilla extract. Whisk these together until they are well emulsified – meaning they are thoroughly combined into a smooth, homogenous mixture. This step is important because it ensures these liquids are evenly distributed throughout the dry ingredients, preventing overmixing later.
4. The Batter: Achieving the Right Consistency
Gradually add the wet ingredients to the dry ingredients, mixing on low speed with an electric mixer (or by hand with a whisk) just until no streaks of dry flour remain. The batter should be smooth and pourable, but not thin. Do NOT overmix! Overmixing develops gluten too much, resulting in a tough, dense cake. Scrape down the sides of the bowl to ensure everything is incorporated.
5. Baking for Doneness: Visual Cues and Internal Temperature
Divide the batter evenly between your prepared cake pans. Bake for approximately 28-32 minutes, or until a wooden skewer or toothpick inserted into the center of the cakes comes out clean or with a few moist crumbs attached. The cakes should spring back lightly when gently pressed. For ultimate precision, use an instant-read thermometer; the internal temperature should read 200-205°F (93-96°C). Avoid opening the oven door too early, as this can cause cakes to sink.
6. Cooling the Cakes: Why Patience Prevents Cracks
Once baked, let the cakes cool in their pans on a wire rack for about 10-15 minutes. This allows them to firm up slightly and prevents them from breaking when you invert them. After this initial cooling, carefully invert the cakes onto the wire rack and remove the pans (and parchment paper, if used). Let them cool completely to room temperature before frosting. Attempting to frost warm cakes will lead to melted frosting and potential structural collapse – patience is truly a virtue here!
7. Making the Strawberry Filling: Freshness is Best
While your cakes cool, prepare your strawberry filling. In a saucepan, combine diced fresh strawberries, a little sugar (to taste), and a splash of lemon juice. Cook over medium heat, stirring occasionally, until the strawberries soften and release their juices, and the mixture thickens slightly, about 5-7 minutes. If you want a thicker, jam-like consistency, you can optionally mix a teaspoon of cornstarch with a tablespoon of water and stir it into the simmering mixture. Allow the filling to cool completely before using. A cool filling prevents your buttercream from melting.
8. Crafting the Chocolate Ganache: Smooth, Glossy, and Stable
For the ganache, finely chop your high-quality dark chocolate and place it in a heatproof bowl. In a small saucepan, heat heavy cream until it just begins to simmer around the edges (do not boil!). Pour the hot cream over the chopped chocolate and let it sit undisturbed for 5 minutes. Then, whisk gently from the center outwards until the ganache is completely smooth, glossy, and emulsified. Stir in a teaspoon of vanilla extract, if desired. Let the ganache cool slightly at room temperature, stirring occasionally, until it reaches a spreadable (but not too thick) consistency. It should still be pourable but have some body to it – think thick syrup. This ensures a beautiful drape over your cake. For an external resource on perfect ganache, check out King Arthur Baking’s ganache guide.
9. Assembling Your Cake: Layering for Stability and Beauty
Once the cakes are completely cool, level them if necessary using a serrated knife or a cake leveling tool. Place one cake layer on your serving plate or cake stand. Spread a generous layer of your cooled strawberry filling over it, leaving a small border. Top with the second cake layer. Now, starting from the center, pour or spoon your slightly cooled ganache over the top of the cake, allowing it to slowly drip down the sides for that signature ‘drip’ effect. You can use an offset spatula to gently guide the drips.
10. Decorating for That Signature ‘Chocolate Covered Strawberry’ Look
The final flourish! Arrange fresh, whole chocolate-dipped strawberries on top of the ganache-covered cake. To dip, melt some extra chocolate (or use a fresh batch), dip each strawberry halfway, and let excess drip off. Place them on parchment paper to set before arranging on the cake. For extra sparkle, a dusting of powdered sugar or a sprinkle of finely chopped pistachios can add a beautiful contrast. Allow the ganache to set slightly before serving.
Expert Tips for Chocolate Covered Strawberry Cake Success
- Temperature Matters: Room Temperature Ingredients Explained: This is a golden rule in baking! Room temperature butter, eggs, and buttermilk emulsify much better, creating a smooth, homogenous batter. Cold ingredients can cause your batter to curdle or become lumpy, leading to a less desirable cake texture. Plan ahead and take them out of the fridge at least an hour before baking.
- Precise Measuring for Consistent Results: Baking is a science, and accuracy is key! Use a kitchen scale for flour, sugar, and cocoa powder whenever possible. If using measuring cups, spoon and level your flour (don’t scoop directly from the bag) to avoid compacting it, which can add too much flour and result in a dry cake.
- Don’t Overmix: Understanding Gluten Development: Mix the cake batter only until just combined and no streaks of dry ingredients remain. Overmixing develops the gluten in the flour too much, leading to a tough, chewy, and dense cake rather than a tender one.
- Achieving a Flat Cake Top: Leveling Techniques: If your cakes bake with a slight dome, don’t fret! Once completely cool, use a long, serrated knife or a dedicated cake leveling tool to carefully slice off the top domes. This creates flat layers, making your cake easier to stack and ensuring a professional finish.
- Troubleshooting Ganache: Too Thick? Too Thin?: If your ganache is too thick, gently warm it over a double boiler or in short bursts in the microwave, stirring until it loosens. If it’s too thin, let it sit at room temperature for longer, stirring occasionally, or pop it in the fridge for 5-10 minute intervals, stirring after each, until it reaches the desired consistency.
- Handling Strawberries for Decorating: Preventing Bleeding: For decorating, only place fresh strawberries on top of the cake just before serving or within a few hours. Strawberries release moisture, and if left on cake for too long, they can ‘bleed’ and discolor your ganache or frosting. Dipping them in chocolate first also creates a protective barrier.
What to Serve With Your Chocolate Covered Strawberry Cake
This decadent chocolate covered strawberry cake is a showstopper on its own, but a few thoughtful pairings can elevate the experience even further!
- Drink Pairings: Coffee, Tea, or Wine: For a classic touch, a freshly brewed cup of strong coffee or a rich espresso cuts through the sweetness beautifully. A fragrant black tea, like Earl Grey or Darjeeling, also provides a lovely contrast. If you’re feeling sophisticated, consider a glass of sparkling rosé or a light-bodied red wine like a Pinot Noir, which can complement the fruit notes without overpowering. Or, of course, a glass of cold milk is always a winner!
- Simple Accompaniments: Whipped Cream or Ice Cream: A dollop of freshly whipped cream, lightly sweetened, adds an extra layer of creaminess and lightness. For those who love a dessert à la mode, a scoop of good quality vanilla bean ice cream or even strawberry ice cream would be absolute perfection, offering a delightful temperature contrast.
Storing and Reheating Your Chocolate Covered Strawberry Cake
You’ve put so much love into your chocolate covered strawberry cake, so let’s make sure it stays as delicious as possible!
- Best Practices for Freshness and Flavor: Store your cake, covered, in the refrigerator. An airtight cake dome or a large container is ideal. The cold temperature helps stabilize the ganache and keeps the fresh strawberries firm. It will stay fresh for 3-4 days. For optimal flavor and texture, I recommend bringing slices to room temperature for about 30-60 minutes before serving.
- Freezing Options for Longer Storage: If you’re planning ahead or have leftovers, this cake freezes beautifully! Wrap individual slices or the entire cake (without fresh strawberry decoration) tightly in plastic wrap, then an additional layer of aluminum foil. Freeze for up to 2-3 months.
- Reviving Chilled or Frozen Slices: To revive a chilled slice, simply let it sit at room temperature until the ganache softens slightly and the cake is no longer cold. For frozen slices, transfer them to the refrigerator overnight to thaw. Alternatively, you can unwrap a frozen slice and let it thaw at room temperature for 1-2 hours. Do not microwave, as it can alter the texture of the ganache and cake.
Chocolate Covered Strawberry Cake FAQ
Can I use frozen strawberries?
How far in advance can I make the cake?
My ganache is too runny/thick, what do I do?
Can I make this dairy-free?
How do I prevent my cake from drying out?
Delicious Chocolate Covered Strawberry Cake Recipe
- Total Time: 1 hour 15 minutes
- Yield: 12 servings
Description
Rich, moist chocolate cake layers embrace a vibrant fresh strawberry filling, all draped in a luscious chocolate ganache. This stunning dessert delivers the iconic flavor of chocolate-covered strawberries in an unforgettable cake experience.
Ingredients
- For the Chocolate Cake:
- 2 cups (240g) all-purpose flour, sifted
- 1 ½ cups (300g) granulated sugar
- ½ cup (100g) light brown sugar, packed
- ¾ cup (75g) Dutch-processed cocoa powder
- 2 teaspoons baking soda
- 1 teaspoon baking powder
- 1 teaspoon salt
- 1 cup (240ml) buttermilk, room temperature
- ½ cup (113g) unsalted butter, melted and cooled
- ¼ cup (60ml) vegetable oil
- 2 large eggs, room temperature
- 2 teaspoons vanilla extract
- 1 cup (240ml) hot water or hot coffee
- For the Strawberry Filling:
- 2 cups (approx. 300g) fresh strawberries, hulled and diced
- ¼ cup (50g) granulated sugar (or to taste)
- 1 tablespoon lemon juice
- 1 teaspoon cornstarch mixed with 1 tablespoon water (optional, for thicker filling)
- For the Chocolate Ganache:
- 12 ounces (340g) good quality dark chocolate (60-70% cocoa), finely chopped
- 1 ½ cups (360ml) heavy cream
- 1 teaspoon vanilla extract (optional)
- For Decoration:
- Fresh whole strawberries, some dipped in chocolate (optional)
Instructions
- Step 1: Prepare Oven and Pans. Preheat oven to 350°F (175°C). Grease and flour two 8-inch round cake pans, or line with parchment paper.
- Step 2: Combine Dry Ingredients. In a large bowl, whisk together sifted flour, granulated sugar, brown sugar, cocoa powder, baking soda, baking powder, and salt.
- Step 3: Combine Wet Ingredients. In a separate bowl, whisk together buttermilk, melted butter, vegetable oil, eggs, and vanilla extract until smooth.
- Step 4: Make the Batter. Gradually add wet ingredients to dry ingredients, mixing on low speed until just combined and no dry streaks remain. Stir in hot water or coffee until smooth. Do not overmix.
- Step 5: Bake the Cakes. Divide batter evenly between prepared pans. Bake for 28-32 minutes, or until a wooden skewer inserted into the center comes out clean or with moist crumbs.
- Step 6: Cool the Cakes. Cool cakes in pans for 10-15 minutes, then invert onto a wire rack to cool completely to room temperature.
- Step 7: Make Strawberry Filling. In a saucepan, combine diced strawberries, sugar, and lemon juice. Cook over medium heat until softened and slightly thickened, 5-7 minutes. If desired, stir in cornstarch slurry and cook for another minute. Cool completely.
- Step 8: Prepare Chocolate Ganache. Place chopped chocolate in a heatproof bowl. Heat heavy cream until simmering, then pour over chocolate. Let sit 5 minutes, then whisk until smooth and glossy. Stir in vanilla, if using. Let cool slightly until pourable but thick enough to drip slowly.
- Step 9: Assemble the Cake. Level cake layers if necessary. Place one layer on a serving plate. Spread with cooled strawberry filling, leaving a small border. Top with second cake layer. Pour or spoon ganache over the top, letting it drip down the sides.
- Step 10: Decorate and Serve. Arrange fresh (and optionally chocolate-dipped) strawberries on top. Allow ganache to set slightly before serving. Store covered in the refrigerator.
- Prep Time: 45 mins
- Cook Time: 30 mins