
Table of Contents
- Introduction: Your New Favorite Dessert Hack
- Why These Strawberry Shortcake Dessert Cups Shine
- Ingredients and Smart Substitutions
- Step-by-Step: Assembling Your Dessert Cups
- Expert Tips for Dessert Cup Success
- What to Serve With Strawberry Shortcake Dessert Cups
- Storing and Reheating Best Practices
- Frequently Asked Questions About Dessert Cups
Introduction: Your New Favorite Dessert Hack
Imagine a dessert that’s bright, fresh, and bursting with the sweet taste of summer, yet incredibly easy to assemble. Our Strawberry Shortcake Dessert Cups are precisely that – a symphony of fluffy cake, juicy macerated strawberries, and decadent whipped cream, all layered beautifully in individual servings. Each spoonful delivers that perfect balance of tender crumb, vibrant fruit, and creamy bliss that will have everyone asking for your secret. It’s the ultimate dessert for any occasion, from casual backyard BBQs to elegant brunches. Best of all, it looks so impressive, but it’s shockingly simple to put together! For more delightful and easy recipes like this, be sure to See more easy recipes on our site.
Quick, Delicious, and Impressively Simple! This isn’t just another dessert recipe; it’s a game-changer. Forget elaborate tarts or complicated layered cakes. These dessert cups come together with minimal fuss, making them perfect for busy hosts or anyone craving a taste of homemade goodness without the stress. The individual portions are also ideal for entertaining, eliminating serving hassle and ensuring everyone gets a picture-perfect treat.
Why This Recipe Is a Must-Try: Beyond their ease and beauty, these strawberry shortcake cups offer a truly satisfying dessert experience. The textures and flavors are perfectly harmonious, creating a memorable treat that celebrates the best of fresh strawberries. They’re light enough for a summer afternoon but rich enough to feel like a special occasion dessert.
Why These Strawberry Shortcake Dessert Cups Shine
- Perfectly Balanced Sweetness and Tartness: We macerate our fresh strawberries, drawing out their natural sweetness and creating a luscious syrup that complements the tender cake and rich cream without overwhelming your palate.
- Light and Fluffy Cake Texture, Never Dry: Our shortcake base is designed to be moist and tender, absorbing some of the delicious strawberry juices without becoming soggy, ensuring a delightful bite every time.
- Creamy Whipped Topping Without the Fuss: A simple, perfectly sweetened heavy cream whipped to soft peaks provides the ideal counterpart to the fruit and cake, delivering richness without being overly heavy.
- Effortless Layering for Beautiful Presentation: The beauty of these cups lies in their simplicity. Even a novice baker can create stunning, Instagram-worthy layers with ease.
Ingredients and Smart Substitutions
Here is what you need and why each ingredient plays a crucial role:
The Cake Base: Why All-Purpose Flour and Baking Powder Matter: For our shortcake, we’re aiming for a crumb that’s tender but still has some structure. All-purpose flour provides that perfect balance. You could substitute cake flour for an even lighter, more delicate crumb, but all-purpose works beautifully. Baking powder is our leavening agent, giving the cake its delightful lift and airy texture. Ensure it’s fresh for the best rise!
Sweetness and Moisture: Granulated Sugar and Vanilla Extract Explained: Granulated sugar sweetens the cake and contributes to its moistness and golden crust. Don’t skip the vanilla extract; it enhances all the other flavors, adding a warm, aromatic depth that’s essential for a classic shortcake.
Richness and Binding: Eggs and Milk Selection: Eggs in the batter act as a binder, providing structure and richness, while also helping with leavening. Use large eggs for consistency. Milk (whole milk is preferred for richness) contributes to the tender texture and helps hydrate the dry ingredients. You can use a dairy-free alternative if needed, but the flavor might vary slightly.
The Star Ingredient: Fresh Strawberries (And Frozen Alternatives): There’s nothing quite like fresh, ripe strawberries, especially during peak season. Look for berries that are vibrant red, firm, and fragrant. If fresh aren’t available or in season, good quality frozen strawberries can work in a pinch. Thaw them completely, drain any excess liquid, and then proceed with macerating.
Creamy Topping: Heavy Cream and Confectioners’ Sugar Secrets: Heavy cream (or heavy whipping cream) is absolutely essential for creating that luscious, stable whipped topping. Make sure it’s very cold for optimal whipping. Confectioners’ sugar (also known as powdered sugar) is preferred over granulated sugar for whipped cream because its fine texture dissolves instantly, preventing a grainy consistency and providing a silky smooth finish.
Optional Enhancements: Lemon Zest or a Splash of Liqueur: A little lemon zest added to the macerating strawberries or the whipped cream can brighten the flavors beautifully. For an adult twist, a splash of Grand Marnier or Cointreau can infuse the berries with a lovely citrus hint, or a touch of rum or bourbon for a warmer, richer note.
Step-by-Step: Assembling Your Dessert Cups
Follow these step-by-step instructions to create your perfect Strawberry Shortcake Dessert Cups:
1. Prepare Your Strawberries
Begin by gently washing your fresh strawberries under cool water. Pat them dry with a clean paper towel. Hull each strawberry by removing the green leafy top with a small knife, then slice them into uniformly sized pieces, about 1/4 to 1/2 inch thick. Place the sliced strawberries in a medium bowl, sprinkle with 1-2 tablespoons of granulated sugar (adjust to your strawberries’ sweetness), and a tiny squeeze of lemon juice if using. Gently toss to combine. Let them macerate at room temperature for at least 20-30 minutes, or in the refrigerator for up to an hour. This process draws out their delicious juices and intensifies their flavor.
2. Bake the Shortcake Base
Preheat your oven to 375°F (190°C). In a large bowl, whisk together 1 ½ cups all-purpose flour, 2 tablespoons granulated sugar, 2 teaspoons baking powder, and ¼ teaspoon salt. In a separate bowl, whisk together 1 large egg, ½ cup milk (whole milk is great here!), and ¼ cup melted unsalted butter, along with 1 teaspoon vanilla extract. Pour the wet ingredients into the dry ingredients and mix with a spoon or spatula until just combined. Be careful not to overmix; a few lumps are okay. Pour the batter into a greased 8×8 inch baking pan or a muffin tin lined with paper liners (for individual mini cakes). Bake for 18-22 minutes for the pan or 12-15 minutes for muffins, or until a toothpick inserted into the center comes out clean. The cake should be lightly golden brown and spring back when gently pressed.
3. Cool and Cube the Cake
Once baked, remove the cake from the oven and let it cool in the pan on a wire rack for about 10-15 minutes. This allows the cake to set and prevents it from crumbling when you remove it. Once slightly cooled, invert the cake onto the wire rack to cool completely. Patience here is key! A fully cooled cake is much easier to handle and prevents your whipped cream from melting. Once completely cool, use a sharp knife to cut the cake into small, bite-sized cubes, roughly ¾ inch to 1 inch in size.
4. Whip the Cream to Perfection
In a large, chilled bowl (using a metal bowl that has been in the freezer for 10-15 minutes helps tremendously!), pour 1 ½ cups very cold heavy cream. Add ¼ cup confectioners’ sugar and ½ teaspoon vanilla extract. Using an electric mixer (handheld or stand mixer with a whisk attachment) on medium-high speed, whip the cream until soft to medium peaks form. You want it fluffy and stable enough to hold its shape, but not overly stiff or gritty. Avoid over-whipping, as it can turn grainy quickly.
5. Layer for Success
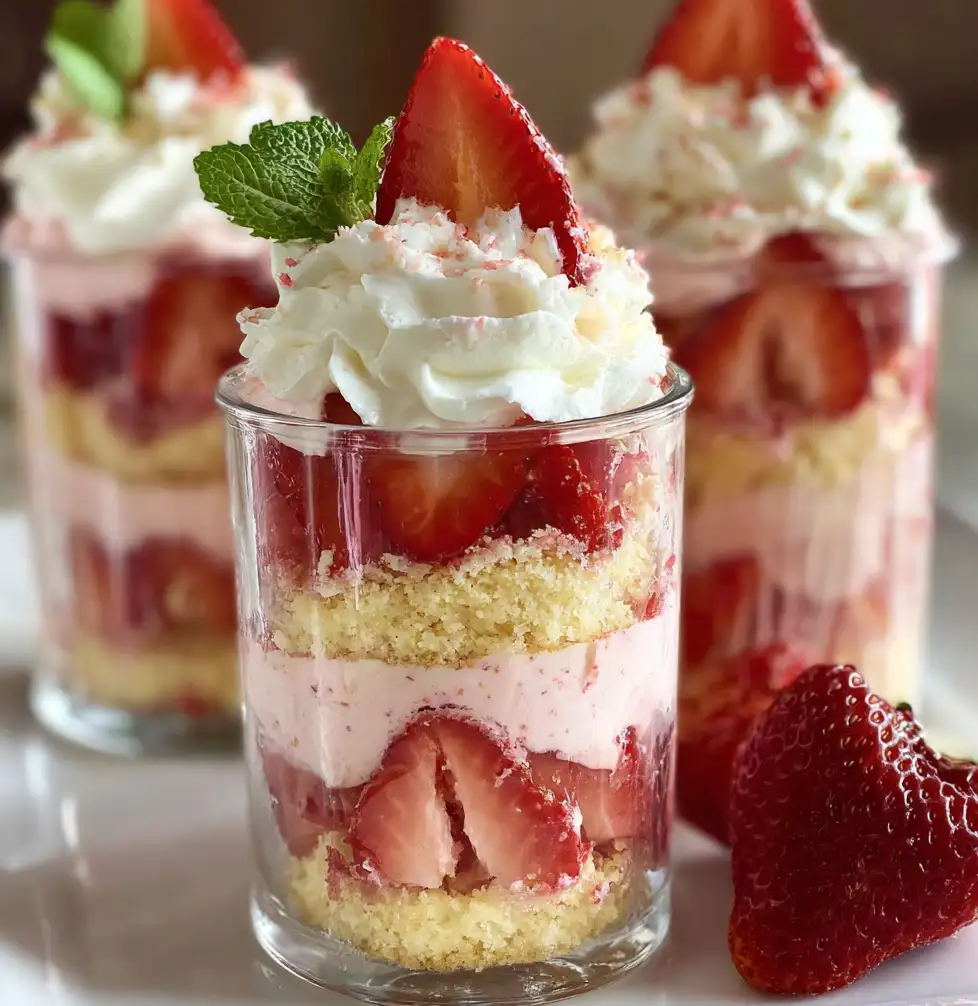
Now for the fun part – assembly! Grab your individual dessert cups, jars, or glasses. Start with a layer of cake cubes at the bottom. Spoon a generous amount of macerated strawberries (including their delicious juices!) over the cake. Follow with a dollop or piped layer of whipped cream. Repeat these layers: cake, strawberries, and then cream, until your cup is full, ending with a beautiful swirl of whipped cream on top. For a professional finish, you can pipe the whipped cream using a star tip.
Expert Tips for Dessert Cup Success
- Don’t Overmix the Batter: Keep it Light and Tender: When combining your wet and dry ingredients for the shortcake base, mix until just combined. Overmixing develops the gluten in the flour, leading to a tougher, chewier cake instead of the tender crumb we’re aiming for. A few small lumps are perfectly fine!
- Cut Cake Uniformly for Even Layers: When cubing your shortcake, try to cut pieces of similar size. This ensures that each layer looks neat and every bite has an even distribution of cake.
- Avoid Soggy Cakes: The Maceration Timing Trick: While macerating the strawberries creates fantastic flavor, too much liquid too early can make your cake soggy. Assemble the cups no more than 2-3 hours before serving. If making further in advance, store the cake, strawberries, and whipped cream separately and assemble just before serving.
- Chill Before Serving: Enhances Flavors and Texture: After assembling, chill your dessert cups in the refrigerator for at least 30 minutes. This allows the flavors to meld beautifully and the components to set, providing a more refreshing and cohesive dessert experience.
- Presentation Matters: Pipe the Whipped Cream for a Professional Finish: For an effortlessly elegant look, transfer your whipped cream to a piping bag fitted with a star tip (or even a plain round tip). Pipe swirls of cream on top of each cup. It instantly elevates the presentation!
What to Serve With Strawberry Shortcake Dessert Cups
These Strawberry Shortcake Dessert Cups are delightful on their own, but a few thoughtful additions can elevate the experience even further:
- Simple Garnishes: Mint Leaves or Chocolate Shavings: A fresh mint leaf or a sprinkle of finely grated dark chocolate on top of the whipped cream adds a touch of color and sophistication.
- Complementary Beverages: Iced Tea or Sparkling Wine: Pair these cups with a refreshing glass of iced tea or lemonade for a casual summer vibe. For a more celebratory feel, a crisp sparkling wine or prosecco makes a wonderful accompaniment.
- As Part of a Dessert Spread: Alongside Other Mini Treats: These individual cups are perfect for a dessert table. Serve them alongside mini chocolate mousse cups, lemon bars, or small cheesecakes for a diverse and appealing spread.
Storing and Reheating Best Practices
To ensure your delightful Strawberry Shortcake Dessert Cups remain fresh and delicious, proper storage is key.
- Short-Term Storage: Refrigeration is Key: Once assembled, these dessert cups should be stored in the refrigerator. Cover them loosely with plastic wrap to prevent them from absorbing refrigerator odors. They are best enjoyed within 24-48 hours. After this time, the cake may start to become a bit too soft from the strawberry juices and moisture.
- Preventing Soggy Layers: Store Components Separately if Possible: If you plan to make these more than 2-3 hours in advance, consider storing the cake cubes, macerated strawberries, and whipped cream in separate airtight containers in the refrigerator. You can then assemble the cups just before serving to maintain optimal texture for all components. The cake can be kept in an airtight container at room temperature for up to 2 days, or refrigerated for up to 4 days.
- Reheating (Not Recommended, But If You Must): Gentle Warming Tips: Reheating these dessert cups is generally not recommended, as the delicate whipped cream will melt, and the strawberries will soften further. The beauty of this dessert is its fresh, cool nature. If you find yourself with leftover cake cubes that haven’t been assembled, you can gently warm them in a microwave for 10-15 seconds for a warm shortcake experience, but always add fresh strawberries and whipped cream afterward.
Frequently Asked Questions About Dessert Cups
Can I use frozen strawberries?
How far in advance can I make these?
What if I don’t have individual dessert cups?
Can I make this gluten-free?
How to prevent separation in whipped cream?
Strawberry Shortcake Dessert Cups: Easy Recipe Guide
- Total Time: 50 minutes
- Yield: 8-10 servings
Description
Indulge in our delightful Strawberry Shortcake Dessert Cups! This step-by-step guide makes it easy to bake the best flavored dessert that’s perfect for any occasion.
Ingredients
- 1 ½ cups all-purpose flour
- 2 tablespoons granulated sugar (for cake)
- 2 teaspoons baking powder
- ¼ teaspoon salt
- 1 large egg
- ½ cup whole milk
- ¼ cup unsalted butter, melted
- 1 teaspoon vanilla extract (for cake)
- 4 cups fresh strawberries, hulled and sliced
- 1–2 tablespoons granulated sugar (for macerating)
- 1 ½ cups very cold heavy cream
- ¼ cup confectioners’ sugar
- ½ teaspoon vanilla extract (for cream)
- Optional: lemon zest, mint leaves for garnish
Instructions
- Prepare Strawberries: Wash, hull, and slice strawberries. Toss with 1-2 tbsp granulated sugar and a squeeze of lemon juice (optional). Let macerate for 20-30 minutes at room temperature.
- Bake Shortcake Base: Preheat oven to 375°F (190°C). Whisk flour, 2 tbsp sugar, baking powder, and salt. In another bowl, whisk egg, milk, melted butter, and 1 tsp vanilla extract. Combine wet and dry ingredients until just mixed, do not overmix. Pour into a greased 8×8 inch pan or muffin tin. Bake 18-22 minutes (pan) or 12-15 minutes (muffins), until a toothpick comes out clean.
- Cool and Cube Cake: Let cake cool in pan for 10-15 minutes, then invert onto a wire rack to cool completely. Once cool, cut into ¾ to 1-inch cubes.
- Whip Cream: In a chilled bowl, combine cold heavy cream, ¼ cup confectioners’ sugar, and ½ tsp vanilla extract. Whip with an electric mixer until soft to medium peaks form.
- Layer Dessert Cups: In individual dessert cups, layer cake cubes, macerated strawberries (with their juices), and whipped cream. Repeat until cups are full, ending with a layer of whipped cream.
- Chill and Serve: Chill assembled cups for at least 30 minutes before serving. Garnish with a mint leaf or chocolate shavings if desired.
- Prep Time: 30 mins
- Cook Time: 20 mins