
Introduction: Your Keto Breadstick Solution
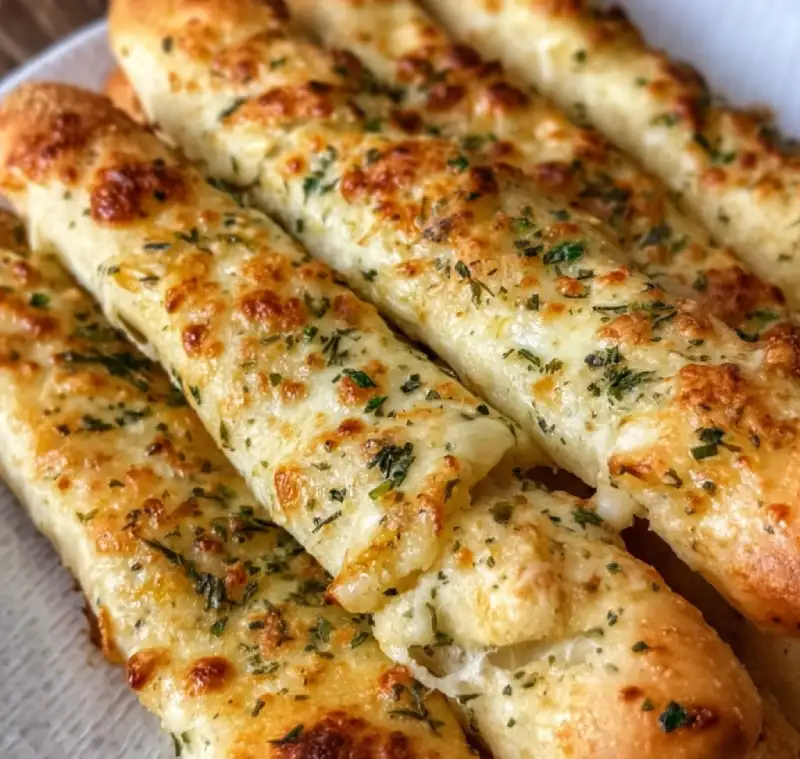
Oh, the glorious breadstick! That warm, garlicky, buttery delight that perfectly complements a hearty Italian meal or stands alone as a satisfying snack. If you’ve been following a keto lifestyle, you know the struggle is real when it comes to finding a low-carb alternative that truly hits the spot. But fear not, my fellow food enthusiasts! I’m thrilled to share my absolute go-to recipe for Keto Garlic Butter Breadsticks that will make you forget all about their carb-laden cousins. We’re talking crispy on the outside, wonderfully soft and chewy on the inside, and bursting with that irresistible garlic-butter flavor. Get ready to achieve classic breadstick texture and taste, all while keeping it perfectly low-carb!
Table of Contents
Why This Keto Breadstick Recipe Works
I’ve tested countless keto breadstick recipes, and this one consistently comes out on top. Here’s why it’s become a staple in my kitchen:
- Perfect Texture Every Time: This recipe masterfully balances a delightfully crispy exterior with a soft, chewy interior, mimicking traditional breadsticks without the carbs.
- Authentic Flavor Profile: We layer garlic, onion, and Italian seasonings into the dough itself, then finish with a generous brush of melted garlic butter for an explosion of savory taste.
- Accessible Keto Ingredients: No obscure ingredients here! We use common keto pantry staples that are easy to find and work together beautifully to create a dough that handles like the real deal.
- Quick and Easy: From start to finish, you’ll have warm, delicious breadsticks on your table in under 30 minutes. It’s perfect for a weeknight side or a last-minute craving.
- Versatile and Dippable: These breadsticks hold up perfectly for dipping into your favorite sugar-free marinara or scooping up a hearty keto chili.
Ingredients and Substitutions: Building Perfect Keto Breadsticks
Here is what you need and why each ingredient is crucial for building these amazing Keto Garlic Butter Breadsticks:
Mozzarella (low-moisture, part-skim): This is the star of our ‘fathead’ dough base. It provides the essential chewiness and structure that makes these breadsticks feel like actual bread. Using low-moisture, part-skim is key to avoid excess water, which can make your dough gummy.
Cream Cheese: Don’t skip this! Cream cheese adds richness, moisture, and a lovely tenderness to the dough. It also helps prevent the breadsticks from becoming rubbery, a common pitfall in some keto baked goods.
Almond Flour (super-fine blanched): Our primary low-carb flour. Super-fine blanched almond flour provides structure without any grittiness, ensuring a smooth texture. Make sure it’s blanched (skins removed) for the best result.
Psyllium Husk Powder: This is a game-changer for keto baking! Psyllium husk powder acts as a binder, providing elasticity and preventing the breadsticks from crumbling. It mimics the gluten in traditional flour, giving our dough a more pliable, bread-like quality. I highly recommend not omitting this for the best texture.
Baking Powder: A little leavening goes a long way. Baking powder ensures a light rise, giving our breadsticks a slightly airy interior rather than being too dense.
Garlic Powder, Onion Powder, Italian Seasoning: These are our flavor powerhouses! Layering these spices directly into the dough ensures deep, savory flavor throughout. Don’t be shy with them!
Melted Butter: This is the carrier for our glorious garlic and herb topping. It also contributes to that beautiful golden-brown crust and rich mouthfeel. Use unsalted butter so you can control the seasoning.
Fresh Parsley: For a pop of color and a fresh aromatic finish. It’s optional, but highly recommended for that classic breadstick appeal.
How to Make Keto Garlic Butter Breadsticks
Follow these simple steps to bake your way to keto breadstick bliss:
1. Prep Oven & Baking Sheet
Preheat your oven to 375°F (190°C). Line a baking sheet with parchment paper. This is essential for preventing sticking and ensuring even baking. A well-preheated oven is key for a good rise and crispy exterior.
2. Melt Cheese Base
In a microwave-safe bowl, combine the shredded mozzarella and cream cheese. Microwave in 30-second intervals, stirring well after each, until completely melted and smooth. This usually takes about 1-2 minutes total. You want a uniform, gooey cheese mixture with no lumps.
3. Combine Wet & Dry
To the melted cheese mixture, add the almond flour, psyllium husk powder, baking powder, garlic powder, onion powder, and Italian seasoning. Mix quickly with a sturdy spoon or spatula until a cohesive dough forms. It will be sticky at first, but as it cools slightly, it will become more manageable. Avoid overmixing, as this can lead to a tougher texture.
4. Form Breadsticks
Lightly grease your hands with a little olive oil or cooking spray. Divide the dough into 12 equal portions. Roll each portion into a breadstick shape, about 5-6 inches long and ½ inch thick. Place them on the prepared baking sheet, leaving a little space between each. Ensure they are uniform in thickness for consistent cooking.
5. Bake First Pass
Bake for 10-12 minutes, or until lightly golden and set. They should be firm to the touch and just starting to brown. This initial bake helps them hold their shape and develop a foundational crispness.
6. Brush with Garlic Butter
While the breadsticks are baking, melt the butter in a small bowl. Stir in the remaining garlic powder and a pinch of salt. Once the breadsticks come out of the oven, immediately brush them generously with the melted garlic butter. This allows the butter to soak into the warm breadsticks, infusing maximum flavor.
7. Final Bake & Garnish
Return the buttered breadsticks to the oven for another 3-5 minutes, or until they are beautifully golden brown and crispy. Keep a close eye on them to prevent burning. Once out of the oven, sprinkle with fresh chopped parsley, if using. Serve warm and enjoy!
Expert Tips for Breadstick Success
- Choose Your Mozzarella Wisely: Always opt for fresh, low-moisture, part-skim mozzarella. High-moisture mozzarella can release too much water, making your dough soggy and difficult to work with.
- Don’t Overmix the Dough: Once the ingredients are combined and a dough forms, stop mixing. Overworking fathead dough can make it tough and less pliable.
- Uniform Shaping is Key: Take a moment to shape your breadsticks to an even thickness. This ensures they bake consistently, preventing some from being undercooked while others are overdone.
- Know Your Oven: Ovens can vary significantly. Keep a close eye on your breadsticks during the baking process, especially during the second bake. You’re looking for a beautiful golden-brown color.
- Brush Generously and Immediately: The moment those breadsticks come out of the oven, brush them with the garlic butter. The heat helps the butter absorb deeply, maximizing that incredible flavor.
- Consider a Stand Mixer: While not strictly necessary, a stand mixer with a dough hook can make combining the fathead dough much easier, especially if you find it too sticky to handle by hand initially.
What to Serve with Keto Garlic Butter Breadsticks
These versatile Keto Garlic Butter Breadsticks are perfect for so many occasions! Here are some of my favorite ways to enjoy them:
- Marinara Sauce (sugar-free): The classic pairing! A warm, sugar-free marinara sauce is the ultimate dipping companion.
- Keto Chili or Soup: They are fantastic for dipping into a hearty bowl of keto chili or a creamy low-carb soup.
- Grilled Meats or Chicken: Serve them as a flavorful side dish alongside grilled steak, chicken, or fish.
- Salad Companion: Elevate a simple green salad by adding a couple of these breadsticks on the side.
- As a Snack: Honestly, they’re so good, they don’t even need a companion! Enjoy them on their own for a satisfying keto snack.
Storing & Reheating Your Leftovers
While these Keto Garlic Butter Breadsticks are best enjoyed fresh and warm, you can certainly store and reheat any leftovers:
- Room Temperature: Store them in an airtight container at room temperature for up to 2 days. They might lose a little crispness but will still be delicious.
- Refrigeration: For longer storage, place them in an airtight container in the refrigerator for up to 5 days.
- Freezing: Yes, these are freezer-friendly! Once completely cooled, place them in a single layer on a baking sheet and freeze until solid. Then transfer to a freezer-safe bag or container for up to 1 month.
- Reheating for Best Crispness: To bring them back to life, I highly recommend reheating them in a toaster oven or air fryer at 350°F (175°C) for 5-8 minutes, or until heated through and crispy again. A conventional oven works too, but might take a bit longer. Microwaving is not recommended as it can make them soft and chewy.
Frequently Asked Questions
Can I use coconut flour instead of almond flour?
Are these breadsticks freezer-friendly?
How do I prevent them from being too soft or crumbly?
What’s the best way to get a really strong garlic flavor?
Keto Garlic Butter Breadsticks
- Total Time: 24 minute
- Yield: 12 breadsticks
Description
Craving warm, garlicky breadsticks on keto? This recipe delivers a crispy exterior and soft interior, bursting with savory flavor. Easy to bake and perfect for dipping!
Ingredients
- 1 ½ cups (6 oz) low-moisture, part-skim shredded mozzarella cheese
- 2 tbsp cream cheese
- ¾ cup super-fine blanched almond flour
- 1 tbsp psyllium husk powder
- 1 tsp baking powder
- 1 tsp garlic powder (divided)
- ½ tsp onion powder
- ½ tsp Italian seasoning
- ¼ tsp salt (or to taste)
- 2 tbsp unsalted butter, melted
- 1 tbsp fresh parsley, chopped (optional, for garnish)
Instructions
- 1. Prep Oven & Baking Sheet: Preheat oven to 375°F (190°C). Line a baking sheet with parchment paper.
- 2. Melt Cheese Base: In a microwave-safe bowl, combine mozzarella and cream cheese. Microwave in 30-second intervals, stirring, until completely melted and smooth (1-2 minutes total).
- 3. Combine Wet & Dry: To the melted cheese, add almond flour, psyllium husk powder, baking powder, ½ tsp garlic powder, onion powder, Italian seasoning, and salt. Mix quickly until a cohesive dough forms.
- 4. Form Breadsticks: Lightly grease hands. Divide dough into 12 portions. Roll each into a 5-6 inch long, ½ inch thick breadstick. Place on prepared baking sheet.
- 5. Bake First Pass: Bake for 10-12 minutes, until lightly golden and set.
- 6. Brush with Garlic Butter: While breadsticks bake, melt butter. Stir in remaining ½ tsp garlic powder and a pinch of salt. Immediately brush generously over hot breadsticks.
- 7. Final Bake & Garnish: Return to oven for 3-5 minutes, until golden brown and crispy. Sprinkle with fresh parsley, if desired. Serve warm.
- Prep Time: 10 mins
- Cook Time: 15-17 mins