
Table of Contents
- Chocolate Covered Strawberries: Simple Elegance, Irresistible Flavor
- Why This Recipe Delivers Perfect Chocolate Covered Strawberries Every Time
- Ingredients for the Best Chocolate Covered Strawberries (And Smart Substitutions)
- Step-by-Step: Crafting Your Perfect Chocolate Covered Strawberries
- Expert Tips for Flawless Chocolate Covered Strawberries
- Serving Suggestions: Elevating Your Chocolate Covered Strawberries
- Storing Your Chocolate Covered Strawberries (And How Long They Last)
- Chocolate Covered Strawberries FAQ
Imagine biting into a perfectly ripe, juicy strawberry, its natural sweetness bursting forth, immediately followed by the satisfying snap of rich, decadent chocolate. That’s the magic of homemade chocolate covered strawberries – a symphony of textures and flavors that’s both elegant and incredibly simple to achieve. Forget store-bought versions; once you taste the difference of fresh, quality ingredients and a little homemade love, you’ll never go back. These aren’t just a dessert; they’re an experience, a delightful treat that feels luxurious yet takes minimal effort.
Chocolate Covered Strawberries: Simple Elegance, Irresistible Flavor
There’s something inherently special about chocolate covered strawberries. They embody simple elegance, making them perfect for any occasion, from a romantic evening to a casual get-together. But why choose homemade?
Why Choose Homemade Chocolate Covered Strawberries?
When you make them yourself, you control the quality of every ingredient. You pick the plumpest, sweetest strawberries and the finest chocolate, ensuring a superior taste that pre-made versions simply can’t match. Plus, the satisfaction of crafting something so beautiful and delicious with your own hands is truly rewarding.
The Joy of Simple Indulgence
These treats are the epitome of simple indulgence. They require no baking, minimal equipment, and offer maximum impact. It’s a delightful way to treat yourself or someone you love to a moment of pure, unadulterated bliss.
Why This Recipe Delivers Perfect Chocolate Covered Strawberries Every Time
- Achieving That Signature Snap: The Right Chocolate Choice: We’ll guide you to select the best quality chocolate that melts smoothly and sets with that coveted, satisfying snap, not a waxy coating.
- Silky Smooth Coating: The Importance of Tempering (Simple Method): Don’t be intimidated by tempering! We’ll show you a simple, foolproof method to achieve a glossy, streak-free chocolate coating that resists blooming and cracking.
- Freshness First: The Key to Juicy Berries: Our focus on perfectly ripe, dry strawberries ensures maximum flavor and prevents the chocolate from seizing or sliding off.
Ingredients for the Best Chocolate Covered Strawberries (And Smart Substitutions)
Here is what you need and why:
The Strawberries: Size, Ripeness, and Preparation
Choose large, firm, and perfectly ripe strawberries. They should be vibrant red, fragrant, and free of blemishes. Smaller berries are harder to dip, and overripe ones can be mushy. The most crucial step is ensuring they are completely dry after washing; any moisture will cause your chocolate to seize.
The Chocolate: Why Quality Matters (Dark, Milk, White)
This is where the magic happens! For the best results, use high-quality chocolate bars or couverture chocolate (chocolate specifically designed for melting and coating). Chocolate chips often contain stabilizers that prevent smooth melting. You can use:
- Dark Chocolate: My personal favorite for its rich, intense flavor that beautifully contrasts the strawberry’s sweetness. Look for 60-70% cacao for a balanced taste.
- Milk Chocolate: A classic choice, offering a sweeter, creamier coating that’s universally loved.
- White Chocolate: Provides a lovely visual contrast and a sweet, vanilla-like flavor. Be aware that white chocolate is more prone to seizing if overheated.
Optional Enhancements: Coconut Oil vs. Paraffin Wax (Understanding the Difference)
A tiny bit of fat can help the chocolate melt smoother and achieve a glossier finish. I prefer a small amount of refined coconut oil (which has no coconut flavor) as it’s a natural, edible option. It helps thin the chocolate slightly and adds a beautiful sheen. Paraffin wax is sometimes used in commercial products for shine and snap, but it’s not food-grade and I do not recommend it for homemade treats.
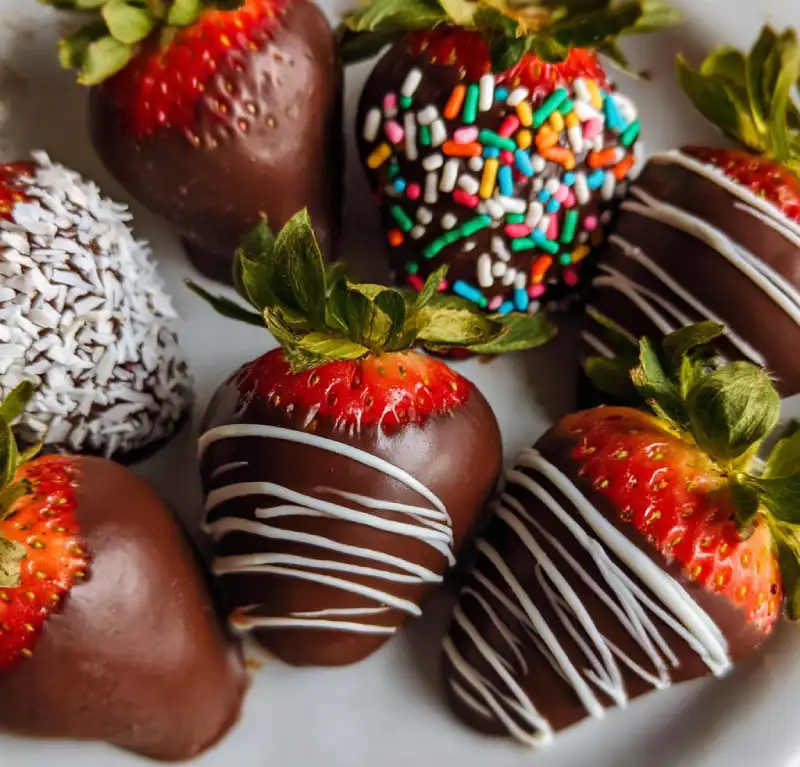
Decorative Touches: Sprinkles, Nuts, Drizzles
This is where you can get creative! Have your toppings ready before you start dipping. Think:
- Sprinkles: Any color or shape!
- Finely chopped nuts: Pistachios, almonds, or walnuts add a lovely crunch.
- Shredded coconut: For a tropical twist.
- Contrasting chocolate drizzles: Use white chocolate over dark, or vice-versa.
Step-by-Step: Crafting Your Perfect Chocolate Covered Strawberries
Follow these step-by-step photos:
1. Prepare Your Strawberries
Gently wash your strawberries under cool running water. The most critical step here is to ensure they are completely dry. Lay them out on a clean kitchen towel or paper towels and allow them to air dry for at least 30 minutes, or gently pat them dry. Any water will cause your chocolate to seize and become clumpy. Leave the green stems on – they act as a perfect handle for dipping!
2. Melt the Chocolate
There are two main methods for melting chocolate smoothly:
- Double Boiler Method: Place chopped chocolate in a heatproof bowl set over a saucepan of simmering water (ensure the bowl doesn’t touch the water). Stir constantly until the chocolate is smooth and melted. This method offers more control and is ideal for tempering.
- Microwave Method: Place chopped chocolate in a microwave-safe bowl. Microwave on 50% power in 30-second intervals, stirring well after each, until mostly melted. Stir vigorously until completely smooth. Be careful not to overheat, as this can burn the chocolate.
If using, stir in 1/2 teaspoon of refined coconut oil per 8 ounces of chocolate once it’s melted and smooth. This helps with consistency and shine. For a truly professional finish, consider a simple tempering method (see Expert Tips).
3. The Dipping Method
Hold a strawberry by its stem. Dip it into the melted chocolate, rotating it to ensure full coverage, leaving a small collar of red at the top for visual appeal. Gently lift the strawberry, allowing excess chocolate to drip back into the bowl. You can lightly tap the wrist holding the strawberry against the edge of the bowl to encourage dripping and create a smoother coating.
4. Decorate and Set
Immediately after dipping, if you’re adding toppings, gently roll or sprinkle them onto the chocolate-covered strawberry before the chocolate sets. Place the decorated strawberries on a baking sheet lined with parchment paper or wax paper. This prevents sticking. Once all strawberries are dipped and decorated, transfer the baking sheet to the refrigerator for 15-20 minutes, or until the chocolate is completely set and firm. For more baking inspiration, see more easy recipes!
Expert Tips for Flawless Chocolate Covered Strawberries
- Temperature Control: Avoiding Seizing and Bloom: Always melt chocolate slowly and gently. Water is chocolate’s enemy – even a tiny drop can cause it to seize into a thick, grainy mess. To prevent bloom (the grayish streaks that can appear on chocolate), try a simple tempering method: melt 2/3 of your chocolate, then stir in the remaining 1/3 (finely chopped) until melted and smooth. This helps stabilize the chocolate crystals.
- Troubleshooting: What to Do if Your Chocolate is Too Thick or Thin: If your chocolate is too thick for dipping, add 1/4 teaspoon of refined coconut oil (or a neutral oil like grapeseed) at a time, stirring until you reach the desired consistency. If it’s too thin, it might be overheated or have too much added fat; unfortunately, it’s harder to fix thin chocolate, but you can try letting it cool slightly to thicken.
- The Art of Decoration: Simple Swirls and Toppings: For elegant drizzles, melt a contrasting chocolate (e.g., white chocolate over dark) and transfer it to a small piping bag with a tiny snip off the end, or use a fork to create delicate zig-zags. Apply toppings immediately after dipping, before the chocolate sets.
- Use a Deep, Narrow Bowl: This allows for easier, more complete dipping of the strawberries without needing excessive amounts of chocolate.
- Work in Batches: If making a large quantity, melt chocolate in smaller batches to keep it at the ideal dipping temperature.
Serving Suggestions: Elevating Your Chocolate Covered Strawberries
Perfect for Parties: Display Ideas
Arrange your beautiful chocolate covered strawberries on a tiered dessert stand for an elegant presentation. You can also place them in mini cupcake liners or on a platter with contrasting colors, like fresh mint leaves or a dusting of cocoa powder. They make a stunning centerpiece!
Dessert Pairings: Complementary Flavors
These treats pair wonderfully with a glass of sparkling wine, champagne, or a rich coffee. For a dessert spread, serve them alongside a light panna cotta, a delicate fruit tart, or a scoop of vanilla bean ice cream. The freshness of the strawberry and the richness of the chocolate complement so many other flavors.
Gift Giving: Packaging for Presentation
Chocolate covered strawberries make a thoughtful and impressive gift. Arrange them in a decorative box lined with tissue paper or parchment. For transport, ensure they are kept cool to prevent melting. A simple ribbon can elevate the presentation even further.
Storing Your Chocolate Covered Strawberries (And How Long They Last)
Optimal Storage Conditions: Refrigeration and Airtight Containers
Once the chocolate has fully set, store your chocolate covered strawberries in a single layer in an airtight container in the refrigerator. This prevents them from absorbing odors and keeps the chocolate firm. Placing a piece of parchment paper between layers can help if you need to stack them.
Best Enjoyed Fresh: Why Reheating Isn’t Recommended
While they can last for 2-3 days in the refrigerator, chocolate covered strawberries are truly best enjoyed within 24 hours. Over time, the moisture from the strawberries can start to seep into the chocolate, making it less crisp. Reheating is not recommended as it will cause the chocolate to melt and the strawberries to become mushy.
Chocolate Covered Strawberries FAQ
Can I use frozen strawberries?
How do I prevent the chocolate from cracking?
What’s the best way to clean my strawberries?
Can I use chocolate chips instead of baking bars?
How far in advance can I make these?
Delicious Chocolate Covered Strawberries
- Total Time: 25 minutes
- Yield: 12-18 servings
Description
Indulge in the simple elegance of homemade chocolate covered strawberries. This recipe guarantees a perfect snap and juicy sweetness every time.
Ingredients
- 1 lb (approx. 16-20 large) fresh strawberries, firm and ripe
- 8–10 oz (225-280g) high-quality chocolate (dark, milk, or white), chopped
- 1/2 tsp refined coconut oil (optional, for smoother melting and shine)
- Optional toppings: sprinkles, finely chopped nuts, shredded coconut, contrasting chocolate for drizzling
Instructions
- Prepare Strawberries: Gently wash strawberries and ensure they are completely dry. Leave stems on.
- Melt Chocolate: Using a double boiler or microwave (50% power, 30-sec intervals), melt chopped chocolate until smooth. Stir in coconut oil if using.
- Dip Strawberries: Hold a strawberry by its stem, dip into melted chocolate, rotating for full coverage. Allow excess to drip off.
- Decorate: Immediately add desired toppings or drizzles.
- Chill to Set: Place dipped strawberries on parchment-lined baking sheet. Refrigerate for 15-20 minutes until chocolate is firm.
- Prep Time: 20 mins
- Cook Time: 5 mins