
Table of Contents
- Let’s Make Flavorful King Cake Cookies!
- Why This King Cake Cookie Recipe Works
- Ingredients: Your Flavor Foundation (And Why)
- Step-by-Step: Baking Your Flavorful King Cake Cookies
- Expert Tips for King Cake Cookie Success
- What to Serve With Your King Cake Cookies
- Storing and Reheating Your King Cake Cookies
- King Cake Cookies FAQ
Let’s Make Flavorful King Cake Cookies!
Get ready to experience the magic of Mardi Gras in a bite-sized, utterly delicious form! These flavorful King Cake Cookies are not just a treat; they’re a celebration. Imagine a cookie that’s perfectly soft and chewy, bursting with the iconic zesty-sweet flavor of a traditional King Cake, all adorned in vibrant purple, green, and gold. Every bite transports me back to my first Mardi Gras in New Orleans, the air thick with music, laughter, and the irresistible aroma of freshly baked King Cake. Now, you can capture that joy and flavor right in your own kitchen, with a recipe designed for ease and maximum deliciousness. Prepare for a cookie experience that will have everyone asking for more!
Why This King Cake Cookie Recipe Works
- Perfectly Soft-Chewy Texture: We’ve meticulously balanced the ingredients to ensure these cookies are tender on the inside with just the right amount of chewiness, never dry or crumbly.
- Authentic Zesty-Sweet Flavor: The combination of fresh citrus zest, warm spices, and a hint of almond extract perfectly mimics the beloved taste profile of a classic King Cake.
- No-Fuss Dough Handling: This dough comes together beautifully, chills easily, and is a dream to roll out and cut, making the baking process enjoyable for all skill levels.
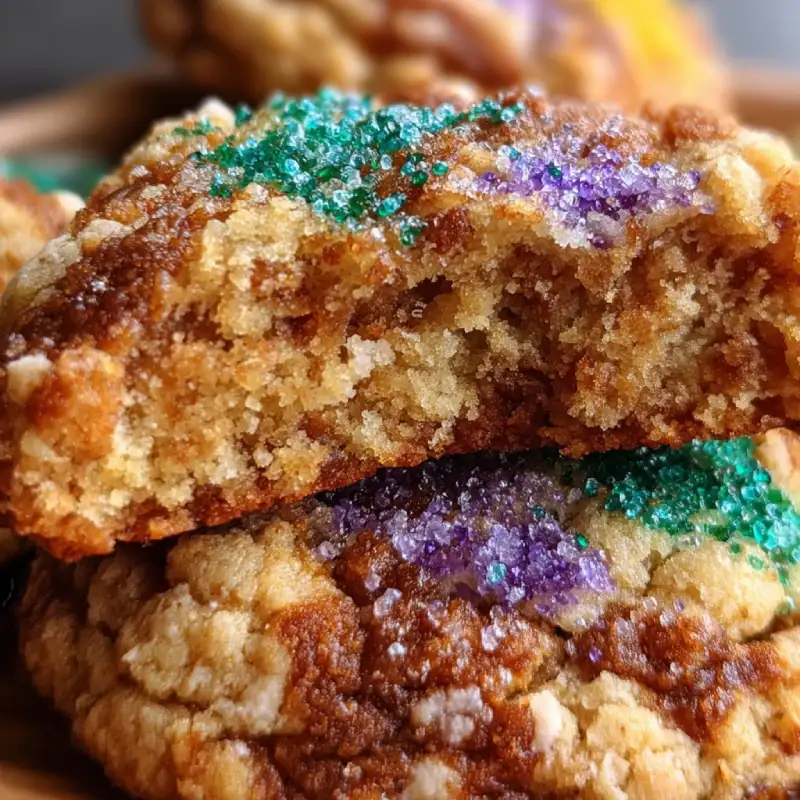
- Colorful and Festive Appearance: With our simple glazing technique, you’ll achieve those iconic Mardi Gras hues that make these cookies as visually appealing as they are tasty.
Ingredients: Your Flavor Foundation (And Why)
Here is what you need and why:
All-Purpose Flour: This is our primary structure builder. It provides the necessary gluten framework for a tender yet sturdy cookie. For best results, measure by weight if possible, or spoon and level to avoid a dense cookie.
Unsalted Butter: The cornerstone of richness and tenderness. Using unsalted butter allows us to control the salt content precisely. Ensure it’s at room temperature for proper creaming, which incorporates air for a lighter texture.
Granulated Sugar: Provides sweetness, contributes to the cookie’s spread, and helps with browning for those lovely golden edges.
Large Eggs: Eggs act as a binder, adding moisture and richness. They also contribute to the cookie’s structure and help create that desirable chewy texture.
Fresh Citrus Zest (Lemon and/or Orange): This is absolutely essential for that signature King Cake flavor! The bright, aromatic oils from the zest infuse the dough with a vibrant, zesty sweetness that truly sets these cookies apart. Don’t skip this!
Ground Nutmeg and Cinnamon: These warm spices are classic King Cake companions, adding depth and a comforting aroma that complements the citrus beautifully.
Almond Extract: Our secret weapon for an extra boost of authentic King Cake flavor. Just a touch enhances the overall profile without being overpowering.
Baking Powder and Baking Soda: These are our leavening agents, working together to give the cookies a slight lift and a tender crumb.
Salt: A pinch of salt balances the sweetness and enhances all the other flavors in the cookie.
Powdered Sugar: The base for our smooth, sweet glaze. It dissolves easily, creating a silky finish.
Milk or Cream: Used to thin the powdered sugar into a pourable glaze. Cream will yield a richer, slightly thicker glaze, while milk works perfectly fine for a lighter consistency.
Food Coloring (Purple, Green, Gold): For that unmistakable Mardi Gras flair! Gel food colorings tend to produce more vibrant hues without thinning the glaze too much.
Step-by-Step: Baking Your Flavorful King Cake Cookies
Follow these step-by-step instructions to create your own batch of delightful flavorful King Cake Cookies:
1. Mixing the Dough: Creaming to Combine
In a large bowl, cream together the softened unsalted butter and granulated sugar until light and fluffy. This step is crucial for incorporating air, which contributes to the cookie’s tender texture. Beat in the eggs one at a time, ensuring each is fully incorporated before adding the next. Stir in the fresh citrus zest, ground nutmeg, cinnamon, and almond extract. In a separate bowl, whisk together the all-purpose flour, baking powder, baking soda, and salt. Gradually add the dry ingredients to the wet ingredients, mixing on low speed until just combined. Be careful not to overmix!
2. Chilling the Dough: The Key to Shape
Divide the dough in half, flatten each half into a disc, wrap tightly in plastic wrap, and refrigerate for at least 1 hour, or up to 24 hours. This chilling period is non-negotiable! It allows the butter to firm up, preventing the cookies from spreading too much in the oven, and also deepens the flavors.
3. Shaping the Cookies: Rolling and Cutting
Preheat your oven to 375°F (190°C). Line baking sheets with parchment paper. On a lightly floured surface, roll out one disc of chilled dough to about 1/4-inch thickness. Use your favorite cookie cutters (round, fluted, or even a King Cake shape if you have one!) to cut out cookies. Carefully transfer them to the prepared baking sheets, leaving about 1 inch between each cookie. Gather and re-roll scraps as needed.
4. Baking to Golden Perfection
Bake for 8-10 minutes, or until the edges are lightly golden and the centers are just set. The exact baking time will depend on your oven and the size of your cookies. Do not overbake! We want these cookies to remain soft and chewy. Let them cool on the baking sheets for a few minutes before transferring them to a wire rack to cool completely.
5. Preparing the Festive Glaze
While the cookies cool, prepare the glaze. In a medium bowl, whisk together the powdered sugar and milk (or cream) until smooth and lump-free. The consistency should be thick enough to coat a spoon but still pourable. Divide the glaze into three small bowls. Add a few drops of purple food coloring to one, green to another, and gold (or yellow) to the third. Mix each color until vibrant.
6. Decorating Your King Cake Cookies
Once the cookies are completely cool, drizzle or spread the colored glazes over them in alternating stripes or patterns. You can use a spoon, a small offset spatula, or even a piping bag with a small round tip for more precision. For an extra festive touch, sprinkle with coordinating sanding sugars or edible glitter while the glaze is still wet. Let the glaze set completely before stacking or storing the cookies.
Expert Tips for King Cake Cookie Success
- Don’t Overmix the Dough: Overmixing develops too much gluten, leading to tough cookies. Mix until just combined.
- Chill Time is Non-Negotiable: Seriously, don’t skip this! Chilled dough is easier to work with and prevents excessive spreading, ensuring your cookies hold their shape.
- Use Fresh Citrus Zest: Bottled zest or extracts won’t give you the same vibrant, authentic flavor. Fresh is best!
- Proper Baking Sheet Preparation: Always use parchment paper or silicone baking mats. This prevents sticking and ensures even baking and easy cleanup.
- Glaze When Cooled: Applying glaze to warm cookies will cause it to melt and run off. Patience is key for a beautiful, set glaze.
- For a Hidden Baby: If you want to incorporate the traditional King Cake baby, gently press a small, oven-safe plastic baby or a whole pecan into the bottom of one cookie before baking. Just be sure to warn your guests!
What to Serve With Your King Cake Cookies
These flavorful King Cake Cookies are delightful on their own, but here are some ideas to elevate your Mardi Gras celebration:
- Coffee or Tea: A warm cup of coffee or a fragrant herbal tea makes for a perfect pairing, especially for a morning or afternoon treat.
- Milk for the Kids (and Adults!): Nothing beats a classic cookie and milk combination.
- Mardi Gras Brunch Spread: Incorporate these cookies into a festive brunch alongside savory dishes like quiche, fruit salad, and perhaps some classic New Orleans beignets for a truly indulgent spread.
- Sparkling Wine or Mimosa: For an adult celebration, a crisp sparkling wine or a festive mimosa complements the sweet and zesty flavors beautifully.
Storing and Reheating Your King Cake Cookies
To keep your flavorful King Cake Cookies fresh and delicious:
- Room Temperature Storage: Store cooled, glazed cookies in an airtight container at room temperature for up to 3-4 days. If stacking, place a piece of parchment paper between layers to prevent the glaze from sticking.
- Freezing for Longer Freshness: You can freeze unglazed baked cookies for up to 3 months. Once completely cooled, place them in a single layer on a baking sheet and freeze until solid. Then transfer to a freezer-safe bag or container. Thaw at room temperature before glazing. Glazed cookies can also be frozen, but the glaze might become slightly tacky upon thawing.
- Reviving Their Texture: If your cookies seem a little less soft after a day or two, you can briefly warm them in the microwave for 5-10 seconds, or in a low oven (250°F/120°C) for a few minutes, to bring back some of that fresh-baked tenderness.
King Cake Cookies FAQ
Can I use pre-made cookie dough?
What if I don’t have almond extract?
Can I make these gluten-free?
How do I get vibrant colors for the glaze?
What’s the best way to hide the baby/bean?
Flavorful King Cake Cookies
- Total Time: 40 minutes
- Yield: 24-30 cookies
Description
Unleash the best flavor with our step-by-step guide to baking delicious, flavorful King Cake Cookies. This easy to bake recipe guarantees a treat!
Ingredients
- 2 ½ cups (300g) all-purpose flour
- 1 teaspoon baking powder
- ½ teaspoon baking soda
- ½ teaspoon salt
- 1 cup (226g) unsalted butter, softened
- 1 ½ cups (300g) granulated sugar
- 2 large eggs
- 1 tablespoon fresh lemon zest
- 1 tablespoon fresh orange zest
- 1 teaspoon ground nutmeg
- ½ teaspoon ground cinnamon
- 1 teaspoon almond extract
- For the Glaze:
- 2 cups (240g) powdered sugar
- 3–4 tablespoons milk or heavy cream
- Purple, green, and gold (or yellow) gel food coloring
- Optional: Mardi Gras sanding sugars or edible glitter
Instructions
- 1. Prepare the Dough: In a medium bowl, whisk together flour, baking powder, baking soda, and salt. In a large bowl, cream softened butter and granulated sugar until light and fluffy. Beat in eggs one at a time. Stir in lemon zest, orange zest, nutmeg, cinnamon, and almond extract. Gradually add dry ingredients to wet, mixing until just combined.
- 2. Chill the Dough: Divide dough in half, flatten into discs, wrap in plastic, and refrigerate for at least 1 hour (up to 24 hours).
- 3. Roll and Cut: Preheat oven to 375°F (190°C). Line baking sheets with parchment paper. On a lightly floured surface, roll out one dough disc to ¼-inch thickness. Cut out cookies with desired cutters and transfer to prepared baking sheets.
- 4. Bake: Bake for 8-10 minutes, or until edges are lightly golden. Do not overbake. Let cool on sheets for a few minutes, then transfer to a wire rack to cool completely.
- 5. Make the Glaze: In a bowl, whisk powdered sugar and milk/cream until smooth. Divide into three bowls and color each with purple, green, and gold food coloring.
- 6. Decorate: Once cookies are completely cool, drizzle or spread colored glazes over them. Add sanding sugars if desired. Let glaze set completely before serving or storing.
- Prep Time: 30 mins
- Cook Time: 10 mins