
Table of Contents
- Roll Up Perfection: Your Guide to Homemade California Crunch Sushi
- Why This Homemade Crunch Roll Recipe Delivers Every Time
- Ingredients & Substitutions: Smart Choices for Your Sushi
- Step-by-Step: Assembling Your California Crunch Rolls
- Expert Tips for Perfect Homemade Sushi
- What to Serve with Your California Crunch Rolls
- Storing and Reheating Your Sushi Rolls
- Frequently Asked Questions About Homemade Crunch Rolls
Roll Up Perfection: Your Guide to Homemade California Crunch Sushi
Oh, the glorious crunch! There’s something utterly irresistible about the textural symphony of a perfectly crafted California Crunch Roll. That delightful crispiness, combined with the creamy avocado, fresh cucumber, and savory ‘krab’ stick, all wrapped in perfectly seasoned sushi rice and nori – it’s a flavor and texture explosion that makes your taste buds sing! If you’ve ever thought making sushi at home was too daunting, prepare to have your mind changed. I’m here to tell you that creating delicious Homemade California Crunch Roll Sushi is not only achievable but incredibly rewarding. Say goodbye to expensive takeout and hello to fresh, customizable, and utterly satisfying sushi made right in your own kitchen!
Why Bother Making Sushi at Home? (It’s Easier Than You Think!)
Honestly, the biggest hurdle is often just getting started. Once you understand the basic techniques, you’ll wonder why you didn’t try it sooner. Making sushi at home gives you complete control over the quality of ingredients, allows for endless customization, and is surprisingly cost-effective. Plus, there’s immense satisfaction in presenting a beautiful platter of your own hand-rolled creations!
My First Crunchy Roll Journey (No More Takeout Guilt!)
My own journey into homemade sushi started with a craving for that specific crunch that only a California Crunch Roll can deliver. I was tired of paying premium prices for rolls that sometimes lacked that fresh, vibrant taste. After a few attempts (and a few slightly lopsided rolls, I’ll admit!), I cracked the code. Now, it’s a fun weekend activity, and my friends and family rave about my Homemade California Crunch Roll Sushi. You can do it too!
Why This Homemade Crunch Roll Recipe Delivers Every Time
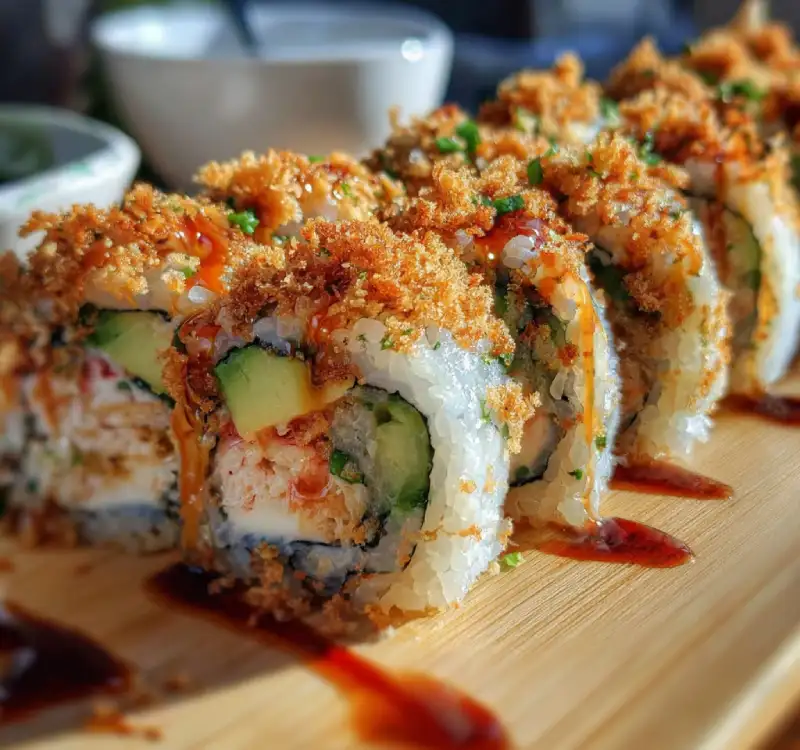
- The ‘Crunch’ Factor: Mastering Texture Contrast: We’re not just adding crunch; we’re building layers of texture. From the perfectly toasted panko to the crisp cucumber, every bite offers a delightful contrast that keeps you coming back for more.
- Flavor Balance: Sweet, Savory, and Umami in Every Bite: This recipe meticulously balances the subtle sweetness of the sushi rice, the savory notes of the ‘krab’ and nori, the richness of avocado, and the spicy kick of our homemade sauce. It’s a symphony of flavors!
- Freshness You Can Taste: Elevating Home-Assembled Ingredients: When you make it yourself, you control the freshness. Ripe avocado, crisp cucumber, and perfectly cooked rice make all the difference, creating a sushi experience far superior to many store-bought options.
- Customizable to Your Liking: Want more spice? Less ‘krab’? A different veggie? Making it at home means you can tailor every roll to your exact preferences.
Ingredients & Substitutions: Smart Choices for Your Sushi
Here is what you need and why:
The Rice: The Foundation of Good Sushi (Choosing & Preparing Sushi Rice): This is arguably the most crucial component. You absolutely need short-grain sushi rice. It has the right starch content to become sticky and pliable when cooked and seasoned. Avoid long-grain or jasmine rice; they won’t give you the correct texture. Look for brands specifically labeled ‘sushi rice’.
Nori (Seaweed Sheets): Essential for Structure and Flavor: These dried seaweed sheets hold everything together and add a distinct, savory, umami flavor. Choose good quality, dark green, crisp nori. If it’s flimsy or discolored, it won’t roll well or taste as good.
Krab Stick (Surimi): The Classic Choice and Alternatives: Surimi, often labeled ‘krab stick’ or ‘imitation crab,’ is the traditional choice for California rolls. It’s made from white fish (like pollock) and flavored to mimic crab. If you prefer, you can use cooked shrimp, real crab meat, or even thinly sliced smoked salmon for a different twist.
Crunch Factor: Panko Breadcrumbs vs. Fried Onions/Garlic: Panko breadcrumbs are my go-to for that perfect, light, and airy crunch. Toasting them lightly brings out their best flavor and texture. Some recipes use crispy fried onions or garlic, which also work well, but panko offers a more neutral flavor profile that lets the other ingredients shine. You can find excellent panko breadcrumbs from brands like King Arthur Baking.
Avocado: Creaminess and Healthy Fats (Ripeness is Key): A perfectly ripe avocado adds a luxurious creaminess and healthy fats. It should yield slightly to gentle pressure but not be mushy. Unripe avocado is hard and flavorless; overripe avocado can be stringy and brown.
Cucumber: Freshness and a Snap: English or Persian cucumbers are ideal as they have fewer seeds and thinner skins. They provide a refreshing, crisp counterpoint to the other ingredients. Cut them into thin matchsticks.
Mayonnaise & Sriracha: Elevating the Sauce: A simple spicy mayo (sriracha mixed with mayonnaise) is essential for that classic crunch roll flavor. Adjust the sriracha to your preferred spice level. You can also add a touch of sesame oil for extra depth.
Wasabi & Pickled Ginger (Gari): Traditional Accompaniments: These aren’t strictly *in* the roll but are crucial for serving. Wasabi provides a pungent kick that cleanses the palate, and pickled ginger offers a sweet, tangy contrast between bites.
Soy Sauce: Choosing Your Dipping Sauce: A good quality soy sauce is a must. I prefer a low-sodium variety, but choose what you like. Some people enjoy tamari (gluten-free soy sauce) or even a ponzu sauce for a citrusy tang.
Step-by-Step: Assembling Your California Crunch Rolls
Follow these step-by-step photos:
1. Prepping Your Ingredients: Mise en Place for Success
Before you even think about rolling, get everything ready! Cook and season your sushi rice according to package directions, then let it cool to room temperature. Fluff it gently. Slice your ‘krab’ sticks, avocado, and cucumber into thin, even strips. Mix your spicy mayo. Toast your panko breadcrumbs in a dry pan over medium heat until golden brown and crispy, then set aside. Having everything prepped makes the rolling process smooth and enjoyable.
2. Coating the Nori: The Rice Layer Trick
Place a sheet of nori, shiny side down, on your bamboo rolling mat (which should be covered with plastic wrap for easy cleanup). Dip your hands in water (this prevents rice from sticking!) and grab a small handful of sushi rice. Spread the rice evenly over about 3/4 of the nori sheet, leaving a 1/4-inch strip bare at the top edge. Don’t press too hard; you want a gentle, even layer. You can also flip the nori over so the rice is on the outside, which is common for California rolls.
3. Adding the Fillings: Strategic Placement for Even Rolls
Arrange your fillings (krab, avocado, cucumber) in a neat line across the bottom third of the rice-covered nori. Don’t overfill! A thin, even line is key to a tight, well-formed roll. Drizzle a little spicy mayo over the fillings.
4. The Art of Rolling: Using a Bamboo Mat Like a Pro
Using your bamboo mat, lift the edge closest to you and fold it over the fillings, tucking them in tightly. Press down gently to secure. Continue rolling forward, applying gentle, even pressure with the mat to create a tight cylinder. Use the bare strip of nori at the end to seal the roll. If the rice is on the outside, gently press the toasted panko onto the rice-covered exterior.
5. Slicing Your Rolls: The Wet Knife Secret
This is crucial for clean cuts! Dip a very sharp knife in water before each slice. Slice the roll in half, then align the halves and slice into 6-8 even pieces. Re-wet your knife as needed to prevent sticking and tearing.
6. Sauce and Serve: Finishing Touches
Arrange your beautiful Homemade California Crunch Roll Sushi on a platter. Drizzle with extra spicy mayo, a touch of eel sauce (if desired), and a sprinkle of sesame seeds. Serve immediately with soy sauce, wasabi, and pickled ginger. Enjoy your culinary masterpiece!
Expert Tips for Perfect Homemade Sushi
- Don’t Overcook Your Rice: It’s Not Just Sticky Rice: Sushi rice should be tender but still have a slight bite, and it should be perfectly seasoned with sushi vinegar. Overcooked rice becomes mushy and difficult to work with.
- Keep Your Hands Wet: Prevents Rice Stickiness: A small bowl of water (or water mixed with a little rice vinegar) next to your rolling station is your best friend. Dip your hands frequently to prevent the sticky rice from adhering to your fingers.
- Don’t Overfill Your Rolls: Less is More for Tight Rolls: It’s tempting to load up on fillings, but too much will make your rolls impossible to close tightly and prone to falling apart. Aim for a modest, even line of fillings.
- Sharpen Your Knife: Clean Slices Matter: A dull knife will tear and squish your beautiful rolls. A very sharp, wet knife is essential for clean, professional-looking cuts.
- Practice Makes Perfect: Don’t Be Afraid of Imperfection: Your first few rolls might not be Instagram-perfect, and that’s okay! Each roll gets easier, and the taste will still be amazing. Embrace the learning process!
What to Serve with Your California Crunch Rolls
Classic Sides: Edamame, Miso Soup, Seaweed Salad
Complement your Homemade California Crunch Roll Sushi with some traditional Japanese sides. Steamed edamame with a sprinkle of sea salt is always a hit. A warm bowl of miso soup provides a comforting, savory balance. And a refreshing seaweed salad adds another layer of umami and texture.
Beverage Pairings: Sake, Green Tea, or Cold Beer
For adults, a crisp, dry sake or a cold Japanese beer (like Sapporo or Asahi) pairs wonderfully. For a non-alcoholic option, a refreshing green tea (hot or iced) is perfect for cleansing the palate between bites.
Storing and Reheating Your Sushi Rolls
Best Storage Practices: Keeping it Fresh
Sushi is best enjoyed fresh, ideally within a few hours of making it. If you have leftovers, store them in an airtight container in the refrigerator for no more than 24 hours. The rice can dry out and harden, and the avocado can brown.
Reheating (or Not): The Reality of Leftover Sushi
Sushi is generally not meant to be reheated. The texture of the rice will change, and the fillings (especially avocado) won’t hold up well. It’s best to enjoy leftover sushi cold, but be aware that the quality will diminish significantly after the first day. Plan to make only what you can eat!
Frequently Asked Questions About Homemade Crunch Rolls
Can I use regular rice instead of sushi rice?
Is it safe to eat raw fish in homemade sushi?
How do I prevent my rolls from falling apart?
What if I don’t have a bamboo rolling mat?
Homemade California Crunch Roll Sushi
- Total Time: 50 minutes
- Yield: 4 rolls (24-32 pieces)
Description
Craft your own delicious California Crunch Roll Sushi at home with this easy-to-follow recipe. Enjoy the perfect blend of creamy, crunchy, and savory flavors in every bite!
Ingredients
- 2 cups short-grain sushi rice
- 2 ½ cups water (for cooking rice)
- ¼ cup rice vinegar
- 2 tbsp sugar
- 1 tsp salt
- 4 sheets nori (seaweed sheets)
- 8 ‘krab’ sticks (surimi), cut into thin strips
- 1 ripe avocado, thinly sliced
- ½ English cucumber, cut into thin matchsticks
- ½ cup panko breadcrumbs, toasted
- ¼ cup mayonnaise
- 1–2 tbsp sriracha (to taste)
- Sesame seeds (for garnish, optional)
- Soy sauce, wasabi, pickled ginger (for serving)
Instructions
- Prepare Sushi Rice: Rinse sushi rice thoroughly until water runs clear. Cook rice with water according to package directions (usually 15-20 minutes, then let stand for 10 minutes).
- Season Rice: While rice cooks, whisk together rice vinegar, sugar, and salt until dissolved. Once rice is cooked and fluffed, transfer to a large bowl and gently fold in the seasoning mixture. Let cool to room temperature.
- Prep Fillings: Cut ‘krab’ sticks, avocado, and cucumber into thin, even strips. Toast panko breadcrumbs in a dry pan over medium heat until golden brown and crispy; set aside. Mix mayonnaise and sriracha for spicy mayo.
- Set Up Rolling Station: Cover a bamboo rolling mat with plastic wrap. Have a small bowl of water nearby for wetting your hands.
- Assemble Roll: Place one sheet of nori, shiny side down, on the plastic-wrapped mat. Dip hands in water, then spread about ¾ cup of cooled sushi rice evenly over the nori, leaving a ¼-inch strip bare at the top. (For rice-on-the-outside rolls, flip the nori so the rice side is down on the mat).
- Add Fillings: Arrange a line of ‘krab’ sticks, avocado, and cucumber across the bottom third of the rice-covered nori. Drizzle with spicy mayo.
- Roll Sushi: Lift the edge of the mat closest to you, folding it over the fillings. Tuck the fillings in tightly, then continue rolling forward, applying gentle, even pressure with the mat to form a tight cylinder. Use the bare nori strip to seal the roll. If rice is on the outside, gently press toasted panko onto the rice.
- Slice and Serve: Dip a very sharp knife in water before each cut. Slice the roll in half, then cut each half into 3-4 even pieces (6-8 pieces total per roll). Arrange on a platter, garnish with sesame seeds, and serve immediately with soy sauce, wasabi, and pickled ginger.
- Prep Time: 30 mins
- Cook Time: 20 mins