
Table of Contents
- Marbled Effect Candy Apples: A Visual Treat You Can Master
- Why This Marbled Candy Apple Recipe Delivers
- Ingredients and Why They Matter for Marbled Candy Apples
- Your Step-by-Step Guide to Crafting Marbled Candy Apples
- Expert Tips for Marbled Candy Apple Success
- What to Serve With Marbled Candy Apples
- Storing and Reheating Marbled Candy Apples
- Frequently Asked Questions About Marbled Candy Apples
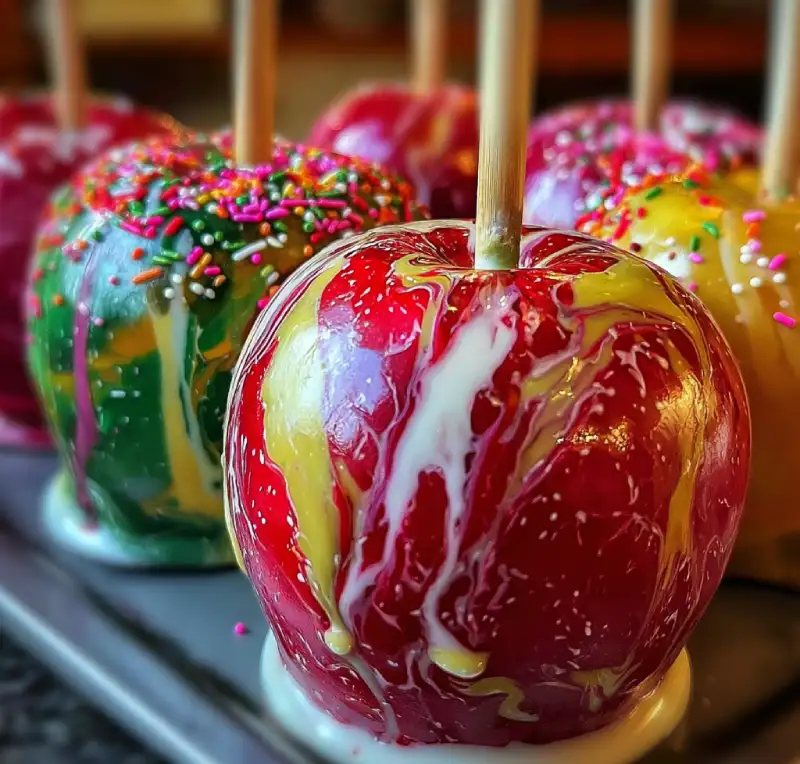
Marbled Effect Candy Apples: A Visual Treat You Can Master
There’s something truly magical about a candy apple. That satisfying, crisp crack as you bite through the glossy, sweet shell, followed by the juicy, tart crunch of a fresh apple – it’s an experience that transports you straight to a carnival or a festive autumn day. But what if you could elevate that classic treat into a stunning work of art? Enter the Marbled Effect Candy Apples! These aren’t just delicious; they’re a feast for the eyes, boasting swirling patterns of vibrant colors that make them almost too beautiful to eat. Almost!
Why I Love Making Marbled Candy Apples
As a passionate home baker, I’m always looking for ways to add a touch of flair to my creations, and these marbled candy apples hit all the right notes. They’re surprisingly simple to achieve with the right technique, and the ‘wow’ factor is off the charts. Every single apple turns out unique, a tiny edible masterpiece. Plus, they’re a fantastic project for getting creative in the kitchen, whether you’re making them for a party, a holiday, or just a special treat for yourself. They bring so much joy, both in the making and the eating!
Your Guide to Stunning Marbled Apples
Don’t be intimidated by their intricate appearance! I’m here to walk you through every step, ensuring your Marbled Effect Candy Apples are not only gorgeous but also perfectly crisp and flavorful. We’ll cover everything from selecting the best apples to mastering the dipping technique that creates those mesmerizing swirls. Get ready to impress everyone with your confectionery prowess!
Why This Marbled Candy Apple Recipe Delivers
- Achieving That Perfect Snap (Not Too Hard, Not Too Soft): Our precise temperature control ensures the candy coating sets to a delightful, brittle snap without being so hard it threatens your teeth. It’s the ideal balance of crunch and chew.
- Vibrant Colors That Don’t Bleed: By using gel food coloring and a specific layering technique, your colors will remain distinct and brilliant, creating a truly eye-catching marbled effect without muddying.
- Flavor That Complements, Not Overpowers, the Apple: This recipe focuses on a classic, sweet candy coating that enhances the natural tartness and juiciness of the apple, rather than overwhelming it with artificial flavors.
- Consistent Marbling For Every Apple: With our detailed dipping instructions, you’ll be able to create beautiful, consistent marbled patterns on each and every apple, making them all picture-perfect.
Ingredients and Why They Matter for Marbled Candy Apples
Here is what you need and why:
Apples: The Right Type for Dipping: For candy apples, you want firm, slightly tart apples that can stand up to the hot candy coating. Granny Smith apples are my absolute favorite for their crisp texture and tartness, which beautifully balances the sweetness of the candy. Fuji or Honeycrisp can also work well, but avoid overly soft or mealy varieties.
Granulated Sugar: The Foundation of Your Candy Coating: This is the primary ingredient, providing the sweetness and structure for your candy shell. Use regular white granulated sugar for the best results.
Light Corn Syrup: Preventing Crystallization: Corn syrup is a crucial ingredient that acts as an interfering agent, preventing the sugar from crystallizing and becoming grainy. It ensures a smooth, clear, and glossy candy coating. Don’t skip it!
Water: Your Solvent for a Smooth Syrup: Water dissolves the sugar and corn syrup, allowing them to cook into a smooth syrup. The amount is important for reaching the correct consistency.
Food Coloring (Gel Preferred): For Intense, Stable Hues: Gel food colorings are highly concentrated, meaning you need less to achieve vibrant colors, and they won’t thin out your candy syrup. Liquid food colorings can sometimes be too watery and affect the candy’s setting. For the best results and stunning marbling, invest in good quality gel colors.
Flavoring Extracts (Optional): Enhancing the Taste: While optional, a few drops of a clear flavoring extract (like vanilla, almond, or even a fruit flavor) can add another layer of deliciousness to your candy apples. Make sure to add it at the very end of cooking to preserve its potency.
Specialized Equipment: Candy Thermometer and Silicone Mat: A candy thermometer is absolutely non-negotiable for candy making. It ensures your syrup reaches the precise temperature needed for a perfect hard crack stage. Guessing will lead to sticky, soft, or overly brittle candy. A silicone mat (or parchment paper) is essential for cooling your apples without them sticking. It makes for easy removal and cleanup.
Your Step-by-Step Guide to Crafting Marbled Candy Apples
Follow these step-by-step photos:
1. Preparation: Cleaning and Prepping Your Apples
Start by thoroughly washing and drying your apples. This is crucial because any wax or residue on the apple skin can prevent the candy from adhering properly. You can even dip them briefly in boiling water and then wipe them dry to remove wax. Remove any stems and firmly insert a sturdy candy apple stick or skewer into the core of each apple. Line a baking sheet with a silicone mat or parchment paper and set it aside.
2. Creating the Base Candy Syrup
In a heavy-bottomed saucepan, combine the granulated sugar, light corn syrup, and water. Stir gently over medium heat until the sugar dissolves. Once dissolved, stop stirring. Insert your candy thermometer, making sure it doesn’t touch the bottom of the pan. Bring the mixture to a boil and continue cooking without stirring until the thermometer reads 300-310°F (149-154°C), which is the hard crack stage. This usually takes about 15-20 minutes. If using, stir in your flavoring extract at this point.
3. Dividing and Coloring Your Syrup
Once the syrup reaches the correct temperature, immediately remove it from the heat. Carefully pour about 1/3 to 1/2 of the hot syrup into a separate heat-safe bowl or measuring cup. Add your first gel food coloring to the main pot and stir gently to combine. Add your second gel food coloring to the smaller bowl and stir. You can even leave a third portion uncolored or use a third color if you wish. Work quickly, as the syrup will start to cool and thicken.
4. The Dipping Technique: Achieving the Marbled Effect
Hold an apple by its stick and quickly dip it into the first color of syrup, swirling to coat about two-thirds of the apple. Lift it out, letting excess drip off. Immediately, while the first layer is still wet, dip the apple into the second color, swirling it in a different direction or just coating the bottom portion, allowing the colors to swirl and marble together. You can also drizzle a third color over the apple. The key is to work swiftly to create those beautiful, distinct swirls before the candy sets. Don’t over-swirl, or the colors will blend too much. For visual guidance on dipping, check out Food Network’s tips!
5. Setting and Cooling Your Candy Apples
Once dipped and marbled, immediately place the candy apple onto your prepared silicone mat or parchment paper. Repeat the dipping process with the remaining apples, working as quickly as possible. Allow the candy apples to cool completely at room temperature for at least 30-60 minutes, or until the candy shell is firm and hard. Resist the urge to refrigerate them, as this can cause the candy to become sticky.
Expert Tips for Marbled Candy Apple Success
- Temperature Control: Why It’s Non-Negotiable: A candy thermometer is your best friend here. The difference between perfectly crisp candy and sticky, gooey candy is often just a few degrees. Aim for 300-310°F (149-154°C) for the hard crack stage.
- Working Quickly: The Key to Crisp Marbling: Hot sugar cools and sets fast! Have all your apples prepped, sticks inserted, and cooling mats ready before you even start cooking the syrup. Speed is essential for achieving distinct marbling before the candy becomes too thick to work with.
- Preventing Bubbles: A Smooth Finish: When cooking the syrup, avoid stirring once the sugar has dissolved. Excessive stirring can introduce air bubbles. When dipping, dip smoothly and avoid plunging the apple in and out too many times, which can also create bubbles.
- Troubleshooting Common Marbling Issues: If your colors are blending too much, you might be swirling too long or the syrup is too hot. If the candy is setting too fast, your syrup might be too cool, or you’re not working quickly enough. Practice makes perfect!
- Safety First: Handling Hot Sugar: Hot sugar syrup is extremely hot and can cause severe burns. Always use caution, wear oven mitts, and keep children and pets away from the stovetop. Have a bowl of ice water nearby in case of accidental splashes.
What to Serve With Marbled Candy Apples
Complementary Desserts
While these Marbled Effect Candy Apples are showstoppers on their own, they can also be part of a larger dessert spread. Imagine them alongside a rich chocolate fondue, a creamy vanilla bean panna cotta, or even a rustic apple crumble. The crisp, sweet candy shell provides a wonderful textural contrast to softer desserts.
Holiday Spreads
These apples are absolutely perfect for holiday gatherings! Their vibrant colors make them ideal for Halloween, Thanksgiving, or even a festive Christmas display. Arrange them on a tiered platter for an impressive centerpiece that doubles as a delicious treat. They’re a fantastic conversation starter!
As a Standalone Treat
Honestly, these marbled candy apples are so visually stunning and satisfyingly delicious, they truly shine as a standalone treat. Hand them out at a party, pack them for a special picnic, or simply enjoy one as a delightful indulgence. They’re a complete dessert experience in themselves!
Storing and Reheating Marbled Candy Apples
Optimal Storage for Freshness
To keep your Marbled Effect Candy Apples at their best, store them individually wrapped in cellophane or in an airtight container at room temperature. They are best enjoyed within 1-2 days. Humidity is the enemy of candy apples, so avoid storing them in the refrigerator, as this can cause the candy to become sticky and cloudy.
Can You Reheat Candy Apples? (Short Answer: No)
Unfortunately, candy apples cannot be reheated. The candy coating is designed to be a hard, brittle shell. Reheating would melt the candy, making it impossible to re-form properly and likely turning it into a sticky mess. Enjoy them fresh!
Frequently Asked Questions About Marbled Candy Apples
Can I use artificial sweeteners for candy apples?
How do I prevent the candy from sliding off the apples?
What’s the best way to clean my candy apple equipment?
Can I make these ahead of time?
Marbled Effect Candy Apples
- Total Time: 40 minutes
- Yield: 6-8 apples
Description
Create stunning and delicious Marbled Effect Candy Apples with this easy-to-follow recipe. Enjoy the perfect crisp candy shell and juicy apple interior, beautifully swirled with vibrant colors.
Ingredients
- 6–8 medium firm apples (Granny Smith, Fuji, or Honeycrisp)
- 6–8 candy apple sticks or skewers
- 2 cups granulated sugar
- 1/2 cup light corn syrup
- 1/2 cup water
- Gel food coloring (2-3 colors)
- 1/2 teaspoon clear flavoring extract (optional, e.g., vanilla, almond)
Instructions
- 1. Prepare Apples: Wash and thoroughly dry apples. Insert sticks firmly. Line a baking sheet with a silicone mat or parchment paper.
- 2. Cook Syrup: In a heavy-bottomed saucepan, combine sugar, corn syrup, and water. Stir over medium heat until sugar dissolves. Insert candy thermometer. Cook without stirring until 300-310°F (hard crack stage). Remove from heat and stir in flavoring extract if using.
- 3. Color Syrup: Carefully pour 1/3 to 1/2 of the hot syrup into a separate heat-safe bowl. Add different gel food colorings to each syrup portion and stir gently to combine.
- 4. Dip Apples: Hold an apple by its stick. Quickly dip into the first color, swirling to coat. Lift, let excess drip. Immediately dip into the second color, swirling in a different direction to create a marbled effect.
- 5. Cool: Place dipped apple onto the prepared silicone mat. Repeat with remaining apples, working quickly. Allow to cool completely at room temperature until candy is firm and hard.
- Prep Time: 20 mins
- Cook Time: 20 mins