
Your New Go-To Snack: Why These No-Bake Protein Balls Are a Game Changer
Imagine a snack that’s rich, chocolatey, perfectly peanut buttery, and delivers a satisfying chew with every bite. Now imagine it requires absolutely no baking, comes together in minutes, and fuels your body with quality protein. That, my friends, is the magic of these no-bake chocolate peanut butter protein balls. They’re not just a snack; they’re a revelation for anyone seeking delicious, convenient, and healthy fuel.
From Kitchen Chaos to Snack Success: My Journey to No-Bake Perfection
As a busy food blogger and home baker, I’ve had my fair share of kitchen triumphs and, let’s be honest, a few spectacular failures. My quest for the ultimate grab-and-go snack often led to elaborate baking projects that, while delicious, weren’t always practical for my on-the-go lifestyle. I needed something that could be whipped up quickly, stored easily, and satisfy those inevitable cravings without derailing my healthy eating goals. After countless experiments, tweaking ratios, and testing ingredients, I finally landed on this recipe for no-bake chocolate peanut butter protein balls. It’s a true game-changer, transforming my snack routine from chaotic to effortlessly successful. Trust me, once you try these, you’ll wonder how you ever lived without them!
Why This Recipe Delivers: The Science Behind the Snack
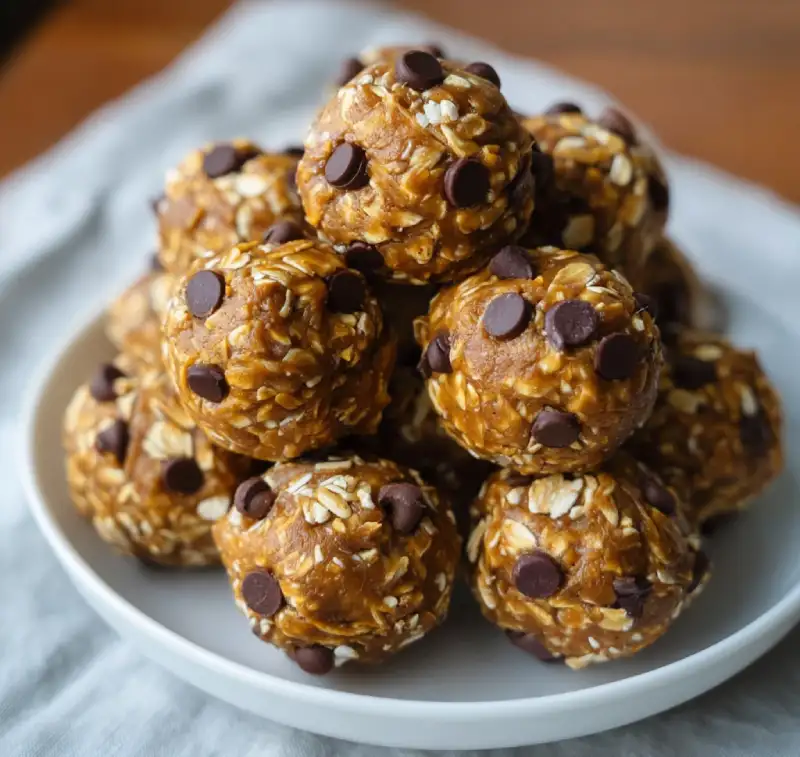
- Perfectly Chewy Texture, Every Time: The combination of creamy peanut butter, sticky sweetener, and finely ground oats creates an ideal matrix that holds together beautifully without being crumbly or overly dense. The chilling process further solidifies this structure, ensuring a delightful chew.
- Flavor That Hits All the Right Notes: Sweet, Salty, & Satisfying: The natural sweetness from honey or maple syrup balances the slight bitterness of cocoa, while a pinch of salt (a secret weapon!) elevates all the flavors, creating that irresistible sweet-and-salty dynamic we all crave.
- Energy-Boosting Power: Fueling Your Day the Delicious Way: Packed with protein from the powder and peanut butter, complex carbohydrates from oats, and healthy fats, these balls provide sustained energy release, making them an ideal pre- or post-workout snack, or a midday pick-me-up.
- Quick & Easy: Minimal Effort, Maximum Reward: The beauty of a no-bake recipe is its simplicity. No oven preheating, no delicate mixing techniques, just a few ingredients combined in one bowl, rolled, and chilled. It’s snack perfection with minimal fuss.
The Essential Ingredients & Smart Swaps: What You Need & Why
Here is what you need and why:
Peanut Butter: The Creamy Foundation (and why type matters): This is the star of our no-bake chocolate peanut butter protein balls! I highly recommend using a natural, creamy peanut butter that contains only peanuts and salt. Avoid brands with added sugars or oils, as these can alter the consistency and sweetness of your balls. The natural oils in good quality peanut butter are crucial for binding and moisture. If your natural peanut butter is very oily, give it a good stir before measuring.
Protein Powder: Your Muscle-Building Boost (choosing the right one): This is where you get your protein punch! I typically use a vanilla or unflavored whey protein powder, but plant-based options like pea protein or a blend also work well. Be mindful that different protein powders absorb liquid differently, so you might need to adjust the amount of oats or sweetener slightly. Avoid highly flavored or very chalky protein powders, as they can overpower the other flavors.
Oats: Structure and Fiber (the role of quick vs. rolled): Oats provide structure, fiber, and a lovely chewiness. Quick oats (instant oats) are my preferred choice here because they are finer and blend more seamlessly into the mixture, creating a smoother texture. Rolled oats (old-fashioned oats) can be used, but I recommend pulsing them briefly in a food processor first to break them down slightly, otherwise, your balls might be a bit too chunky.
Honey/Maple Syrup: Natural Sweetness & Binding (sweetener alternatives): These natural sweeteners do double duty: they add delicious sweetness and act as a crucial binder, helping everything stick together. You can use either honey or pure maple syrup interchangeably. For a vegan option, definitely stick with maple syrup. Agave nectar could also work, but it’s often sweeter, so you might want to use a little less.
Cocoa Powder: Rich Chocolate Flavor (dutch vs. natural): Unsweetened cocoa powder is essential for that deep chocolatey goodness. Both natural cocoa powder and Dutch-processed cocoa powder will work. Dutch-processed cocoa tends to be darker and less acidic, resulting in a smoother chocolate flavor. Natural cocoa powder is slightly more acidic and can give a more intense chocolate kick. Use whichever you prefer!
Vanilla Extract: The Flavor Enhancer: A splash of good quality vanilla extract elevates all the other flavors, adding a warm, aromatic depth that makes these balls truly irresistible.
Optional Add-ins: Texture & Nutritional Boosts: This is where you can get creative! Consider adding a tablespoon of chia seeds or ground flaxseed for extra fiber and omega-3s, a sprinkle of mini chocolate chips for an extra treat, or even a pinch of cinnamon for a warm spice note. Shredded coconut is also a fantastic addition for texture and flavor.
Step-by-Step: Crafting Your Perfect No-Bake Protein Balls
Follow these step-by-step photos:
1. Gathering Your Gear: What You’ll Need
Before you begin, make sure you have a large mixing bowl, a sturdy spoon or spatula, measuring cups and spoons, and a baking sheet lined with parchment paper or wax paper. Having everything ready makes the process smooth and enjoyable.
2. Mixing the Magic: Combining Dry & Wet Ingredients
In your large mixing bowl, combine the peanut butter, honey (or maple syrup), and vanilla extract. Stir until well combined and smooth. In a separate small bowl, whisk together the protein powder, quick oats, and cocoa powder. Gradually add the dry mixture to the wet mixture, stirring continuously until a thick, uniform dough forms. It should be sticky but firm enough to roll. If it seems too dry, add a tiny bit more peanut butter or sweetener; if too wet, add a touch more oats or protein powder.
3. Rolling into Perfection: Forming Your Balls
Once your mixture is ready, take small portions (about 1 tablespoon each) and roll them between your palms to form smooth, bite-sized balls. Place the formed balls onto your prepared baking sheet. Aim for consistency in size for even chilling and portion control.
4. Chill Out: The Essential Setting Step
This step is crucial! Once all your no-bake chocolate peanut butter protein balls are rolled, transfer the baking sheet to the refrigerator. Chill for at least 30 minutes, or until firm. This allows the ingredients to set, making the balls less sticky and giving them that perfect chewy texture. Don’t skip this!
Expert Tips for Success: Avoiding Common Pitfalls
- Achieving the Right Consistency: Troubleshooting Your Mixture: The ideal mixture should be sticky enough to hold together but not so wet that it’s impossible to roll. If it’s too dry and crumbly, add a teaspoon of peanut butter or honey at a time until it comes together. If it’s too wet and sticky, add a tablespoon of oats or protein powder until it’s manageable.
- Uniform Rolling: For Even Bites: Use a small cookie scoop or a measuring spoon (like a tablespoon) to portion out the mixture. This ensures all your protein balls are roughly the same size, which is great for consistent texture and portion control.
- Enhancing Flavor: A Pinch of Salt Makes a Difference: Even if your peanut butter contains salt, adding a tiny pinch (1/8 to 1/4 teaspoon) of fine sea salt to the mixture can dramatically enhance the chocolate and peanut butter flavors. It truly makes them pop!
- Making Them Kid-Friendly: Fun Shapes & Toppings: Get the kids involved! Instead of balls, you can press the mixture into a small pan, chill, and then cut into squares or use cookie cutters for fun shapes. Roll them in sprinkles, shredded coconut, or finely chopped nuts for an extra layer of fun and flavor.
Serving Suggestions: What Pairs Well With Your Protein Balls
Post-Workout Fuel
These no-bake chocolate peanut butter protein balls are the ultimate post-workout recovery snack. The combination of protein for muscle repair and carbohydrates for energy replenishment makes them perfect for refueling after a gym session or run. Grab one (or two!) on your way out the door.
Afternoon Pick-Me-Up
Feeling that 3 PM slump? Instead of reaching for sugary processed snacks, grab one of these protein balls. They provide sustained energy without the sugar crash, keeping you focused and productive through the rest of your day. They pair wonderfully with a cup of coffee or herbal tea.
Healthy Dessert Swap
Satisfy your sweet tooth in a healthier way! These protein balls are rich and decadent enough to feel like a treat, but they’re packed with good-for-you ingredients. They’re a fantastic alternative to traditional desserts, especially when you’re craving something chocolatey and satisfying after dinner. See more easy recipes for healthy dessert swaps!
Storing & Reheating (No Reheating Needed!): Keeping Them Fresh
Refrigerator Storage: Optimal Freshness
Once chilled and firm, store your no-bake chocolate peanut butter protein balls in an airtight container in the refrigerator for up to 1-2 weeks. They will maintain their best texture and flavor when kept cold. They’re perfect for grabbing straight from the fridge!
Freezer Storage: Long-Term Convenience
For longer storage, these protein balls freeze beautifully! Place the chilled balls in a single layer on a baking sheet and freeze for about an hour until solid. Then, transfer them to a freezer-safe airtight container or zip-top bag. They will keep well in the freezer for up to 2-3 months. When you’re ready to enjoy one, simply take it out of the freezer and let it thaw at room temperature for 10-15 minutes, or enjoy it straight from frozen for a firmer, chewier treat!
Frequently Asked Questions
Can I use almond butter instead of peanut butter?
What kind of protein powder works best?
Are these gluten-free?
How long do they last?
No-Bake Chocolate Peanut Butter Protein Balls
- Total Time: 15 minutes
- Yield: 12-15 balls
Description
Whip up these incredibly easy and delicious no-bake chocolate peanut butter protein balls for a healthy, satisfying snack. Perfect for post-workout fuel or an afternoon pick-me-up, they’re packed with flavor and energy.
Ingredients
- 1 cup natural creamy peanut butter
- 1/2 cup honey or pure maple syrup
- 1 teaspoon vanilla extract
- 1/2 cup protein powder (vanilla or unflavored recommended)
- 1 cup quick oats (certified gluten-free if needed)
- 1/4 cup unsweetened cocoa powder
- Pinch of salt (optional, but recommended)
- Optional: 2 tablespoons mini chocolate chips, chia seeds, or shredded coconut
Instructions
- In a large mixing bowl, combine the peanut butter, honey (or maple syrup), and vanilla extract. Stir until well combined and smooth.
- In a separate small bowl, whisk together the protein powder, quick oats, cocoa powder, and optional pinch of salt.
- Gradually add the dry mixture to the wet mixture, stirring continuously until a thick, uniform dough forms. It should be sticky but firm enough to roll.
- Take small portions (about 1 tablespoon each) and roll them between your palms to form smooth, bite-sized balls. If using optional add-ins like mini chocolate chips, gently fold them into the mixture before rolling.
- Place the formed balls onto a baking sheet lined with parchment paper or wax paper.
- Transfer the baking sheet to the refrigerator and chill for at least 30 minutes, or until firm.
- Store the no-bake chocolate peanut butter protein balls in an airtight container in the refrigerator for up to 1-2 weeks, or freeze for longer storage.
- Prep Time: 15 mins
- Cook Time: 0 mins