
Imagine a dessert that’s not just a treat for the taste buds, but a romantic gesture in itself. Picture this: a warm, incredibly moist pink cake, yielding to reveal a decadent, molten chocolate center that simply oozes onto your plate. That, my friends, is the magic of our Pink Lava Cake Valentine’s Day recipe. It’s the perfect blend of rich chocolate and a delightful blush hue, making it an irresistible climax to any romantic meal. The anticipation in each bite, the way the warm goo mingles with a scoop of cool vanilla ice cream – it’s pure dessert euphoria. If you’re looking to truly impress your loved one, or simply indulge yourself in a luxurious treat, you’ve found your perfect recipe. And if you’re hungry for more delightful creations, See more easy recipes.
Table of Contents
- Pink Lava Cake for Valentine’s Day: Your Guide to a Romantic Dessert
- Why This Pink Lava Cake Recipe Delivers
- Ingredients and Smart Substitutions for Perfect Pink Lava Cakes
- Step-by-Step: Baking Your Pink Lava Cake Valentine’s Day Masterpiece
- Expert Tips for Pink Lava Cake Success
- What to Serve with Your Pink Lava Cake
- Storing and Reheating Pink Lava Cakes
- Pink Lava Cake Valentine’s Day FAQ
Pink Lava Cake for Valentine’s Day: Your Guide to a Romantic Dessert
There’s something uniquely enchanting about a lava cake. The reveal of its molten center is a moment of pure culinary delight, a delicious secret unfolding before your eyes. This Pink Lava Cake Valentine’s Day recipe elevates that experience into a celebration of love and sweetness. Why is this your ultimate Valentine’s dessert champion? Because it combines a sophisticated appeal with surprising ease of execution. You don’t need to be a pastry chef to create this showstopper. Its vibrant pink exterior, hinting at the luscious chocolate within, immediately sets a romantic mood. It’s an intimate dessert, perfect for sharing, and guaranteed to leave a lasting impression.
The irresistible appeal isn’t just in its beauty; it’s in the contrast of textures and temperatures. The slightly firm exterior giving way to that warm, flowing chocolate is truly captivating. Add to that a subtle hint of vanilla, a delicate sweetness, and the option for a natural pop of pink, and you have a dessert that’s both comforting and thrilling, perfectly embodying the spirit of Valentine’s Day.
Why This Pink Lava Cake Recipe Delivers
- Guaranteed gooey, molten center: Our precise baking times and ingredient ratios ensure that perfect, Instagram-worthy flow every time. No dry cakes here!
- Balanced sweetness with a subtle tang: We’ve carefully crafted the flavor profile so it’s sweet without being cloying, with hints of vanilla that perfectly complement the rich chocolate.
- Vibrant pink color: Discover how to achieve a stunning pink hue, whether you prefer natural options like beetroot powder or the intense stability of gel food coloring. We prioritize beauty without sacrificing flavor.
- Bakes quickly for a last-minute romantic gesture: Clocking in at under 20 minutes of baking, these individual cakes are ideal for a spontaneous dessert or when you’re short on time but still want to create something special.
Ingredients and Smart Substitutions for Perfect Pink Lava Cakes
Here is what you need and why:
Good quality chocolate: This is arguably the most important ingredient. Since chocolate is the STAR of a lava cake, using a high-quality baking chocolate (at least 60% cacao) will make all the difference in flavor and melt. Avoid chocolate chips as they contain stabilizers that prevent them from melting smoothly. Think chocolate bars you’d actually enjoy eating on their own!
Unsalted butter: Using unsalted butter allows you to control the exact amount of salt in your recipe. This ensures a balanced flavor profile, preventing your cakes from becoming too salty. If you only have salted butter, omit the added pinch of salt in the recipe.
Eggs and egg yolks: Whole eggs provide structure and moisture, while the extra egg yolks contribute incredible richness, tenderness, and a more pronounced custard-like quality to the molten center. They are key for that luxurious texture!
Granulated sugar: This provides the necessary sweetness and helps with the caramelization process, contributing to a slightly crispy edge on the cake’s exterior. It also helps stabilize the egg mixture.
All-purpose flour: We only use a small amount of all-purpose flour. Its purpose is to provide just enough structure to hold the cake together around its molten core, without making it dense or chewy. Too much flour will result in a fully baked cake rather than a lava cake.
Pinch of salt: A tiny bit of salt is a magical flavor enhancer. It doesn’t make the cake salty, but rather sharpens the chocolate flavor and balances the sweetness, making every bite more complex and delicious.
Pink coloring options: This is where the magic happens! For a natural approach, consider a small amount of beetroot powder (1/4 – 1/2 tsp) or a concentrated raspberry puree (strain out seeds for smooth color). These will impart a subtle, earthy flavor note which can be quite pleasant with chocolate. For a vibrant, consistent pink without any flavor interference, high-quality gel food coloring is your best friend. A few drops are usually enough to achieve stunning results. King Arthur Baking has some great tips on using natural colorings!
Vanilla extract: A classic flavor booster, vanilla extract harmonizes beautifully with chocolate, adding warmth and depth to the overall taste profile. Use good quality pure vanilla extract for the best results.
Step-by-Step: Baking Your Pink Lava Cake Valentine’s Day Masterpiece
Follow these step-by-step instructions to create your perfect Pink Lava Cakes:
1. Prepare Your Ramekins
The unsticking secret: Generously butter and flour four 6-ounce ramekins. This is crucial for easy unmolding. Ensure every nook and cranny is coated. You can also dust with cocoa powder for a stronger chocolate flavor and color, or even granulated sugar for a slightly crispier edge.
2. Melt Chocolate and Butter
Low and slow for smooth ganache: In a heatproof bowl, combine the chopped good quality chocolate and unsalted butter. Place this bowl over a saucepan of simmering water (a double boiler), ensuring the bottom of the bowl doesn’t touch the water. Stir occasionally until completely melted and smooth. Alternatively, melt in the microwave in 20-30 second intervals, stirring well after each interval, until silky smooth. Set aside to cool slightly.
3. Whisk Eggs, Yolks, and Sugar
Creating aeration and stability: In a separate medium bowl, whisk together the whole eggs, egg yolks, and granulated sugar until the mixture is pale yellow and slightly thickened, about 1-2 minutes. This incorporates air, which contributes to the cake’s light texture and helps stabilize the batter.
4. Combine Wet and Dry Ingredients, Add Color
Gentle folding for tender cakes and perfect hue: Gradually whisk the slightly cooled chocolate mixture into the egg mixture until just combined. Stir in the vanilla extract. Now, for the pink! Add your chosen pink coloring option (beetroot powder, raspberry puree, or gel food coloring) a little at a time, folding gently until you reach your desired hue. Next, gently fold in the all-purpose flour and pinch of salt until just a few streaks of flour remain. Be careful not to overmix, as this can develop the gluten and lead to tough cakes.
5. Fill and Bake
Timing is everything for the gooey center: Divide the batter evenly among the prepared ramekins. Place the ramekins on a baking sheet and bake in a preheated 400°F (200°C) oven for 12-15 minutes. The edges should be set, but the center will still be visibly soft and jiggly when gently shaken. This jiggle is the secret to your molten core!
6. The Invert and Serve Technique
Presentation tips: Remove cakes from the oven. Let them rest in their ramekins for just 1-2 minutes – no longer! This allows them to firm up slightly. Carefully run a thin knife around the edge of each cake, then invert each ramekin onto a serving plate. Lift the ramekin gently. Voila! Your perfect Pink Lava Cakes are ready to be adorned and enjoyed.
Expert Tips for Pink Lava Cake Success
- Don’t overmix the batter: Overmixing develops gluten in the flour, which leads to tough, chewy cakes instead of light, tender ones. Mix just until ingredients are combined.
- Correct oven temperature: A hot oven (400°F/200°C) is crucial. It quickly bakes the outer edges while leaving the center molten.
- Know your ramekins: Thicker ceramic ramekins might require an extra minute or two of baking compared to thinner metal ones. Adjust baking time accordingly.
- Test for doneness: The Jiggle Test! Gently shake a ramekin. If the outer edges are set but the center still wiggles like Jell-O, it’s perfect. If it looks completely set, it’s overbaked.
- Cooling time: Be patient, but only for a minute or two! Allowing the cakes to cool briefly makes unmolding much easier without them falling apart, but waiting too long will solidify the lava.
What to Serve with Your Pink Lava Cake
Elevate your Pink Lava Cake Valentine’s Day experience with these perfect pairings:
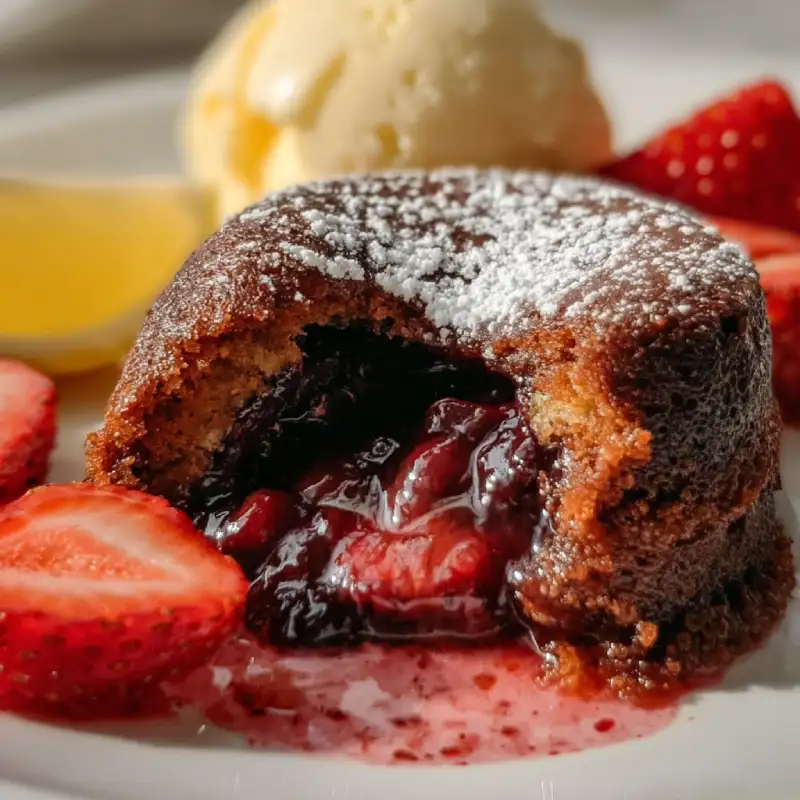
- Classic pairings: A scoop of creamy vanilla bean ice cream is an absolute must! The cool ice cream contrasts beautifully with the warm, molten chocolate. Fresh berries, especially raspberries or strawberries, add a burst of tartness and a vibrant color contrast.
- Creative toppings: Drizzle with a homemade raspberry coulis for an extra layer of fruitiness and color. A dusting of powdered sugar adds an elegant finish. For chocolate lovers, a scattering of mini chocolate shavings or a spoonful of whipped cream makes it even more indulgent.
- Beverage suggestions: A crisp, sparkling rosé wine enhances the romantic mood and complements the cake’s sweetness. For a non-alcoholic option, a rich, dark roasted coffee or a refreshing glass of milk are equally delightful.
Storing and Reheating Pink Lava Cakes
While best enjoyed fresh from the oven, you can certainly prepare these gorgeous cakes partially or reheat them successfully!
- Can you make lava cake ahead? Yes! You can prepare the batter up to 24 hours in advance. Cover the bowl tightly with plastic wrap and refrigerate. When ready to bake, give the batter a gentle stir (it might thicken slightly), then pour into prepared ramekins and bake as directed, adding a minute or two to the baking time if the batter is very cold. You can also bake the cakes ahead and reheat them.
- Best way to store leftover baked cakes: If you have any leftover baked cakes (unlikely, we know!), let them cool completely. Store them individually wrapped in plastic wrap or in an airtight container in the refrigerator for up to 2-3 days.
- Reheating for the perfect molten center: To regain that gooey center, place the refrigerated cake (still in its ramekin or on a microwave-safe plate) in the microwave for 20-40 seconds, depending on your microwave’s power, until the center is warm and beginning to flow again. Alternatively, you can reheat them in a preheated oven (350°F/175°C) for about 5-7 minutes.
Pink Lava Cake Valentine’s Day FAQ
Why won’t my lava cake flow?
Can I make these gluten-free?
How to achieve a deeper pink color?
What if I don’t have ramekins?
Pink Lava Cake Valentine’s Day: Delicious Recipe
- Total Time: 51 minute
- Yield: 4 servings
Description
Create a romantic dessert with our Pink Lava Cake Valentine’s Day recipe. This guide provides step-by-step instructions for an easy to bake and best flavor treat that guarantees a gooey, molten center.
Ingredients
- 4 ounces (113g) good quality dark chocolate (60-70% cacao), finely chopped
- 1/2 cup (113g) unsalted butter
- 2 large eggs
- 2 large egg yolks
- 1/4 cup (50g) granulated sugar
- 2 tablespoons (16g) all-purpose flour
- Pinch of salt
- 1 teaspoon vanilla extract
- 1/4 – 1/2 teaspoon beetroot powder OR a few drops pink gel food coloring (for color)
- Butter and flour (for ramekins)
Instructions
- Preheat oven to 400°F (200°C). Generously butter and flour four 6-ounce ramekins.
- In a heatproof bowl set over a saucepan of simmering water (or microwave in 20-second intervals), melt the chopped chocolate and butter until smooth. Stir until silky and set aside to cool slightly.
- In a separate bowl, whisk together the whole eggs, egg yolks, and granulated sugar until pale yellow and slightly thickened (about 1-2 minutes).
- Gradually whisk the slightly cooled chocolate mixture into the egg mixture until just combined. Stir in the vanilla extract.
- Add your pink coloring (beetroot powder or gel food coloring) and gently fold it in until well distributed and you achieve your desired hue.
- Gently fold in the all-purpose flour and pinch of salt until just combined, being careful not to overmix.
- Divide the batter evenly among the prepared ramekins. Place ramekins on a baking sheet.
- Bake for 12-15 minutes, or until the edges are set but the center still jiggles when gently shaken.
- Remove from oven and let rest for 1-2 minutes. Carefully run a thin knife around the edges, then invert each cake onto a serving plate.
- Serve immediately with vanilla bean ice cream and fresh berries, if desired.
- Prep Time: 15 mins
- Cook Time: 12-15 mins