
Table of Contents
- Ready for a S’mores & Peanut Butter Mashup?
- Why These S’mores Peanut Butter Cups Are Your Next Obsession
- Essential Ingredients & Smart Substitutions
- Your Step-by-Step Guide to Perfect S’mores Peanut Butter Cups
- Expert Tips for S’mores Peanut Butter Cup Success
- What to Serve with Your S’mores Peanut Butter Cups
- Storing & Reheating Your Delicious Treats
- S’mores Peanut Butter Cups FAQ
Ready for a S’mores & Peanut Butter Mashup?
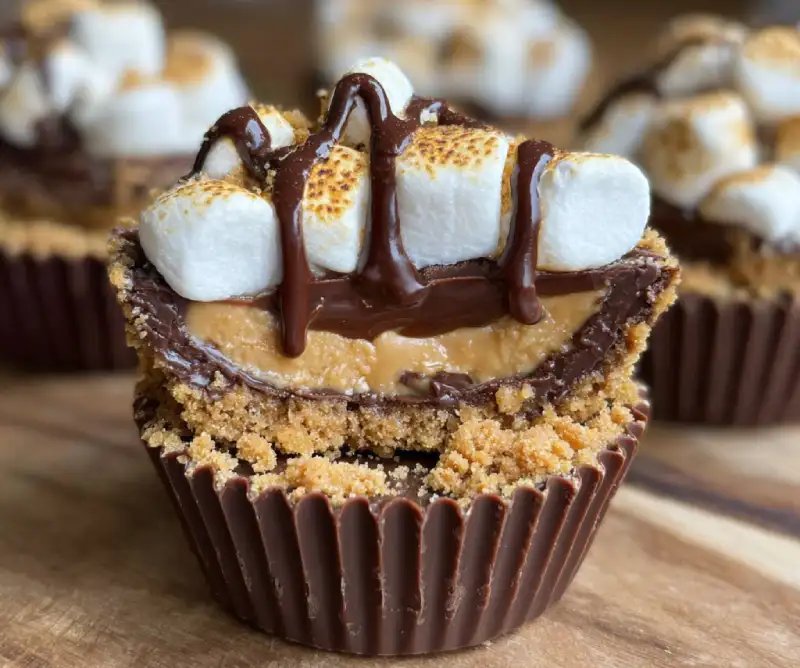
Imagine sinking your teeth into a treat that delivers the nostalgic crunch of graham crackers, the creamy, salty bliss of peanut butter, the rich decadence of chocolate, and the sweet, gooey perfection of toasted marshmallow – all in one bite. That, my friends, is the magic of these S’mores Peanut Butter Cups. It’s a flavor explosion that marries two of the most beloved comfort food classics into an irresistible, utterly addictive confection. This isn’t just a recipe; it’s an experience, a journey to ultimate dessert satisfaction.
My personal journey to perfecting this ultimate comfort candy began with a simple craving: I wanted the campfire experience without the actual campfire, and I wanted it fused with my lifelong love affair with peanut butter cups. After countless experiments, tweaking ratios, and testing different marshmallow techniques, I finally landed on a recipe that hits every single note. This isn’t just a good recipe; it’s the recipe for the best S’mores Peanut Butter Cups you’ll ever make. Trust me, your taste buds are in for a serious treat!
Why These S’mores Peanut Butter Cups Are Your Next Obsession
- The perfect balance of creamy, crunchy, and gooey textures. Each bite offers a delightful contrast, from the crisp graham cracker base to the smooth peanut butter filling and the soft, toasted marshmallow top.
- Rich chocolate pairs perfectly with salty peanut butter and toasted marshmallow. The slight bitterness of dark chocolate beautifully cuts through the sweetness, while the salty peanut butter elevates all the other flavors.
- A no-bake convenience with all the campfire flavor you crave. You get all the nostalgic taste of S’mores without the need for a bonfire, making these an ideal treat any time of year.
- Surprisingly easy to make, yet incredibly impressive. These look like they came from a gourmet candy shop, but they’re simple enough for even novice bakers to master.
Essential Ingredients & Smart Substitutions
Here is what you need and why:
Chocolate: For the best results, I recommend using a good quality melting chocolate or chocolate chips (semi-sweet or dark chocolate work wonderfully). A higher cocoa content will balance the sweetness of the other components. If you’re out, you can use chocolate bars chopped into small pieces, but ensure it’s a brand that melts smoothly. For a truly professional finish, tempering your chocolate is key, but simply melting it carefully will still yield delicious results. For more on chocolate, check out King Arthur Baking’s guide to melting chocolate.
Peanut Butter: Full-fat, creamy peanut butter is non-negotiable for texture. Natural peanut butter that separates can be too oily and make your filling runny. Stick to a classic, no-stir creamy peanut butter for that perfect, firm-yet-creamy consistency. If you have a peanut allergy, almond butter or cashew butter can be used, but be aware the flavor profile will change slightly.
Graham Cracker Crumbs: You can buy pre-crushed graham cracker crumbs for convenience, which is what I often do. However, making your own by crushing whole graham crackers in a food processor or a bag with a rolling pin will give you a fresher, more robust flavor and a slightly coarser texture, which I personally love for that extra crunch. Either way, they provide the essential S’mores base.
Marshmallow Fluff vs. Meltable Marshmallows: This is where the magic happens! Marshmallow fluff is fantastic for a smooth, gooey layer that doesn’t require much fuss. If you want that classic toasted S’mores look and flavor, mini marshmallows are your best bet. They melt beautifully and can be lightly broiled for that irresistible golden-brown char. Avoid large marshmallows unless you’re willing to cut them down significantly.
Powdered Sugar: This helps bind the peanut butter filling and adds a touch of sweetness without making it gritty. Don’t substitute with granulated sugar, as it won’t dissolve properly.
Butter: A little melted butter helps bind the graham cracker crust and adds richness to the peanut butter filling. Unsalted is preferred so you can control the salt content.
Your Step-by-Step Guide to Perfect S’mores Peanut Butter Cups
Follow these step-by-step photos:
1. Prepare Your Muffin Tin
Line a standard 12-cup muffin tin with paper or foil liners. Foil liners tend to release more easily and hold their shape better, especially for chilled treats. This step is crucial for easy demolding and a clean finish for your S’mores Peanut Butter Cups.
2. Create the Graham Cracker Base
In a small bowl, combine the graham cracker crumbs with melted butter and a pinch of sugar. Mix until it resembles wet sand. Press about 1 tablespoon of this mixture firmly into the bottom of each lined muffin cup. Use the back of a spoon or a small tamper to ensure it’s compact. Chill in the freezer for 10 minutes while you prepare the next layers.
3. Craft the Peanut Butter Filling
In a medium bowl, combine the creamy peanut butter, powdered sugar, and a tablespoon of melted butter (if needed for consistency). Mix until well combined and smooth. The mixture should be firm enough to roll into balls but still pliable. If it’s too sticky, add a little more powdered sugar; if too dry, a tiny bit more melted butter. Roll the mixture into 12 equal-sized balls, then flatten each into a disc that will fit inside your muffin liners, leaving a small border for the chocolate.
4. Layer the Chocolate and Peanut Butter
Melt your chocolate according to package directions (microwave in 30-second intervals, stirring, or use a double boiler). Spoon about 1-2 teaspoons of melted chocolate into the bottom of each chilled graham cracker crust. Place a flattened peanut butter disc on top of the chocolate. Then, spoon another 1-2 teaspoons of melted chocolate over the peanut butter, gently spreading to cover the top and seal the edges. Return to the freezer for 15-20 minutes to set the chocolate.
5. Add the Marshmallow Top and Toast
Once the chocolate is set, remove the cups from the freezer. If using marshmallow fluff, dollop about a tablespoon on top of each cup and gently spread. If using mini marshmallows, arrange a few on top of each cup. For that authentic toasted S’mores experience, place the muffin tin under a preheated broiler for 30-60 seconds, watching carefully until the marshmallows are golden brown and slightly charred. Alternatively, you can use a kitchen torch for more precise toasting. If you prefer a no-broil alternative, simply leave the marshmallow fluff as is, or let the mini marshmallows soften slightly at room temperature.
Expert Tips for S’mores Peanut Butter Cup Success
- Temperature control for chocolate: When melting chocolate, go slow and low. Overheating can cause it to seize (become thick and clumpy) or bloom (develop white streaks). If using a microwave, stir every 30 seconds. For a double boiler, ensure the water isn’t boiling vigorously and the bowl doesn’t touch the water.
- Troubleshooting sticky situations with marshmallow: If marshmallow fluff is too sticky to work with, lightly grease your spoon or fingers with a neutral oil or a little butter. For mini marshmallows, they’ll become sticky when warm, so work quickly after broiling.
- Achieving clean edges: Ensure your chocolate layers are fully set before adding the next component. When demolding, gently peel away the paper or foil liners. If they’re sticking, try chilling the cups for an extra 10-15 minutes in the freezer.
- Flavor variations: Elevate your S’mores Peanut Butter Cups with a sprinkle of flaky sea salt on top of the chocolate or marshmallow for a gourmet touch. A dash of vanilla extract in the peanut butter filling can also enhance the flavor.
- Don’t overfill: Resist the urge to overfill your muffin liners. Leaving a little space at the top ensures a neat, professional-looking cup and prevents overflow when adding the marshmallow.
What to Serve with Your S’mores Peanut Butter Cups
These delightful S’mores Peanut Butter Cups are a treat all on their own, but they pair beautifully with a few classic accompaniments. A tall glass of cold milk is always a winner, perfectly complementing the rich flavors. For the adults, a freshly brewed cup of coffee or a creamy latte can be a wonderful pairing, cutting through the sweetness and enhancing the chocolate notes. They also make a fantastic addition to a dessert platter, sitting proudly alongside brownies, cookies, or fruit tarts, offering a unique texture and flavor profile that stands out.
Storing & Reheating Your Delicious Treats
To maintain their freshness and structural integrity, your S’mores Peanut Butter Cups are best stored in an airtight container in the refrigerator for up to 5-7 days. This keeps the chocolate firm and the peanut butter filling perfectly set. If you prefer a slightly softer texture, you can let them sit at room temperature for 10-15 minutes before serving. For longer storage, these treats freeze beautifully! Place them in a single layer on a baking sheet until frozen solid, then transfer them to a freezer-safe airtight container or bag. They will keep well for up to 2-3 months. To prevent freezer burn, ensure they are tightly sealed. Thaw them in the refrigerator overnight or at room temperature for about 30 minutes before enjoying.
S’mores Peanut Butter Cups FAQ
Can I make these dairy-free or gluten-free?
How long do these last?
Why is my chocolate seizing?
Can I use different types of nuts?
S’mores Peanut Butter Cups
- Total Time: 35 minutes
- Yield: 12 cups
Description
Indulge in the ultimate mashup of two classic treats with these easy-to-make S’mores Peanut Butter Cups. Featuring a crunchy graham cracker base, creamy peanut butter filling, rich chocolate, and a toasted marshmallow topping, they’re an irresistible no-bake delight.
Ingredients
- 1 ½ cups graham cracker crumbs
- ¼ cup unsalted butter, melted
- 2 tbsp granulated sugar (optional, for crust)
- 1 ½ cups creamy peanut butter (not natural, no-stir)
- 1 cup powdered sugar
- 1 tsp vanilla extract (optional, for filling)
- 12 oz semi-sweet or dark chocolate chips (or melting chocolate)
- 1 cup mini marshmallows or ½ cup marshmallow fluff
- Pinch of flaky sea salt (optional, for topping)
Instructions
- Line a 12-cup standard muffin tin with paper or foil liners.
- In a small bowl, combine graham cracker crumbs, melted butter, and granulated sugar. Press about 1 tablespoon firmly into the bottom of each lined muffin cup. Freeze for 10 minutes.
- In a medium bowl, mix creamy peanut butter, powdered sugar, and vanilla extract (if using) until smooth and well combined. Roll into 12 equal-sized balls, then flatten into discs.
- Melt chocolate according to package directions. Spoon 1-2 teaspoons of melted chocolate over each graham cracker crust.
- Place a flattened peanut butter disc on top of the chocolate layer.
- Spoon another 1-2 teaspoons of melted chocolate over the peanut butter, spreading gently to cover. Freeze for 15-20 minutes until chocolate is set.
- Top each cup with mini marshmallows or marshmallow fluff. Broil for 30-60 seconds until golden brown and toasted, or use a kitchen torch. Alternatively, leave untoasted.
- Sprinkle with flaky sea salt if desired. Chill until firm, then serve.
- Prep Time: 30 mins
- Cook Time: 5 mins