
Strawberry Cream Cheese Icebox Cake: Easy, No-Bake Recipe
Table of Contents
- Introduction: The Perfect No-Bake Dessert
- Why This Strawberry Cream Cheese Icebox Cake Recipe is a Must-Try
- Essential Ingredients for Your Icebox Cake
- Step-by-Step Instructions: How to Make Strawberry Cream Cheese Icebox Cake
- Expert Tips for the Best Icebox Cake
- Serving Suggestions & Storage
- F.A.Q
Get ready to create a show-stopping dessert with our incredible Strawberry Cream Cheese Icebox Cake: Easy, No-Bake Recipe! This delightful treat is the perfect way to cool down on a warm day, combining layers of fresh strawberries, a rich cream cheese filling, and crisp graham crackers into a harmonious, no-bake masterpiece.
It’s simple to make, requires no oven, and always impresses. Whether you’re a seasoned baker or a kitchen novice, you’ll love how effortlessly this dessert comes together.
Introduction: The Perfect No-Bake Dessert
There’s something magical about a no-bake dessert, especially when the weather heats up. They’re quick, easy, and don’t require you to turn on your oven, keeping your kitchen cool.
An icebox cake, in particular, is a nostalgic classic that consistently delivers on flavor and simplicity. This version elevates the traditional with a brighter, more complex profile.
Why This Strawberry Cream Cheese Icebox Cake Recipe is a Must-Try
This recipe for Strawberry Cream Cheese Icebox Cake stands out for several reasons. First, it’s incredibly forgiving – even if you’re new to dessert making, you’ll find success here.
Second, the combination of tangy cream cheese, sweet strawberries, and crunchy graham crackers creates an unforgettable texture and taste. It’s truly a crowd-pleaser for any occasion, from family dinners to summer potlucks.
Essential Ingredients for Your Icebox Cake
Gathering your ingredients is the first step to creating this delectable dessert. Freshness is key, especially for the star of the show – the strawberries!
Fresh Strawberry Layer Components
- 2 lbs fresh strawberries, hulled and sliced
- 1/4 cup granulated sugar
- 1 tbsp lemon juice
Creamy Filling Essentials
- 16 oz cream cheese, softened
- 1 cup powdered sugar
- 1 tsp vanilla extract
- 1/2 tsp salt
- 2 cups heavy cream, cold
Assembly & Garnish Items
- 1 box (14.4 oz) graham crackers
- Additional fresh strawberries, sliced, for garnish
- Fresh mint leaves, for garnish (optional)
Step-by-Step Instructions: How to Make Strawberry Cream Cheese Icebox Cake
Ready to assemble your dessert masterpiece? Follow these easy steps to bring your Strawberry Cream Cheese Icebox Cake to life!
Prepare the Strawberry Mixture
- In a medium bowl, combine the sliced strawberries, granulated sugar, and lemon juice.
- Gently toss to coat the strawberries. Let them sit for about 15-20 minutes, allowing them to release their juices. This creates a beautiful, natural syrup.
- Drain any excess liquid, reserving about 2 tablespoons for later, if desired, to drizzle over the finished cake.
Whip Up the Cream Cheese Filling
- In a large bowl, using an electric mixer, beat the softened cream cheese until smooth and creamy, about 2-3 minutes.
- Add the powdered sugar, vanilla extract, and salt. Beat until well combined and light.
- In a separate, chilled bowl, whip the cold heavy cream until stiff peaks form.
- Gently fold the whipped cream into the cream cheese mixture until just combined. Be careful not to overmix, as this can deflate the cream.
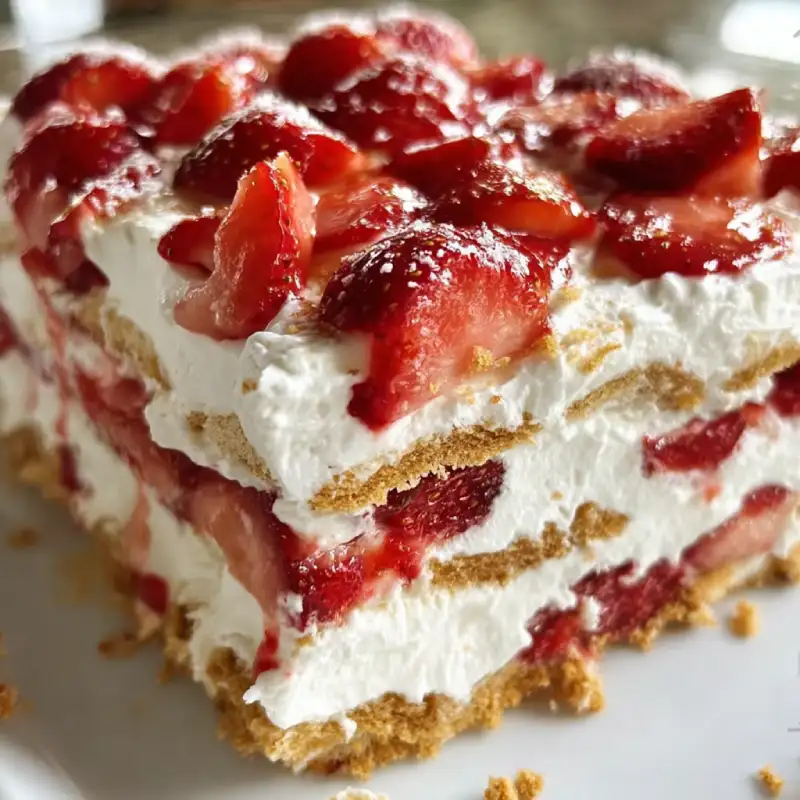
Layering Your Icebox Cake for Success
- Line a 9×13 inch baking dish with parchment paper, leaving an overhang on the sides for easy lifting.
- Spread a thin layer of the cream cheese filling on the bottom of the dish. This helps prevent the graham crackers from sliding.
- Arrange a single layer of graham crackers over the filling, breaking them as needed to fit.
- Spread about one-third of the cream cheese filling evenly over the crackers.
- Top with about one-third of the prepared strawberry mixture.
- Repeat the layers: graham crackers, filling, strawberries, ending with a final layer of cream cheese filling.
- For extra indulgence, you can find more amazing dessert ideas at Read our in-depth guide here.
Chill Until Perfection
- Cover the dish tightly with plastic wrap.
- Refrigerate for at least 6-8 hours, or preferably overnight. This allows the graham crackers to soften and absorb the flavors, creating a cake-like consistency.
- Before serving, lift the cake from the dish using the parchment paper handles.
- Garnish with extra fresh strawberry slices and mint leaves, if desired.
Expert Tips for the Best Icebox Cake
For an extra boost of flavor, consider dipping your graham crackers quickly in milk or a light strawberry syrup before layering.
Don’t rush the chilling process! The longer the cake chills, the better the texture and flavor development. This is crucial for any no-bake dessert.
Want to elevate the presentation? Use a square pan for a more defined slice. You can also vary the berries, adding blueberries or raspberries for a mixed berry icebox cake.
Serving Suggestions & Storage
This Strawberry Cream Cheese Icebox Cake is perfect served chilled, straight from the refrigerator. It makes a fantastic centerpiece for any summer gathering or a simple, refreshing dessert for a weeknight meal.
Store any leftovers in an airtight container in the refrigerator for up to 3-4 days. The cake typically tastes even better on the second day as the flavors meld further. For more dessert inspiration, check out Allrecipes’ dessert collection.
F.A.Q
Can I use frozen strawberries?
While fresh strawberries are highly recommended for the best texture and flavor, you can use frozen strawberries. Thaw them completely and drain thoroughly to remove excess liquid before combining with sugar and lemon juice.
How far in advance can I make this icebox cake?
You can prepare this Strawberry Cream Cheese Icebox Cake up to 2 days in advance. In fact, many find it tastes even better after chilling for 1-2 days as the flavors fully meld and the graham crackers soften perfectly.
What if my cream cheese filling isn’t stiff enough?
Ensure your cream cheese is softened but not warm, and your heavy cream is very cold. If the filling seems too soft after folding in the whipped cream, try chilling it for 15-20 minutes before layering. Over-mixing can sometimes lead to a thinner consistency as well.