
Bake Love This Valentine’s: Your Heart Red Velvet Cake Guide
Imagine biting into a slice of pure affection: a cake so tender, so moist, with that signature subtle tang and hint of chocolate, all wrapped in a dazzling crimson hue. This Valentine’s Day, skip the generic store-bought sweets and create something truly memorable. Our Valentine’s Heart Red Velvet Cake isn’t just a dessert; it’s a declaration of love baked from scratch, a showstopper that will ignite smiles and warm hearts.
Surprise Your Sweetheart with Homemade Perfection
There’s an undeniable magic in homemade treats, especially when they’re crafted with love. This recipe guides you to a red velvet cake that’s not only visually stunning in a heart shape but also boasts an unparalleled taste and texture. It’s the kind of cake that makes memories, transforming a simple dessert into a cherished moment.
Why This Recipe is Your Valentine’s Day Win
This isn’t just another red velvet recipe; it’s *the* recipe you’ll come back to year after year. We’ve perfected the balance of classic flavor, moist crumb, and vibrant color, ensuring your Valentine’s Heart Red Velvet Cake is a triumph. Plus, we’ll walk you through transforming humble round cakes into an adorable heart, making you look like a baking superstar with minimal fuss. Your sweetheart will be utterly smitten!
Why This Red Velvet Cake Recipe Delivers Every Time
Our Valentine’s Heart Red Velvet Cake recipe stands out because it meticulously balances tradition with foolproof techniques, delivering a consistently stunning and delicious result. We’ve cracked the code to that perfect red velvet experience.
- Achieving That Perfect Moist Crumb: The Buttermilk’s Role: Buttermilk is the secret weapon here. Its acidity tenderizes the cake, resulting in an incredibly soft, fine, and moist crumb that practically melts in your mouth.
- The Signature Mild Chocolate Flavor: Cocoa Powder and Food Coloring: We use unsweetened cocoa powder not for intense chocolate, but for that distinctive subtle chocolatey undertone that truly defines red velvet. The red food coloring isn’t just for show; it reacts beautifully with the cocoa to create the classic vibrant hue.
- Velvety Texture: Balancing Acids and Leavening: The scientific magic lies in the dance between buttermilk, baking soda, and vinegar. This combination provides just the right lift and reacts to create that signature velvety smooth texture that red velvet is famous for.
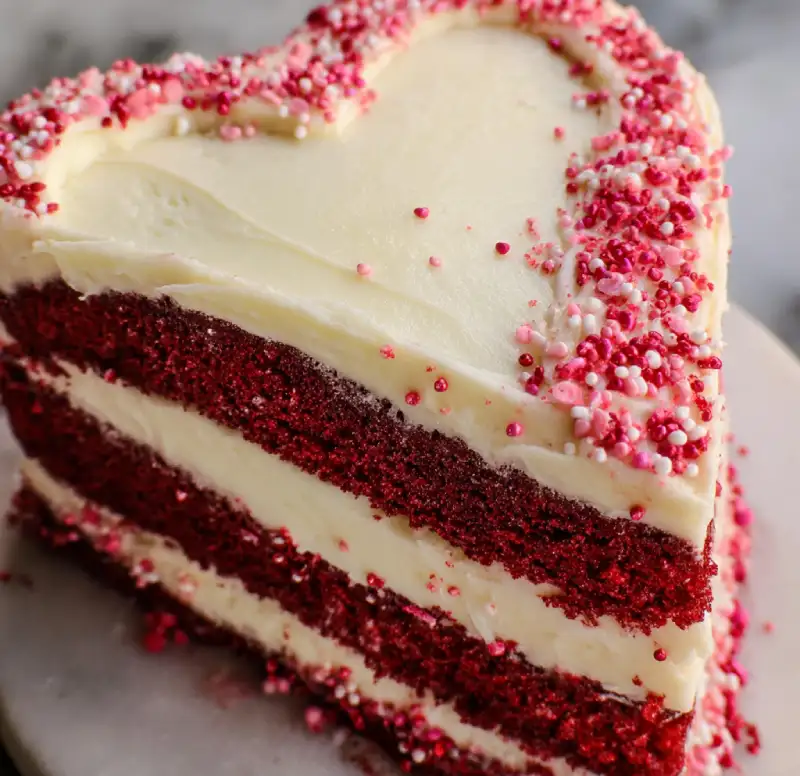
- Show-Stopping Appearance: Deep Red and Heart Shape: Beyond the taste, this cake is a feast for the eyes. The deep, rich red color paired with our easy heart-shaping technique ensures your cake is not just delicious, but also an unforgettable centerpiece for your Valentine’s celebration.
Essential Ingredients & Smart Substitutions for Your Red Velvet Cake
Here is what you need and why:
Flour Power: All-Purpose vs. Cake Flour: For this recipe, we’re using all-purpose flour because it provides a good balance of structure and tenderness. If you happen to have cake flour on hand and prefer an even more delicate, tender crumb, you can absolutely substitute it. Just ensure you measure correctly!
The Role of Buttermilk: Why Acidity Matters, Substitutions Explained: Buttermilk is non-negotiable for authentic red velvet. Its lactic acid reacts with baking soda, promoting both leavening and that characteristic moist, tender crumb. No buttermilk? No problem! You can make your own by adding 1 tablespoon of white vinegar or lemon juice to a measuring cup, then filling the rest with whole milk until it reaches 1 cup. Let it sit for 5-10 minutes until it slightly curdles.
Unsweetened Cocoa Powder: Flavor Depth, Not Just Color: Opt for high-quality unsweetened cocoa powder. This isn’t about making a chocolate cake; it’s about providing a subtle, earthy depth that complements the red dye and buttermilk, contributing to the cake’s unique flavor profile.
Red Food Coloring: Gel vs. Liquid for Vibrant Hue: For the most vibrant red, gel food coloring is your best friend. It’s much more concentrated than liquid food coloring, meaning you’ll need less to achieve that deep, stunning crimson without affecting the batter’s consistency. If using liquid, you may need a significant amount more.
Baking Soda & Vinegar: The Velvety Reaction: This dynamic duo is crucial. The baking soda provides the lift, and when combined with the vinegar (and the buttermilk’s acidity), it creates that beautiful, tender, and slightly open crumb that defines a truly velvety cake. Don’t skip the vinegar!
Cream Cheese Frosting Essentials: Softened Butter & Cream Cheese: For the iconic cream cheese frosting, make sure both your unsalted butter and full-fat cream cheese are at proper room temperature. This ensures a silky-smooth, lump-free frosting that’s a dream to spread.
Your Step-by-Step Guide to a Stunning Heart Red Velvet Cake
Follow these step-by-step instructions to create your beautiful Valentine’s Heart Red Velvet Cake:
1. Prep for Success: Pans, Oven, and Ingredients Ready
Before you even think about mixing, preheat your oven to 350°F (175°C). Grease and flour two 8-inch round cake pans or line them with parchment paper. This ensures your cakes release perfectly. Gather all your ingredients and bring butter, eggs, and buttermilk to room temperature – this is key for a smooth, emulsified batter.
2. Mixing the Wet & Dry: Keys to a Uniform Batter
In a medium bowl, whisk together the dry ingredients: flour, cocoa powder, baking soda, and salt. Set aside. In a large bowl, cream together the softened unsalted butter and granulated sugar until light and fluffy. Beat in the eggs one at a time, ensuring each is fully incorporated before adding the next. Stir in vanilla extract. In a separate small bowl, whisk together buttermilk and red food coloring until uniform.
3. Coloring It Right: Adding the Red Food Coloring Effectively
With the wet ingredients well combined and the buttermilk suitably red, begin adding the dry ingredients to the wet ingredients alternately with the buttermilk mixture, starting and ending with the dry ingredients. Mix on low speed until just combined. In a small bowl, combine the white vinegar and the remaining baking soda. It will fizz! Gently fold this immediately into the cake batter. This creates the ‘velvet’ texture and helps activate the red color.
4. Baking to Perfection: How to Know When It’s Done
Divide the batter evenly between your prepared cake pans. Bake for 25-30 minutes, or until a wooden skewer inserted into the center comes out clean. Don’t overbake, or your cake will be dry! Once done, remove from the oven and let cool in the pans for 10-15 minutes before inverting onto a wire rack to cool completely.
5. Cooling & Leveling: Preparing Your Layers for Assembly
Ensure your cake layers are completely cool before attempting to level or frost them. A warm cake will melt your frosting! Use a serrated knife or a cake leveler to carefully trim the domed tops off each cake layer, creating flat surfaces for easy stacking and shaping. This also helps achieve that professional look.
6. Shaping the Heart: Simple Cutting and Arranging
Once cooled and leveled, take one round cake layer and cut it in half. Arrange these two half-circles against the sides of the second whole round cake layer, forming a heart shape. Use a little frosting to ‘glue’ the pieces together on your serving platter or cake board. This is the simple magic trick for your heart shape without a special pan!
7. Crafting the Cream Cheese Frosting: Smooth and Spreadable
In a large bowl, beat softened unsalted butter and softened full-fat cream cheese together until smooth and creamy. Gradually add sifted powdered sugar, beating until fully incorporated. Add vanilla extract and beat until light, fluffy, and incredibly smooth. If it’s too thick, add a tiny bit of milk or cream; if too thin, a little more powdered sugar.
8. Assembling Your Heart Cake: Layering, Frosting, and Finishing Touches
Spread a generous layer of cream cheese frosting over the first assembled heart layer. If you wish, you can add a sprinkle of cake crumbs for texture. Top with the second heart layer. Apply a thin “crumb coat” of frosting all over the cake to trap any loose crumbs. Chill for 15-20 minutes. Then, apply the final, smooth layer of frosting. Decorate as desired with sprinkles, fresh berries, or chocolate shavings. For more baking inspiration, check out mycakesrecipes.com!
Expert Tips for Red Velvet Cake Success
- Don’t Overmix: The Enemy of Tender Cake: Once you add the dry ingredients to the wet, mix only until just combined. Overmixing develops gluten, leading to a tough, dense cake.
- Chill Your Cake: Easier Heart Shaping and Frosting: Chilling your leveled cake layers, especially after the crumb coat, makes them much easier to handle, cut into a heart, and frost smoothly without tearing or crumbling.
- Room Temp Ingredients: Key for Emulsification: Ensure butter, eggs, and cream cheese are at room temperature. This allows them to combine uniformly, creating a smooth batter and lump-free frosting.
- Achieving Vivid Color: Don’t Skimp on Quality Food Coloring: Invest in a good quality gel food coloring for the best red. Cheap liquid dyes can result in a brownish-red or require so much liquid that they alter the batter’s consistency. King Arthur Baking has some great tips on achieving vibrant colors.
- Crumb Coating: Your Secret to a Professional Finish: This thin layer of frosting applied before the final coat is crucial for trapping loose crumbs, ensuring your finished cake looks clean and professional.
What to Serve With Your Valentine’s Heart Red Velvet Cake
Your magnificent Valentine’s Heart Red Velvet Cake deserves the perfect accompaniment to complete the romantic experience. Think simple elegance!
Complementary Beverages: Coffee, Wine, or Milk
- Coffee: A freshly brewed cup of coffee or a delicious espresso-based drink like a latte or cappuccino pairs beautifully with the rich, tangy frosting and subtle chocolate notes of red velvet.
- Dessert Wine: For an adult pairing, a slightly sweet dessert wine, such as a Moscato d’Asti or a light sparkling rosé, can complement the cake without overpowering it.
- Milk: Sometimes, the simplest choice is the best. A cold glass of milk cuts through the richness and is a classic, comforting pairing for cake.
Simple Garnishes: Berries or Chocolate Shavings
While the cake is stunning on its own, a few simple garnishes can elevate it further:
- Fresh Berries: A scattering of fresh raspberries or sliced strawberries adds a bright, tart counterpoint and a beautiful pop of color against the red and white.
- Chocolate Shavings: A dusting of finely grated dark chocolate or delicate chocolate curls adds an extra layer of decadence and texture.
Storing and Reheating Your Red Velvet Masterpiece
Congratulations on your beautiful Valentine’s Heart Red Velvet Cake! Here’s how to keep it fresh and delicious.
Room Temperature vs. Refrigeration: The Frosting Factor
Due to the cream cheese frosting, this cake is best stored in the refrigerator. Wrap any leftover cake slices or the whole cake tightly in plastic wrap to prevent it from drying out or absorbing refrigerator odors. It will stay fresh for up to 3-4 days. While you can technically leave it at room temperature for a couple of hours for serving, prolonged exposure is not recommended due to the dairy in the frosting.
Freezing for Later: Cake and Frosting Separately
Yes, you can absolutely freeze red velvet cake! For best results, freeze cake layers before frosting. Wrap individual unfrosted layers tightly in plastic wrap, then an additional layer of aluminum foil. They can be frozen for up to 2-3 months. Thaw overnight in the refrigerator before frosting and serving. You can also freeze slices of frosted cake, wrapped similarly, for up to a month, though the frosting texture might be slightly altered upon thawing.
Frequently Asked Questions
Table of Contents
- Bake Love This Valentine’s: Your Heart Red Velvet Cake Guide
- Why This Red Velvet Cake Recipe Delivers Every Time
- Essential Ingredients & Smart Substitutions for Your Red Velvet Cake
- Your Step-by-Step Guide to a Stunning Heart Red Velvet Cake
- Expert Tips for Red Velvet Cake Success
- What to Serve With Your Valentine’s Heart Red Velvet Cake
- Storing and Reheating Your Red Velvet Masterpiece
- Valentine’s Heart Red Velvet Cake FAQ
Can I use natural food coloring?
Why is my red velvet cake dense?
How far in advance can I bake the cake layers?
What if I don’t have a heart-shaped pan?
How do I prevent the frosting from being too sweet?
Valentine’s Heart Red Velvet Cake
- Total Time: 1 hour 15 minutes
- Yield: 12 servings
Description
Bake a stunning and delicious Heart Red Velvet Cake this Valentine’s Day. This recipe delivers a perfectly moist, velvety cake with a tangy cream cheese frosting that will surely impress your sweetheart.
Ingredients
- 2½ cups (300g) all-purpose flour, sifted
- 1 teaspoon baking soda
- 1 teaspoon salt
- 2 tablespoons unsweetened cocoa powder
- 1 cup (226g) unsalted butter, softened
- 2 cups (400g) granulated sugar
- 4 large eggs, room temperature
- 1 teaspoon vanilla extract
- 1 cup (240ml) buttermilk, room temperature
- 2 tablespoons (or more, for desired color) red gel food coloring
- 1 teaspoon white vinegar
- For the Cream Cheese Frosting:
- 16 oz (450g) full-fat cream cheese, softened
- ½ cup (113g) unsalted butter, softened
- 4–5 cups (480-600g) powdered sugar, sifted (adjust to taste)
- 1 teaspoon vanilla extract
- Pinch of salt
Instructions
- Step 1: Prep Oven & Pans. Preheat oven to 350°F (175°C). Grease and flour two 8-inch round cake pans or line with parchment.
- Step 2: Combine Dry Ingredients. In a medium bowl, whisk together sifted flour, baking soda, salt, and cocoa powder. Set aside.
- Step 3: Cream Wet Ingredients. In a large bowl, cream softened butter and granulated sugar until light and fluffy. Beat in eggs one at a time, then vanilla extract.
- Step 4: Mix Batter. In a small bowl, combine buttermilk and red food coloring. Gradually add dry ingredients to wet ingredients alternately with the buttermilk mixture, mixing on low speed until just combined.
- Step 5: Add Vinegar & Baking Soda. In a separate small bowl, combine white vinegar and remaining baking soda. Gently fold immediately into the cake batter.
- Step 6: Bake. Divide batter evenly into prepared pans. Bake 25-30 minutes, or until a wooden skewer comes out clean. Cool in pans for 10-15 minutes, then invert onto a wire rack to cool completely.
- Step 7: Level Cakes. Once completely cool, use a serrated knife to level the tops of both cake layers.
- Step 8: Shape Heart. Cut one round cake in half. Arrange these two half-circles against the sides of the second whole round cake to form a heart shape on your serving platter.
- Step 9: Make Frosting. In a large bowl, beat softened cream cheese and butter until smooth. Gradually add sifted powdered sugar and vanilla, beating until light and fluffy.
- Step 10: Assemble & Frost. Spread a generous layer of frosting over the bottom heart layer. Place the top heart layer, then apply a thin crumb coat. Chill 15-20 minutes. Apply final, smooth layer of frosting and decorate as desired.
- Prep Time: 45 mins
- Cook Time: 30 mins