


Table of Contents
- Introduction: Your Go-To for Fresh, Flavorful Meals
- How This Recipe Works: Layers of Flavor and Texture
- Ingredients and Smart Substitutions
- How to Make Chicken Tzatziki Bowls
- Expert Tips for Success
- What to Serve With Your Chicken Tzatziki Bowls
- Storing and Reheating Your Bowls
- Frequently Asked Questions
Introduction: Your Go-To for Fresh, Flavorful Meals
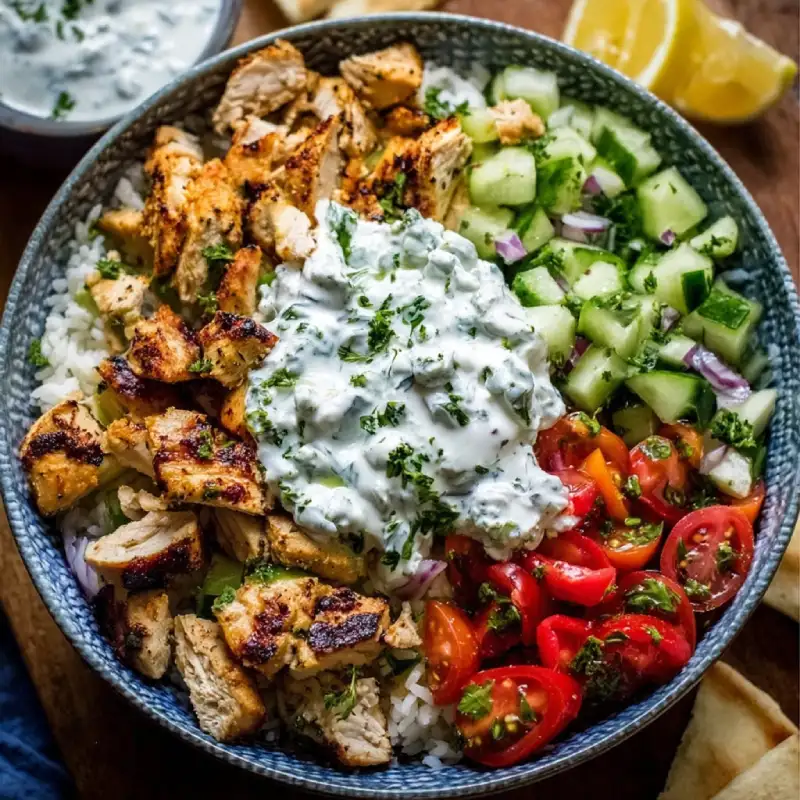
Hey there, food lovers! If you’re anything like me, you’re always on the hunt for those magical recipes that deliver big on flavor without demanding hours in the kitchen. And let me tell you, these Chicken Tzatziki Bowls are exactly that kind of magic! Imagine succulent, perfectly seasoned chicken, nestled alongside a vibrant medley of fresh veggies, all brought together by a creamy, tangy, and utterly refreshing homemade tzatziki sauce. It’s a symphony of textures and tastes that will transport your palate straight to the Greek Isles, even on your busiest weeknights. This isn’t just a meal; it’s an experience – light enough to feel healthy, yet so satisfying you’ll be craving it again tomorrow. For more delicious and easy-to-follow recipes, you can always See more good recipes here !
I absolutely adore these bowls because they hit all the right notes: they’re quick enough for a weeknight, impressive enough for guests, and endlessly customizable to whatever fresh produce you have on hand. The burst of cool cucumber and zesty lemon against the warm, juicy chicken is simply divine. What truly makes this recipe stand out is its incredible balance. Each component, from the marinated chicken to the crisp vegetables and the star of the show – that creamy tzatziki – plays a crucial role, yet each is simple to prepare. My journey to this perfect bowl involved quite a bit of experimentation, balancing spices for the chicken, perfecting the tzatziki’s tang, and discovering the ideal texture for every bite. The result? A foolproof recipe you’ll want to keep in your rotation.
How This Recipe Works: Layers of Flavor and Texture
The beauty of these Chicken Tzatziki Bowls lies in their thoughtful construction, creating a harmonious blend of flavors and textures in every mouthful.
- The Creamy, Tangy Tzatziki Base: This isn’t just a sauce; it’s the soul of the bowl. Made with thick Greek yogurt, fresh cucumber, garlic, lemon, and dill, its bright, cooling tang perfectly cuts through the richness of the chicken. It’s what makes every bite utterly refreshing.
- Perfectly Seasoned, Juicy Chicken: We’re not just cooking chicken here; we’re infusing it with Mediterranean aromatics like oregano, garlic, and lemon. Marinating ensures each piece is tender, flavorful, and incredibly juicy, whether you grill it, pan-sear it, or bake it.
- Fresh, Crisp Vegetables for Contrast: Think vibrant cherry tomatoes, crisp red onion, cooling cucumber, and peppery bell peppers. These elements add crucial texture, pops of color, and vitamins, preventing the bowl from feeling heavy and keeping it light and invigorating.
- Balanced Meal in One Bowl: This recipe is designed to be a complete meal. It provides protein from the chicken, healthy fats from the yogurt and olive oil, and complex carbohydrates (if you add rice or quinoa) and fiber from the vegetables. It’s nourishing, satisfying, and incredibly delicious – all in one easy-to-manage bowl.
Ingredients and Smart Substitutions
Here is what you need to create these irresistible Chicken Tzatziki Bowls, and why each ingredient plays a vital role:
For the Chicken Marinade:
- Boneless, Skinless Chicken Breasts or Thighs: Thighs offer more flavor and tend to stay juicier, but breasts are excellent for a leaner option. You’ll need about 1.5 lbs.
- Olive Oil: The base of our marinade, helping to tenderize the chicken and carry the flavors.
- Lemon Juice: Adds brightness and acidity, which helps tenderize the chicken and activates the flavors of the herbs.
- Dried Oregano: Essential for that classic Mediterranean aroma and taste. Don’t skip it!
- Garlic (minced): Provides a pungent, warming depth.
- Salt and Black Pepper: Basic seasonings, crucial for enhancing all other flavors.
- Paprika (optional): Adds a touch of warm color and a subtle smoky sweetness. It’s not traditionally Greek but complements the flavors beautifully.
For the Tzatziki Sauce:
- Full-Fat Greek Yogurt: This is key! Its thickness and tang are foundational to authentic tzatziki. Avoid low-fat or regular yogurt as it will be too thin. Chobani or Fage are excellent choices.
- Cucumber (English or Persian): Grated and thoroughly squeezed to remove excess water. This step is critical; soggy cucumber makes for watery tzatziki. English cucumbers have fewer seeds and thinner skins, making them ideal.
- Garlic (minced): A fresh clove adds a beautiful, sharp kick. Adjust to your preference.
- Fresh Dill (chopped): The quintessential herb for tzatziki, offering a fresh, slightly anise-like note. If absolutely necessary, you can use a tiny pinch of dried dill, but fresh is vastly superior.
- Lemon Juice: Brightens the sauce and balances the richness of the yogurt.
- Olive Oil: Adds a touch of smoothness and richness.
- Salt and Black Pepper: To taste, enhancing the overall flavor.
Base and Toppings:
- Cooked Grain (Rice, Quinoa, or Farro): Provides a hearty and absorbent base. Jasmine or basmati rice works wonderfully, or for a gluten-free option, quinoa is excellent. For a lower-carb option, swap with a bed of crisp salad greens like romaine or spinach.
- Cherry Tomatoes (halved): Offer bursts of sweet and acidic juiciness.
- Cucumber (diced): Adds a fresh, crisp crunch.
- Red Onion (thinly sliced or finely diced): Provides a pungent, sharp bite that contrasts beautifully with the other ingredients.
- Feta Cheese (crumbled): A salty, tangy addition that truly elevates the authentic Greek flavor.
- Fresh Parsley or Mint (chopped): For garnish and an extra layer of freshness.
- Pita Bread (warmed): Optional, for scooping up all that deliciousness!
Ingredient Quality Matters: Whenever possible, opt for fresh, high-quality ingredients. Organic Greek yogurt often has a superior flavor and texture. Fresh herbs make a significant difference in the tzatziki. Don’t skimp on a good olive oil – its flavor truly comes through. Sourcing ripe, colorful vegetables will ensure your bowls are as visually appealing as they are delicious.
How to Make Chicken Tzatziki Bowls
Follow these step-by-step instructions to create your perfect Chicken Tzatziki Bowls:
1. Prepare the Tzatziki: Mixing and Chilling for Flavor
First, tackle the cucumber for your tzatziki: grate it (a box grater works perfectly) and place it in a clean kitchen towel or several layers of paper towels. Squeeze out as much liquid as humanly possible – this is crucial to prevent watery tzatziki! In a medium bowl, combine the thoroughly squeezed cucumber with the Greek yogurt, minced garlic, fresh dill, lemon juice, olive oil, salt, and pepper. Stir everything together until well combined. Taste and adjust seasonings as needed. Cover the bowl and refrigerate for at least 30 minutes to allow the flavors to meld and develop. The longer it chills, the better it tastes!
2. Marinate the Chicken: Maximizing Flavor Absorption
Cut your chicken breasts or thighs into 1-inch pieces. In a separate bowl or a resealable bag, combine the chicken with olive oil, lemon juice, dried oregano, minced garlic, salt, pepper, and paprika (if using). Toss until the chicken is evenly coated. Cover or seal the bag and refrigerate for at least 20-30 minutes, or up to 4 hours, for best flavor absorption. If you’re short on time, even 15 minutes makes a difference, but don’t skip this step entirely!
3. Cook the Chicken: Achieving Perfect Tenderness
Heat a large skillet or grill pan over medium-high heat. If desired, add a tablespoon of olive oil. Once hot, add the marinated chicken pieces in a single layer, making sure not to overcrowd the pan (cook in batches if necessary). Cook for 4-6 minutes per side, or until the chicken is golden brown, cooked through, and reaches an internal temperature of 165°F (74°C). The chicken should be juicy and slightly caramelized. Remove from heat and let it rest for a few minutes before assembling.
4. Assemble Your Bowls: Layering for Aesthetics and Taste
Now for the fun part – building your beautiful bowls! Start with a base of cooked rice, quinoa, or fresh greens. Arrange the cooked chicken pieces over the base. Artfully add your fresh toppings: cherry tomatoes, diced cucumber, thinly sliced red onion, and crumbled feta cheese. Finish by generously spooning the chilled tzatziki sauce over the chicken and vegetables. Garnish with fresh parsley or mint, and a drizzle of good quality olive oil if you wish. Serve immediately and enjoy the fresh, vibrant flavors!
Expert Tips for Success
- Don’t Skip the Chilling: For both the tzatziki and the marinated chicken, chilling time is crucial. It allows flavors to deepen and meld, resulting in a much more delicious end product. Aim for at least 30 minutes for both!
- Achieving Grill Marks on Chicken (Pan-frying option): If using a grill pan, ensure it’s screaming hot before adding the chicken, and don’t move it for the first few minutes. This creates those beautiful sear marks. For regular pan-frying, a hot pan and not overcrowding are key to developing a nice crust.
- Customizing Heat Levels: While not traditionally spicy, you can add a pinch of red pepper flakes to the chicken marinade for a subtle kick, or a tiny dash to the tzatziki if you like a little extra zing!
- Batch Cooking for Meal Prep: These bowls are fantastic for meal prep! Cook a larger batch of chicken and grain, and prepare the tzatziki. Store components separately in airtight containers in the fridge. Assemble fresh bowls as needed throughout the week for quick and healthy lunches or dinners.
- External Link Tip: For perfectly cooked chicken every time, I trust resources like Food Network’s guide on grilling chicken to ensure proper doneness and juiciness.
What to Serve With Your Chicken Tzatziki Bowls
While these Chicken Tzatziki Bowls are a complete meal on their own, a few additions can elevate the experience and make them even more satisfying:
- Pita Bread or Naan: Warm pita bread, especially toasted lightly, is perfect for scooping up any extra tzatziki or juices from the bowl. Soft naan also works beautifully.
- Extra Grilled Vegetables: Alongside your chicken, consider grilling some zucchini, bell peppers, or eggplant. A simple drizzle of olive oil, salt, and pepper is all they need.
- A Simple Side Salad: If you’re not using greens as your base, a crisp green salad with a light vinaigrette would be a refreshing accompaniment.
- Hummus: A dollop of creamy hummus makes a wonderful side dip for your pita or extra veggie sticks.
Storing and Reheating Your Bowls
One of the best things about these Chicken Tzatziki Bowls is how well they store, making them ideal for meal prep! However, a little care in storage goes a long way:
- Individual Component Storage for Freshness: To maintain the best texture and flavor, store the cooked chicken, tzatziki sauce, cooked grain, and fresh vegetable toppings in separate airtight containers in the refrigerator. This prevents the vegetables from getting soggy and the tzatziki from losing its tang. They’ll keep well for 3-4 days.
- Best Reheating Methods for Chicken: Reheat the chicken gently. The best way is in a skillet over medium-low heat with a tablespoon of water or broth, covered, until just warmed through. This prevents it from drying out. You can also microwave it briefly, but be careful not to overcook.
- Tzatziki Shelf Life: The tzatziki sauce is best consumed within 3-4 days when stored in an airtight container in the fridge. The fresh cucumber can start to release more water over time, so ensure you give it a good stir before serving if it’s been sitting for a day or two.
Frequently Asked Questions
Can I use a different protein?
Absolutely! This recipe is incredibly versatile. You could easily substitute the chicken with grilled shrimp, pan-seared halloumi cheese (a fantastic vegetarian option!), or even marinated chickpeas for a plant-based bowl. Adjust cooking times accordingly. How far in advance can I make the tzatziki?
You can prepare the tzatziki up to 2-3 days in advance. In fact, making it ahead allows the flavors to truly meld and deepen, making it even more delicious. Just remember to squeeze out that cucumber thoroughly! Give it a good stir before serving. Is this recipe gluten-free/dairy-free?
The core recipe for the chicken and tzatziki is naturally gluten-free (ensure your yogurt is GF if strict). To make the bowl entirely gluten-free, use a gluten-free grain like quinoa or a bed of fresh greens as your base. For a dairy-free version, you would need to use a high-quality dairy-free Greek yogurt alternative for the tzatziki and omit the feta cheese. There are some excellent coconut or almond-based yogurts that could work, though the flavor profile will be slightly different. Best way to cook chicken without a grill?
If you don’t have a grill, a well-heated cast iron skillet or a heavy-bottomed pan works wonderfully. Heat a tablespoon of olive oil over medium-high heat until shimmering. Cook the chicken in batches to avoid overcrowding, ensuring a nice sear and even cooking. You can also bake the chicken: spread marinated pieces on a baking sheet and bake at 400°F (200°C) for 15-20 minutes, or until cooked through.