
Ready to Recreate Childhood Joy? Here’s Your Cotton Candy Cake Guide
Imagine a cake that tastes like pure happiness, a whimsical confection that transports you straight back to the magic of a carnival. That, my friends, is the promise of this incredible Cotton Candy Cake. With its vibrant, swirling colors and a flavor that’s unmistakably sweet and airy, this cake isn’t just a dessert; it’s an experience. Every bite is a delightful whisper of spun sugar, encased in a tender, moist crumb that practically melts in your mouth. Get ready to bake something truly extraordinary that will bring smiles to faces of all ages!
My journey to perfecting this fun and flavorful cake began with a simple desire: to capture the ephemeral joy of cotton candy in a more substantial, celebratory form. I experimented with various extracts, different coloring techniques, and countless frosting iterations. There were some overly sweet disasters and some cakes that lacked that true cotton candy essence. But through trial and error, I’ve finally landed on a recipe that I am absolutely thrilled to share with you – one that delivers on both flavor and visual spectacle, making it a true showstopper for any occasion.
Why This Cotton Candy Cake Recipe Delivers Every Time
- Achieving a perfect, light, and fluffy texture: We’re using a specific combination of cake flour and leavening agents, along with the reverse creaming method for the cake layers, which results in an incredibly tender and fine crumb that’s never dense.
- Balancing the sweet cotton candy flavor without being cloying: The secret lies in using a high-quality cotton candy extract judiciously, paired with the subtle tang of buttermilk in the cake and a perfectly balanced buttercream that lets the flavor shine without overwhelming your palate.
- Ensuring vibrant, fun colors naturally: We’ll be using gel food colorings to create distinct, eye-catching layers that truly evoke the look of cotton candy, without needing excessive amounts of dye.
- It’s surprisingly straightforward for a showstopper: While it looks impressive, I’ve broken down each step to be manageable for even intermediate bakers. You’ll be amazed at what you can create!
Your Essential Ingredients & Why They Matter
The Role of Real Cotton Candy Extract (and where to find it): This is the star of the show! A good quality cotton candy extract is crucial for achieving that authentic, nostalgic flavor. I highly recommend LorAnn Oils or Amoretti brands. You can often find them at specialty baking stores, online retailers like Amazon, or even some larger craft stores.
Why cake flour is non-negotiable for true softness (and a quick DIY substitute): Cake flour has a lower protein content than all-purpose flour, which results in a much softer, more tender crumb. It’s essential for that delicate, airy texture we’re aiming for. If you can’t find it, you can make a quick DIY substitute: for every cup of cake flour, measure out 1 cup of all-purpose flour, remove 2 tablespoons, and then add 2 tablespoons of cornstarch. Sift it together thoroughly.
Full-Fat Buttermilk: The secret to moisture and tang: Buttermilk reacts with the baking soda to create a tender crumb and adds a subtle tang that balances the sweetness of the cake. Its acidity also helps break down gluten, contributing to a softer texture. If you don’t have buttermilk, you can make a substitute by adding 1 tablespoon of white vinegar or lemon juice to a liquid measuring cup, then filling the rest with whole milk to the 1-cup line. Let it sit for 5-10 minutes until it slightly curdles.
Gel Food Coloring vs. Liquid: Controlling your cake’s vibrancy: Gel food colorings are highly concentrated, meaning you need only a tiny amount to achieve vibrant colors without adding excess liquid to your batter. Liquid food colorings can dilute your batter and won’t give you the intense hues we want for this cake.
Unsalted Butter: For precise flavor control: Using unsalted butter allows you to control the exact amount of salt in your recipe. Make sure it’s at room temperature for proper creaming.
Granulated Sugar: Its interaction with other ingredients: Sugar not only sweetens but also contributes to moisture, tenderness, and browning. In this recipe, it’s creamed with butter to create air pockets, which are vital for a light cake.
Eggs (Room Temperature): The impact on emulsification and rise: Room temperature eggs emulsify better with the butter and sugar, creating a smoother batter and a more stable structure. They also incorporate more air, leading to a better rise.
Baking Powder & Baking Soda: Their specific leavening actions: Baking powder is a double-acting leavener, meaning it creates gas bubbles when mixed with liquid and again when heated. Baking soda reacts with the acidic buttermilk to produce carbon dioxide, contributing to the cake’s lift and tenderness.
Vanilla Extract: Enhancing other flavors: A good quality vanilla extract (pure, not imitation) enhances and rounds out all the other flavors in the cake and buttercream.
Powdered Sugar: For creating a smooth, stable buttercream: Also known as confectioners’ sugar, its fine texture dissolves easily, creating a silky-smooth buttercream. It also contains a small amount of cornstarch, which helps stabilize the frosting.
Heavy Cream: The key to fluffy, pipeable frosting: Heavy cream (with at least 36% milk fat) whips up beautifully, adding richness and an incredibly light, airy texture to our buttercream, making it perfect for piping and spreading.
Step-by-Step: Baking Your Magical Cotton Candy Cake
1. Prep Your Pans & Dry Ingredients
Preheat your oven to 350°F (175°C). Grease and flour three 6-inch round cake pans (or two 8-inch pans). Line the bottoms with parchment paper. In a medium bowl, whisk together the cake flour, baking powder, baking soda, and salt. Sift this mixture at least once to ensure there are no lumps and all ingredients are evenly distributed. This is crucial for a uniform crumb.
2. Cream Butter & Sugar
In a large mixing bowl, using an electric mixer on medium speed, cream together the softened unsalted butter and granulated sugar until light and fluffy, about 3-5 minutes. Scrape down the sides of the bowl occasionally. This step incorporates air, which is vital for a tender cake.
3. Add Eggs & Flavor
Add the room temperature eggs one at a time, beating well after each addition until fully incorporated. Don’t rush this step! Beat in the vanilla extract and cotton candy extract until just combined. The mixture should look smooth and slightly pale.
4. Alternate Dry & Wet
With the mixer on low speed, gradually add the dry ingredients to the wet ingredients in three additions, alternating with two additions of buttermilk, beginning and ending with the dry ingredients. Mix until just combined after each addition. Be careful not to overmix! Overmixing develops gluten, leading to a tough cake.
5. Color & Bake
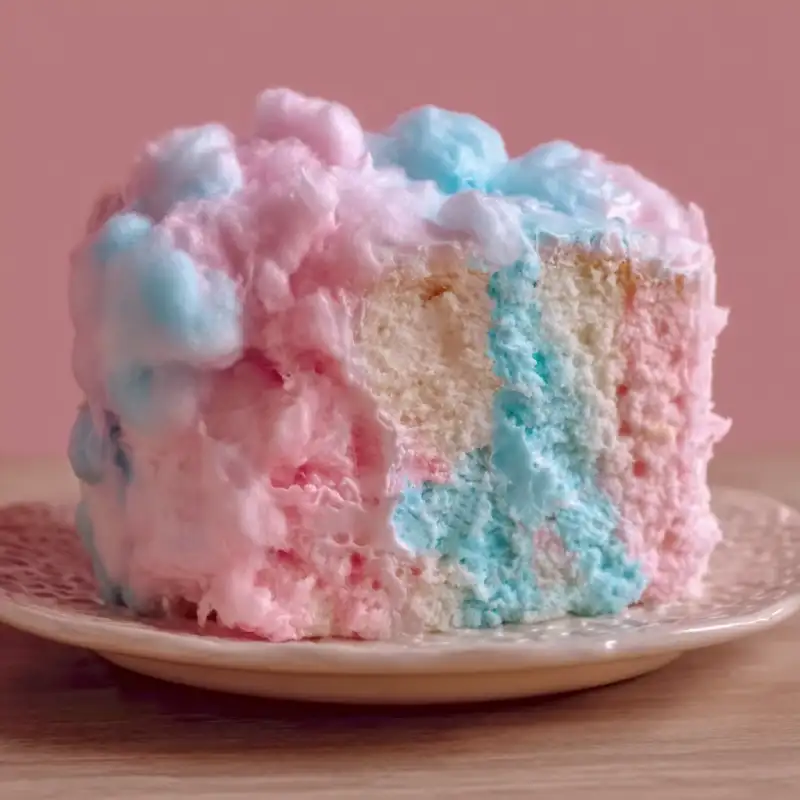
Divide the batter evenly into three separate bowls. Tint each bowl with a different gel food coloring (e.g., pink, blue, purple) until you achieve your desired vibrant shades. Gently fold the color in. Pour each colored batter into a prepared cake pan. Bake for 25-30 minutes, or until a wooden skewer inserted into the center comes out clean. Let the cakes cool in the pans for 10 minutes before inverting them onto a wire rack to cool completely.
6. Make the Cotton Candy Buttercream
While the cakes cool, prepare the buttercream. In a large bowl, beat the softened unsalted butter on medium speed until creamy. Gradually add the powdered sugar, one cup at a time, beating until smooth after each addition. Add the cotton candy extract and vanilla extract. With the mixer on low, slowly pour in the heavy cream until the frosting reaches a light, fluffy, and spreadable consistency. If desired, you can divide the buttercream and tint small portions with gel food coloring for decorative piping.
7. Assemble & Decorate
Once the cake layers are completely cool, level them if necessary. Place one layer on your serving plate or cake stand. Spread a generous layer of buttercream over the top. Repeat with the remaining cake layers. Apply a thin crumb coat to the entire cake and chill for 15-20 minutes to set. Then, apply the final layer of buttercream. Decorate as desired, perhaps with swirls of different colored frosting or by pressing real cotton candy onto the sides just before serving. For more inspiration, see more easy recipes!
Expert Tips for a Flawless Cotton Candy Cake
- Don’t Overmix: The enemy of a tender crumb. Once you add the flour, mix only until just combined. Overmixing develops gluten, which leads to a tough, chewy cake.
- Measure Accurately: Especially when it comes to flour. Use a kitchen scale for the most accurate measurement of flour. If using measuring cups, spoon the flour into the cup and level it off with a straight edge; don’t scoop directly from the bag.
- Room Temperature Ingredients: Why and how it matters. Ensure your butter, eggs, and buttermilk are at room temperature. This allows them to emulsify properly, creating a smooth, uniform batter that traps air effectively, leading to a lighter cake.
- Cool Cakes Completely: Essential for frosting success. Attempting to frost warm cakes will result in melted, sliding frosting and a messy cake. Patience is key here!
- The Crumb Coat: Your best friend for a neat finish. A thin layer of frosting applied to the cake and chilled before the final frosting layer traps any loose crumbs, ensuring a smooth, professional-looking finish.
- Using Real Cotton Candy for Garnish: When and how to apply it. Real cotton candy is delicate and melts quickly when exposed to air or moisture. Apply it as a garnish just before serving, ideally within an hour, for the best effect.
What to Serve With Your Cotton Candy Cake
This whimsical Cotton Candy Cake is a showstopper on its own, but a few simple pairings can elevate the experience. For beverages, consider a light, sparkling rosé or a crisp, dry prosecco for adults, which will cut through the sweetness beautifully. For a non-alcoholic option, a tall glass of cold milk or a simple sparkling water with a hint of lemon or lime would be perfect. Keep other desserts simple, or let this cake be the star of your dessert table. A scoop of vanilla bean ice cream on the side could also be a delightful addition, offering a creamy contrast to the cake’s airy texture.
Storing and Reheating Your Cotton Candy Cake
To keep your Cotton Candy Cake fresh for days, store it in an airtight cake dome or container at room temperature for up to 2-3 days. If your kitchen is particularly warm, or if it’s frosted with a cream cheese or whipped cream frosting (though this recipe uses buttercream), it’s best to refrigerate it. If refrigerated, allow it to come to room temperature for about 30-60 minutes before serving for the best flavor and texture.
For longer enjoyment, you can freeze individual slices or unfrosted cake layers. Wrap unfrosted layers tightly in plastic wrap, then in aluminum foil, and freeze for up to 2 months. Thaw them in the refrigerator overnight before frosting. Frosted slices can be frozen in an airtight container for up to 1 month; thaw in the refrigerator and then bring to room temperature before enjoying. Avoid common storage mistakes like leaving it uncovered, which will dry out the cake, or storing it next to strong-smelling foods in the fridge, as the cake can absorb odors.
Cotton Candy Cake FAQs
Can I use regular food coloring instead of gel?
Where can I find cotton candy extract?
Can I make this into cupcakes?
How far in advance can I bake the cake layers?
My cake turned out dry, what went wrong?
Whimsical Cotton Candy Cake
- Total Time: 1 hour 15 minutes
- Yield: 12 servings
Description
This delightful Cotton Candy Cake brings the magic of the carnival to your kitchen with its vibrant colors and unmistakable sweet, airy flavor. It’s a showstopping dessert that’s surprisingly easy to make and guaranteed to bring smiles.
Ingredients
- For the Cake:
- 2 ½ cups (280g) cake flour, sifted
- 1 ½ tsp baking powder
- ½ tsp baking soda
- ½ tsp salt
- 1 cup (226g) unsalted butter, softened
- 1 ¾ cups (350g) granulated sugar
- 4 large eggs, room temperature
- 1 tsp pure vanilla extract
- 1 ½ tsp cotton candy extract
- 1 cup (240ml) full-fat buttermilk, room temperature
- Gel food coloring (pink, blue, purple)
- For the Cotton Candy Buttercream:
- 1 cup (226g) unsalted butter, softened
- 4 cups (480g) powdered sugar, sifted
- 1 tsp pure vanilla extract
- 1 tsp cotton candy extract
- ¼ cup (60ml) heavy cream (or more, as needed)
Instructions
- 1. Prepare Pans & Dry Ingredients: Preheat oven to 350°F (175°C). Grease and flour three 6-inch round cake pans (or two 8-inch pans) and line bottoms with parchment paper. In a bowl, whisk and sift cake flour, baking powder, baking soda, and salt.
- 2. Cream Butter & Sugar: In a large bowl, cream softened butter and granulated sugar with an electric mixer on medium speed until light and fluffy (3-5 minutes).
- 3. Add Eggs & Flavor: Add eggs one at a time, beating well after each. Beat in vanilla and cotton candy extracts until just combined.
- 4. Alternate Dry & Wet: On low speed, gradually add dry ingredients in three additions, alternating with two additions of buttermilk, beginning and ending with dry. Mix until just combined; do not overmix.
- 5. Color & Bake: Divide batter into three bowls. Tint each with a different gel food coloring. Pour into prepared pans. Bake 25-30 minutes, or until a wooden skewer comes out clean. Cool in pans 10 minutes, then invert onto a wire rack to cool completely.
- 6. Make Buttercream: Beat softened butter until creamy. Gradually add sifted powdered sugar, beating until smooth. Add cotton candy and vanilla extracts. Slowly pour in heavy cream until fluffy and spreadable.
- 7. Assemble & Decorate: Level cooled cake layers. Place one layer on a serving plate, spread with buttercream. Repeat with remaining layers. Apply a thin crumb coat and chill 15-20 minutes. Apply final buttercream layer and decorate as desired.
- Prep Time: 45 mins
- Cook Time: 30 mins