
Table of Contents
- You Don’t Have to Skip Chili: My Go-To Diabetic-Friendly Recipe
- Why This Chili Hits the Spot (And Keeps You Healthy)
- Ingredients That Matter: Build Your Healthy Chili Base
- Your Step-by-Step Guide to the Best Diabetic Chili
- Expert Tips for a Chili Masterpiece
- Beyond the Bowl: What to Serve With Your Chili
- Storing and Reheating Your Delicious Leftovers
- Common Questions About Diabetic Chili
You Don’t Have to Skip Chili: My Go-To Diabetic-Friendly Recipe
There’s nothing quite like a hearty bowl of chili to warm you from the inside out, especially on a crisp evening. But for those managing diabetes, the thought of enjoying this classic comfort food often comes with a side of worry about hidden sugars and carb counts. Well, I’m here to tell you that you absolutely do not have to miss out! I’ve perfected an easy diabetic chili recipe that delivers all the rich, savory flavor and satisfying texture you crave, without compromising your health goals. This isn’t just a ‘good for you’ chili; it’s genuinely delicious, packed with robust spices, tender meat, and a medley of vegetables that will make you forget it’s even diabetic-friendly. Get ready to reclaim chili night!
Reclaiming Chili Night with Smart Swaps
The secret to a fantastic diabetic-friendly chili lies in making smart, intentional ingredient swaps. We’re talking about lean proteins, no-added-sugar tomatoes, and a generous helping of fiber-rich beans and vegetables. These choices not only keep your blood sugar in check but also enhance the overall flavor and nutritional profile of the dish. It’s about building a chili that’s both nourishing and incredibly tasty.
Why This Chili Hits the Spot (And Keeps You Healthy)
- Flavor-Packed Without Added Sugars: Many store-bought chilis and even some recipes sneak in added sugars. Our recipe relies on the natural sweetness of vegetables and a masterful blend of spices to create a deep, complex flavor profile that’s naturally delicious.
- High Fiber for Better Blood Sugar Control: With a generous amount of beans and vegetables, this chili is a fiber powerhouse. Fiber helps slow down sugar absorption, leading to more stable blood glucose levels and keeping you feeling fuller for longer.
- Satisfying Texture, Not Just Broth: We layer in various textures – from the tender ground meat to the hearty beans and slightly firm vegetables – ensuring every spoonful is a delightful experience, far from a watery, unsatisfying stew.
- One-Pot Wonder: This recipe is designed for minimal cleanup, making it perfect for busy weeknights. Everything comes together beautifully in one pot!
Ingredients That Matter: Build Your Healthy Chili Base
Here is what you need and why:
Lean Protein Choices & Why They Work: For this easy diabetic chili recipe, I recommend using lean ground beef (90/10 or leaner) or even ground turkey. Lean proteins provide essential amino acids without excessive saturated fat, which is important for heart health, especially for individuals managing diabetes. They also contribute to the chili’s hearty texture and keep you feeling satisfied.
No-Added-Sugar Tomatoes: Essential for Flavor and Control: This is a crucial swap! Look for canned diced tomatoes, crushed tomatoes, and tomato paste that explicitly state ‘no added sugar’ on the label. Many conventional tomato products contain hidden sugars that can impact blood glucose. These provide the rich, tangy base for our chili without any unwanted surprises.
Fiber-Rich Beans: The Secret to Fullness and Health: Kidney beans and black beans are superstars in this recipe. They are packed with soluble fiber, which helps regulate blood sugar, lower cholesterol, and promote digestive health. They also add bulk and a creamy texture, making the chili incredibly filling. Be sure to rinse canned beans thoroughly to reduce sodium content.
Spice Blends for Depth, Not Sodium: Our chili gets its incredible flavor from a robust blend of spices like chili powder, cumin, smoked paprika, oregano, and a pinch of cayenne pepper. These spices offer warmth, earthiness, and a subtle kick without relying on high-sodium seasonings. Feel free to adjust the spice levels to your preference.
Vegetable Boosters: Adding Volume and Nutrients: Onions, bell peppers (any color!), and garlic are non-negotiable. They add layers of flavor, essential vitamins, and extra fiber. Don’t be shy about adding other non-starchy vegetables like zucchini or corn (in moderation) for even more nutritional punch and visual appeal.
Your Step-by-Step Guide to the Best Diabetic Chili
Follow these step-by-step instructions to create a truly memorable and healthy chili:
1. Prepping Your Produce & Proteins
Start by finely dicing your onion and bell peppers. Mince the garlic. If using canned beans, drain and rinse them thoroughly under cold water. Have your lean ground beef or turkey ready. This prep work makes the cooking process smooth and efficient.
2. Sautéing for Flavor Foundation
In a large, heavy-bottomed pot or Dutch oven, heat a tablespoon of olive oil over medium-high heat. Add the ground beef (or turkey) and cook, breaking it up with a spoon, until it’s fully browned. Drain any excess fat. Add the diced onions and bell peppers to the pot and sauté until softened, about 5-7 minutes. Stir in the minced garlic and cook for another minute until fragrant.
3. Simmering to Perfection: The Key to Deep Taste
Stir in the chili powder, cumin, smoked paprika, oregano, and cayenne pepper. Cook for about 1 minute, stirring constantly, to toast the spices and release their aromas. Pour in the no-added-sugar crushed tomatoes, diced tomatoes (with their juice), and tomato paste. Add the rinsed kidney and black beans, and about 1 cup of low-sodium beef or vegetable broth. Bring the mixture to a gentle simmer, then reduce the heat to low, cover, and let it cook for at least 30 minutes, or up to 2 hours, stirring occasionally. The longer it simmers, the more the flavors will meld and deepen.
4. Adjusting Seasoning for Optimal Flavor
After simmering, taste the chili. This is your chance to adjust the seasonings. Add salt and freshly ground black pepper to taste. If you prefer a little more heat, add a dash more cayenne. If it seems too thick, add a splash more broth. The goal is a rich, balanced flavor that satisfies your palate.
Expert Tips for a Chili Masterpiece
- Don’t Skip the Browning: Maximize Umami: Browning your meat properly creates a rich, savory base (umami) that is essential for a deeply flavorful chili. Don’t overcrowd the pan, and let the meat develop a nice crust.
- Spice Level & Adjustments for Everyone: Start with the recommended amount of cayenne, then add more to individual bowls if some prefer extra heat. A dash of hot sauce at the table also works wonders.
- The Art of the Slow Simmer: While 30 minutes is good, an hour or two of slow simmering on low heat allows the flavors to truly marry and develop. This is where the magic happens for any great chili.
- Testing for Doneness and Flavor Balance: Always taste your chili before serving. Adjust salt, pepper, and other spices as needed. A squeeze of fresh lime juice at the end can brighten all the flavors.
- Consider a Secret Ingredient: A tablespoon of unsweetened cocoa powder or a splash of strong brewed coffee can add incredible depth and richness to your chili without altering the flavor profile significantly. Find more chili tips on Food Network!
Beyond the Bowl: What to Serve With Your Chili
Healthy Toppings for Extra Flavor and Texture
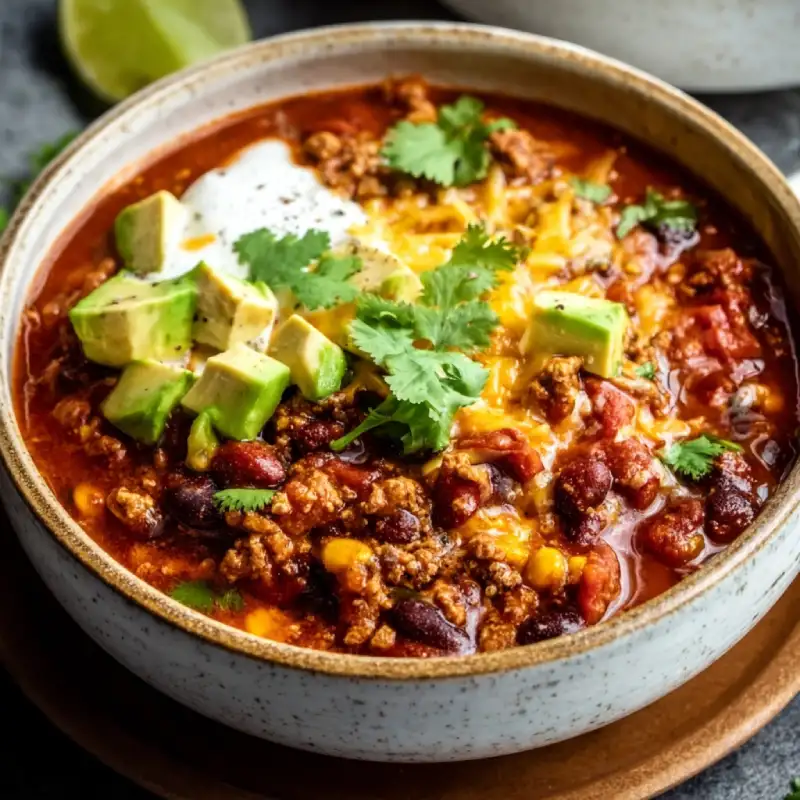
Toppings are key to elevating your chili experience! For a diabetic-friendly approach, consider:
- Plain Greek Yogurt or Light Sour Cream: A dollop adds a creamy, cooling contrast.
- Fresh Avocado: Diced or sliced, it provides healthy fats and a buttery texture.
- Chopped Fresh Cilantro or Green Onions: Adds a burst of freshness and color.
- Jalapeño Slices: For those who love an extra kick.
- A Sprinkle of Shredded Low-Fat Cheese: Use sparingly for a cheesy touch.
Diabetic-Friendly Sides to Complete the Meal
Pair your easy diabetic chili recipe with sides that complement its flavors and keep your meal balanced:
- Whole-Grain Cornbread (sugar-free recipe): Look for recipes that use alternative sweeteners or very little added sugar.
- A Simple Green Salad: A light vinaigrette dressing keeps it fresh and healthy.
- Steamed Brown Rice or Quinoa: In moderation, these whole grains can be a good accompaniment.
- Roasted Vegetables: Broccoli, cauliflower, or asparagus make excellent, fiber-rich sides.
Storing and Reheating Your Delicious Leftovers
Proper Storage for Food Safety
Chili is often even better the next day! Allow your chili to cool completely before transferring it to airtight containers. Store in the refrigerator for up to 3-4 days. For longer storage, chili freezes beautifully. Portion it into freezer-safe containers or heavy-duty freezer bags and freeze for up to 3 months. Label with the date!
Reheating Tips for Best Flavor and Texture
To reheat, thaw frozen chili in the refrigerator overnight. Gently reheat on the stovetop over medium-low heat, stirring occasionally, until heated through. You may need to add a splash of broth or water to achieve your desired consistency. You can also reheat individual portions in the microwave, stirring halfway through.
Common Questions About Diabetic Chili
Can I use ground turkey instead of beef?
How can I make this chili spicier?
Are canned beans okay to use?
What’s the best way to reduce sodium?
For more healthy and delicious recipes, see more easy recipes on our site!
Easy Diabetic Chili Recipe
- Total Time: 1 hour 15 minutes
- Yield: 8 servings
Description
Enjoy a hearty and flavorful chili that’s perfect for managing blood sugar. This recipe is packed with lean protein, fiber-rich beans, and vibrant vegetables, making it both delicious and healthy.
Ingredients
- 1 tbsp olive oil
- 1 lb lean ground beef (90/10 or leaner) or ground turkey
- 1 large onion, diced
- 1 large bell pepper (any color), diced
- 3 cloves garlic, minced
- 2 tbsp chili powder
- 1 tbsp ground cumin
- 1 tsp smoked paprika
- 1/2 tsp dried oregano
- 1/4 tsp cayenne pepper (or more, to taste)
- 1 (28 oz) can no-added-sugar crushed tomatoes
- 1 (14.5 oz) can no-added-sugar diced tomatoes, undrained
- 1 (6 oz) can no-added-sugar tomato paste
- 1 (15 oz) can kidney beans, drained and rinsed
- 1 (15 oz) can black beans, drained and rinsed
- 1 cup low-sodium beef or vegetable broth
- Salt and freshly ground black pepper, to taste
- Optional toppings: plain Greek yogurt, avocado, fresh cilantro, green onions
Instructions
- Step 1: Prep Ingredients. Dice onion and bell pepper, mince garlic. Drain and rinse canned beans.
- Step 2: Brown Meat and Sauté Vegetables. Heat olive oil in a large pot over medium-high heat. Add ground meat and cook until browned, breaking it up. Drain excess fat. Add diced onion and bell pepper, sauté until softened (5-7 mins). Stir in minced garlic and cook for 1 minute until fragrant.
- Step 3: Toast Spices. Stir in chili powder, cumin, smoked paprika, oregano, and cayenne pepper. Cook for 1 minute, stirring constantly, to toast spices.
- Step 4: Simmer Chili. Pour in crushed tomatoes, diced tomatoes (with juice), and tomato paste. Add rinsed kidney and black beans, and beef broth. Bring to a gentle simmer, then reduce heat to low, cover, and cook for at least 30 minutes (up to 2 hours), stirring occasionally.
- Step 5: Season and Serve. Taste and adjust seasoning with salt and pepper as needed. Serve hot with your favorite diabetic-friendly toppings.
- Prep Time: 15 mins
- Cook Time: 1 hour