
Spring’s Golden Harvest: Making Fresh Dandelion Jelly
Imagine a spread that captures the very essence of spring – bright, floral, and subtly sweet, with a delicate texture that melts in your mouth. That’s exactly what you get with homemade Fresh Dandelion Jelly! It’s a taste of sunshine in a jar, a truly unique and delightful treat that will transport you to a field of golden blooms with every bite. Forget store-bought jams; this jelly offers a nuanced flavor profile that’s both comforting and surprisingly sophisticated.
A Taste of Nostalgia: Why Dandelion Jelly?
For many, dandelions evoke childhood memories of blowing fluffy seeds or making wishes. But beyond their playful charm, these ubiquitous ‘weeds’ hold a culinary secret. Dandelion jelly isn’t just a novelty; it’s a delicious way to connect with nature and create something truly special from what’s often overlooked. It’s a nod to simpler times, a sustainable practice, and an incredibly rewarding kitchen project.
Seasonal Foraging: The Best Time for Dandelions
The magic of dandelion jelly begins with the harvest. The prime time for foraging dandelions is in early spring, typically from late March through May, before the weather gets too hot and the flowers start to go to seed. Look for bright, fully open blossoms on a sunny day, ideally mid-morning after the dew has dried. This is when their nectar content is highest, promising the most flavorful infusion for your jelly.
Why This Recipe Delivers Perfect Dandelion Jelly Every Time
- Floral, Not Bitter: Ensuring Optimal Flavor Extraction: Our method focuses on steeping only the yellow petals, carefully avoiding any green bits, which are the source of bitterness. This ensures a pure, sweet floral essence.
- Crystal Clear and Vibrant: Achieving Perfect Color and Clarity: We employ a meticulous straining process, using cheesecloth, to remove all impurities, resulting in a beautifully clear, golden jelly that sparkles in the light.
- The Jell-Setting Science: Consistent Texture Without Guesswork: By using a precise amount of pectin and understanding the ‘jelly point,’ we guarantee a perfectly set jelly every time – firm enough to hold its shape, yet tender and spreadable.
- Balancing Sweetness: Enhancing Natural Floral Notes: The sugar content is carefully calibrated to complement, not overpower, the delicate dandelion flavor, allowing its unique floral notes to truly shine.
Essential Ingredients & Smart Substitutions for Your Jelly
Here is what you need and why:
Dandelion Petals: The Star Ingredient (Why Petals Only?): This is where the magic happens! You’ll need about 4 cups of tightly packed yellow petals. It’s crucial to use only the yellow petals and remove all green parts (the sepals and base). The green bits contain a bitter sap that will ruin the delicate flavor of your jelly. Patience is key here!
The Role of Water: Extracting Deep Flavor: Water acts as the solvent, drawing out the subtle flavors and vibrant color from the dandelion petals during the steeping process. Use good quality filtered water for the best results.
Lemon Juice: Acidity for Set and Brightness (Why Fresh is Best): Freshly squeezed lemon juice is non-negotiable! It provides the necessary acidity for the pectin to set properly, ensuring your jelly isn’t runny. Beyond its functional role, it brightens the overall flavor, adding a lovely tang that balances the sweetness and enhances the floral notes.
Granulated Sugar: Sweetness and Preservative (Understanding Sugar’s Role): Sugar isn’t just for sweetness; it’s a vital component in jelly making. It acts as a preservative, extending the shelf life of your jelly, and also contributes to the texture and clarity. Don’t be tempted to drastically reduce it, as it can affect the set and preservation.
Pectin: The Gelling Agent Explained (Types and How They Work): Pectin is a natural fiber found in fruits that, when combined with sugar and acid, forms a gel. For dandelion jelly, I recommend using powdered fruit pectin (like Sure-Jell or Ball brand). There are different types (regular vs. low-sugar), so make sure to follow the instructions on your specific pectin package for best results. It’s what gives your jelly its characteristic firm, yet tender, texture.
Equipment Essentials: Beyond the Basics: You’ll need a large non-reactive pot (stainless steel is ideal), a fine-mesh sieve, cheesecloth, canning jars with new lids and bands, a canning funnel, a jar lifter, and a water bath canner. A candy thermometer can also be helpful for monitoring the jelly point.
Your Step-by-Step Guide to Fresh Dandelion Jelly
Follow these step-by-step instructions for a perfect batch:
1. Foraging and Preparing Dandelion Petals (Cleaning and Separating)
Head out on a sunny morning to a pesticide-free area. Pick about 6-8 cups of fully open dandelion heads. Bring them home and immediately begin separating the yellow petals from the green bases. This is the most time-consuming step, but crucial for flavor. You want approximately 4 cups of tightly packed yellow petals. Gently rinse the petals in a colander and let them air dry slightly.
2. Creating the Dandelion Infusion (The Crucial Steeping Process)
Place your 4 cups of dandelion petals into a large heatproof bowl or pot. Bring 4 cups of water to a rolling boil, then immediately pour the hot water over the petals. Stir gently to ensure all petals are submerged. Cover the bowl and let it steep for at least 4 hours, or ideally overnight (8-12 hours) in the refrigerator. This long steeping time allows the delicate floral flavors to fully infuse into the water.
3. Straining the Infusion (Achieving Clarity)
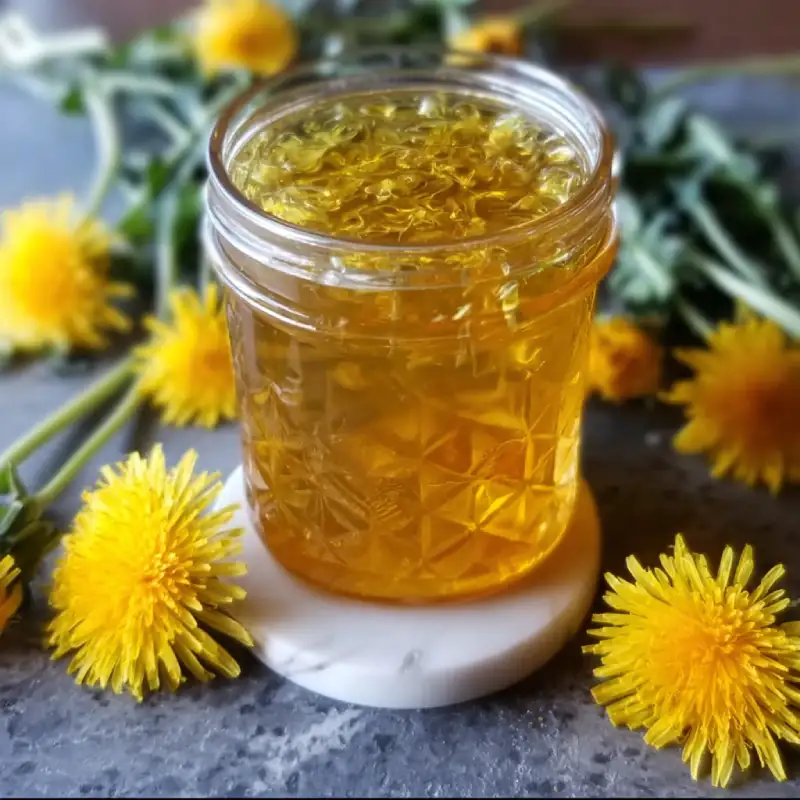
Line a fine-mesh sieve with several layers of cheesecloth and place it over a large bowl or pot. Pour the dandelion infusion through the cheesecloth-lined sieve. Gather the edges of the cheesecloth and gently squeeze out as much liquid as possible from the petals. You should have about 3-3.5 cups of beautiful golden dandelion ‘tea’. Discard the spent petals.
4. Combining Ingredients for the Jelly (Order Matters)
Measure your dandelion infusion. If you have less than 3 cups, add water to make up the difference. Pour the infusion into your large, non-reactive pot. Stir in the fresh lemon juice. In a separate small bowl, whisk together the granulated sugar and the powdered pectin. This prevents the pectin from clumping when added to the liquid.
5. Bringing to a Rolling Boil (Understanding the Jelly Point)
Bring the dandelion infusion and lemon juice to a full, rolling boil over high heat. Once boiling, immediately add the sugar-pectin mixture, stirring constantly. Continue to stir and bring the mixture back to a full, rolling boil that cannot be stirred down. Boil vigorously for exactly 1 minute. This rapid boil is essential for activating the pectin and achieving a proper set. For extra assurance, you can use a candy thermometer; the jelly point is typically around 220°F (104°C).
6. Skimming and Jarring (Achieving a Clean Finish)
Remove the pot from the heat. Skim off any foam that has risen to the surface using a spoon. This helps ensure a clear, beautiful jelly. Ladle the hot jelly into hot, sterilized canning jars, leaving 1/4 inch headspace. Wipe the rims clean with a damp cloth, center new lids on the jars, and screw on the bands until fingertip tight.
7. Water Bath Canning (Ensuring Shelf Stability)
Carefully place the filled jars into a boiling water canner, ensuring they are covered by at least 1 inch of water. Bring the water to a rolling boil and process for 10 minutes (adjusting for altitude if necessary). Turn off the heat, remove the canner lid, and let the jars sit in the hot water for 5 minutes. Carefully remove the jars with a jar lifter and place them on a towel-lined counter to cool undisturbed for 12-24 hours. Check for seals; lids should be concave and not flex when pressed. Any unsealed jars should be refrigerated and consumed within 3 weeks.
Expert Tips for Dandelion Jelly Success
- Picking Dandelions: When, Where, and How to Maximize Flavor: Always forage from areas free of pesticides and pollution (away from roadsides). Pick on a sunny day when flowers are fully open and dry. The more vibrant yellow, the better the flavor.
- The Petal Power: Why Removing Green Bits is Non-Negotiable: Seriously, take your time with this! Even a tiny bit of green can introduce bitterness. It’s tedious but worth it for a pure, sweet jelly.
- Preventing Crystallization: Sugar’s Secret: Ensure all sugar is fully dissolved before bringing the mixture to a boil. Undissolved sugar can lead to crystallization in the finished jelly.
- Pectin Perfection: Getting the Right Set: Always follow the instructions on your specific pectin package. Different brands and types can have slightly different requirements. Don’t eyeball it!
- Troubleshooting Common Jelly Issues (Too Runny? Too Stiff?): If your jelly is too runny, it likely didn’t reach the jelly point or didn’t have enough acid/pectin. If it’s too stiff, you might have over-boiled it or used too much pectin. Don’t despair; runny jelly still tastes great as a syrup!
Serving Suggestions: Beyond Toast
Classic Pairings: Spreading the Joy
Of course, Fresh Dandelion Jelly is divine on warm toast, flaky croissants, or fluffy pancakes. It’s also wonderful swirled into yogurt or oatmeal for a touch of spring sweetness. Try it on a scone with clotted cream for a truly elegant treat!
Savory Applications: An Unexpected Twist
Don’t limit this golden goodness to breakfast! Dandelion jelly makes an incredible glaze for roasted chicken or pork. Whisk a spoonful into a vinaigrette for a floral salad dressing, or serve it alongside a cheese board with sharp cheddar or creamy brie. The sweet-tart notes are surprisingly versatile.
Gift-Giving: Homemade Goodness
Homemade dandelion jelly makes a thoughtful and unique gift. Jar it up with a pretty label and ribbon, and you’ve got a present that truly comes from the heart – and your garden! It’s a delightful way to share the bounty of spring with friends and family. For more delightful homemade gifts, see more easy recipes.
Storing Your Homemade Dandelion Jelly
Shelf-Stable Storage: Proper Canning Techniques
Properly water-bath canned dandelion jelly, with a good seal, can be stored in a cool, dark place for up to 1 year. Always check for a proper seal before storing. If a jar doesn’t seal, refrigerate it.
Refrigerated Storage: For Opened Jars
Once a jar of Fresh Dandelion Jelly is opened, it should be stored in the refrigerator and consumed within 3-4 weeks for the best quality and flavor.
Identifying Spoilage: What to Look For
Always inspect your canned goods before consuming. Signs of spoilage include a bulging lid, mold growth, an off-odor, or bubbling. If you see any of these, discard the jelly immediately. When in doubt, throw it out!
Dandelion Jelly FAQs
Can I use dandelion leaves or stems?
How do I know if my jelly will set?
What if I don’t have pectin?
Can I reduce the sugar?
Is foraging dandelions safe?
Fresh Dandelion Jelly
- Total Time: 1 hour 30 minutes
- Yield: 5-6 half-pint jars
Description
Capture the essence of spring with this delightful homemade dandelion jelly. It’s a unique, floral spread that’s surprisingly easy to make and perfect for toast or as a gourmet gift.
Ingredients
- 4 cups tightly packed fresh dandelion petals (yellow parts only)
- 4 cups filtered water
- 1/4 cup fresh lemon juice
- 1 (1.75 oz) package powdered fruit pectin
- 4 cups granulated sugar
Instructions
- Step 1: Prepare Dandelion Petals: Carefully separate yellow dandelion petals from all green parts. Rinse gently and set aside.
- Step 2: Create Infusion: Place petals in a heatproof bowl. Bring 4 cups of water to a boil, then pour over petals. Cover and steep for 4-12 hours (overnight in the fridge is ideal).
- Step 3: Strain Infusion: Line a fine-mesh sieve with cheesecloth over a large pot. Pour infusion through, squeezing out all liquid from petals. You should have about 3-3.5 cups of dandelion ‘tea’.
- Step 4: Combine Ingredients: Add lemon juice to the dandelion infusion in the pot. In a separate bowl, whisk together sugar and pectin.
- Step 5: Boil Jelly: Bring infusion to a rolling boil over high heat. Stir in sugar-pectin mixture. Return to a full, rolling boil that cannot be stirred down, and boil vigorously for exactly 1 minute.
- Step 6: Skim and Jar: Remove from heat, skim off any foam. Ladle hot jelly into hot, sterilized half-pint jars, leaving 1/4 inch headspace. Wipe rims, center lids, and apply bands fingertip tight.
- Step 7: Water Bath Can: Process jars in a boiling water canner for 10 minutes (adjust for altitude). Remove and cool on a towel-lined counter for 12-24 hours. Check seals before storing.
- Prep Time: 1 hour (plus 4-12 hours steeping)
- Cook Time: 30 mins