
Frozen Yogurt Banana Pops: Your New Go-To Healthy Treat
Imagine a treat that’s simultaneously creamy, refreshing, sweet, and tangy, all while being incredibly good for you. That, my friends, is the magic of Frozen Yogurt Banana Pops! These delightful frozen confections are about to become your absolute favorite way to beat the heat, satisfy a sweet craving, and sneak in some wholesome goodness. They’re a game-changer because they transform simple, everyday ingredients into something truly extraordinary, offering a guilt-free indulgence that both kids and adults will adore. Forget those sugary, artificial ice cream bars; these Frozen Yogurt Banana Pops are the real deal, bursting with natural flavor and packed with protein.
My journey to the perfect Banana Pop began on a sweltering summer afternoon. I was craving something cold and sweet, but also wanted to avoid the usual sugar crash. I had a bunch of ripe bananas on the counter and a tub of Greek yogurt in the fridge, and a lightbulb went off! After a few delicious experiments, tweaking ratios and testing different toppings, I landed on this foolproof recipe. It’s a testament to how simple ingredients, thoughtfully combined, can create culinary bliss. Trust me, once you try these, you’ll wonder where they’ve been all your life!
Why This Recipe Works: The Secret to Perfect Frozen Treats
- Creamy texture every time: The secret lies in using ripe bananas and full-fat Greek yogurt, which freeze beautifully without becoming icy. The natural sugars in the banana also contribute to a smoother consistency.
- A balanced sweet and tangy flavor: The inherent sweetness of ripe bananas perfectly complements the delightful tang of Greek yogurt, creating a harmonious flavor profile that’s incredibly satisfying without being overly sweet.
- Effortless customization options: This recipe is a blank canvas! From various toppings to different yogurt flavors, you can easily tailor these pops to suit any preference or dietary need.
- Quick prep, minimal dishes: You’ll be amazed at how little time and effort it takes to whip up a batch of these. Most of the work is hands-off freezing, and cleanup is a breeze.
Ingredients and Smart Substitutions: Build Your Best Pop
Here is what you need and why:
Ripe bananas: These are the star of our Frozen Yogurt Banana Pops! Look for bananas with plenty of brown spots – this indicates they are at their peak sweetness and will provide the best flavor and creamiest texture when frozen. Under-ripe bananas will be less sweet and more starchy. You can even use slightly overripe bananas that you might otherwise discard; they’re perfect for this!
Greek yogurt: This is crucial for the tangy flavor and protein boost. I highly recommend using full-fat Greek yogurt for the creamiest results. The higher fat content prevents ice crystal formation, leading to a smoother, more luxurious pop. If you prefer, you can use low-fat Greek yogurt, but the texture might be slightly icier. For a dairy-free option, use a thick, plain dairy-free yogurt like coconut or almond-based Greek-style yogurt.
Honey/maple syrup: Just enough sweetness to enhance the natural flavors without overpowering them. Adjust to your taste! If your bananas are very ripe, you might need less. Maple syrup is a fantastic vegan alternative to honey and offers a lovely depth of flavor. Agave nectar also works well.
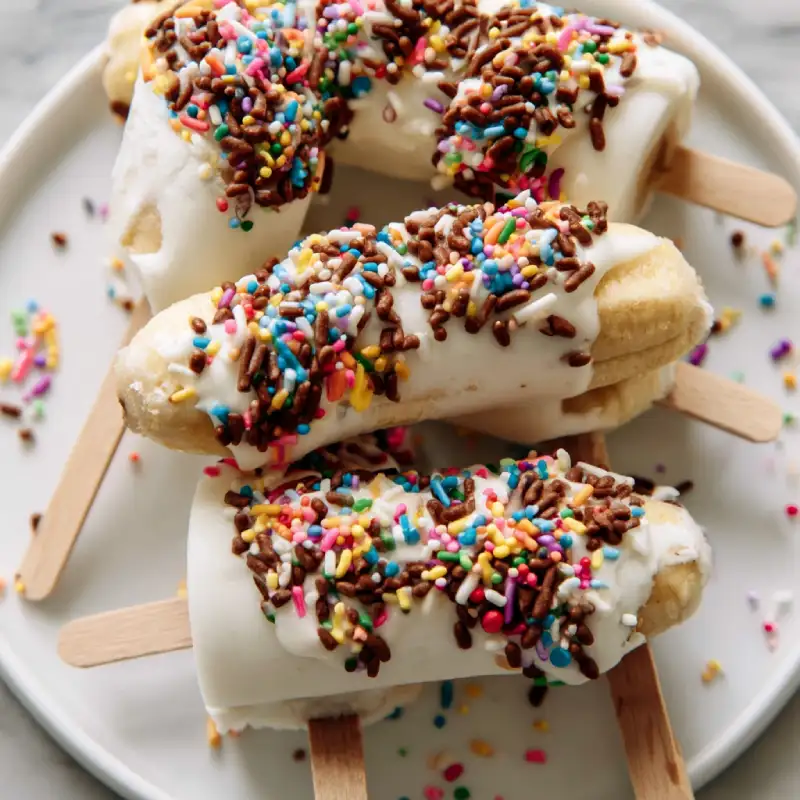
Your favorite toppings: This is where the fun begins! Think beyond just sprinkles. Chopped nuts (pecans, walnuts, almonds), shredded coconut, mini chocolate chips, granola, or even a drizzle of melted peanut butter can add incredible flavor and crunch. Get creative!
Popsicle sticks: The essential handle for your delicious frozen treats. You can find these at most craft stores or grocery stores in the baking aisle. If you don’t have popsicle sticks, you can use small skewers or even sturdy plastic spoons.
Step-by-Step Instructions: Crafting Your Banana Pops
Follow these simple steps to create your perfect Frozen Yogurt Banana Pops:
1. Prepping your bananas
Start by peeling your ripe bananas. Cut each banana in half crosswise, then insert a popsicle stick into the cut end of each banana half, pushing it about halfway through. This creates the perfect handle for your pops. Place the skewered banana halves on a parchment-lined baking sheet. This prevents them from sticking and makes cleanup easier.
2. Coating for a perfect finish
In a shallow bowl, whisk together the Greek yogurt and your chosen sweetener (honey or maple syrup) until well combined and smooth. The consistency should be thick enough to coat the bananas without dripping off too quickly. Dip each banana half into the yogurt mixture, turning to ensure it’s fully coated. You can use a spoon to help spread the yogurt evenly if needed. Let any excess drip off before moving to the next step.
3. Adding the fun toppings
Immediately after coating with yogurt, sprinkle your desired toppings over the yogurt-covered bananas. You can roll them in a bowl of toppings or simply sprinkle them by hand. Press the toppings gently to ensure they adhere well to the yogurt. Work quickly before the yogurt starts to set. Place the topped bananas back onto the parchment-lined baking sheet.
4. The freezing process explained
Once all your Frozen Yogurt Banana Pops are coated and topped, transfer the baking sheet to the freezer. Freeze for at least 2-3 hours, or until completely solid. For best results, ensure they are not touching each other during the initial freezing period to prevent them from sticking together. Once solid, you can transfer them to an airtight container or freezer bag for longer storage.
Expert Tips for Success: Avoid Common Pitfalls
- Choosing the right banana ripeness: As mentioned, very ripe bananas (with brown spots) are key. They are sweeter and have a softer texture that freezes beautifully, preventing an icy mouthfeel.
- Optimizing yogurt thickness: Greek yogurt is naturally thick, which is ideal. If your yogurt seems a bit thin, you can strain it through a cheesecloth-lined sieve for 30 minutes to an hour to remove excess whey, making it even thicker and ensuring a better coating.
- Topping adherence tricks: Apply toppings immediately after dipping the banana in yogurt, while the yogurt is still wet and sticky. If you’re using multiple toppings, consider setting up an assembly line to speed up the process.
- Freezing for best results: Freeze the pops on a flat surface (like a baking sheet) initially. Once they are firm, you can transfer them to a freezer-safe bag or container. This prevents them from sticking together and helps maintain their shape.
What to Serve With Your Frozen Yogurt Banana Pops
These versatile Frozen Yogurt Banana Pops are fantastic on their own as a refreshing and healthy snack. They’re also a wonderful addition to a dessert plate, offering a lighter, fruit-based option alongside richer treats. For kids’ parties, they are an absolute hit – fun, delicious, and a much healthier alternative to traditional sugary desserts. You can even set up a ‘build-your-own-pop’ station with various toppings for an interactive party activity! For more delicious and easy recipes, see more easy recipes.
Storing and Reheating: Keep Them Fresh
For proper storage and longevity, once your Frozen Yogurt Banana Pops are completely frozen, transfer them from the baking sheet to an airtight freezer-safe container or a heavy-duty freezer bag. This will protect them from freezer burn and prevent them from absorbing other freezer odors. They will stay fresh and delicious for up to 2-3 weeks. As for ‘reheating’ frozen treats, it’s not really about reheating, but rather allowing them to soften slightly at room temperature for a minute or two if they are too hard straight from the freezer. This will bring them to the perfect eating consistency.
Frequently Asked Questions
Can I use regular yogurt?
Are there dairy-free options?
How long do they last in the freezer?
What other toppings can I use?
Frozen Yogurt Banana Pops
- Total Time: 15 minutes
- Yield: 8-10 pops
Description
These delightful Frozen Yogurt Banana Pops are a healthy, refreshing, and customizable treat perfect for any occasion. Enjoy the creamy texture and balanced sweet-tangy flavor!
Ingredients
- 4–5 ripe bananas (with brown spots)
- 1 cup full-fat Greek yogurt (plain or vanilla)
- 1–2 tablespoons honey or maple syrup (adjust to taste)
- 1/2 cup assorted toppings (e.g., mini chocolate chips, chopped nuts, shredded coconut, granola)
- 8–10 popsicle sticks
Instructions
- 1. Prepare Bananas: Peel bananas and cut each in half crosswise. Insert a popsicle stick into the cut end of each banana half. Place on a parchment-lined baking sheet.
- 2. Mix Yogurt Coating: In a shallow bowl, whisk together Greek yogurt and honey/maple syrup until smooth.
- 3. Coat and Top: Dip each banana half into the yogurt mixture, ensuring it’s fully coated. Immediately sprinkle with your chosen toppings, pressing gently to adhere. Return to the parchment-lined baking sheet.
- 4. Freeze: Transfer the baking sheet to the freezer and freeze for at least 2-3 hours, or until the pops are completely solid.
- 5. Store: Once frozen, transfer the pops to an airtight freezer-safe container or bag for longer storage (up to 2-3 weeks).
- Prep Time: 15 mins
- Cook Time: 0 mins