


Table of Contents
- Make Your Own Blackberry Jam: Easier Than You Think
- Why This Blackberry Jam Recipe Is Your New Go-To
- Essential Ingredients & Smart Substitutions for the Best Jam
- Your Step-by-Step Guide to Perfect Blackberry Jam
- Expert Tips for Blackberry Jam Success Every Time
- Beyond Toast: Creative Ways to Enjoy Your Blackberry Jam
- Storing Your Homemade Blackberry Jam: Maximize Freshness
- Blackberry Jam Making: Your Questions Answered
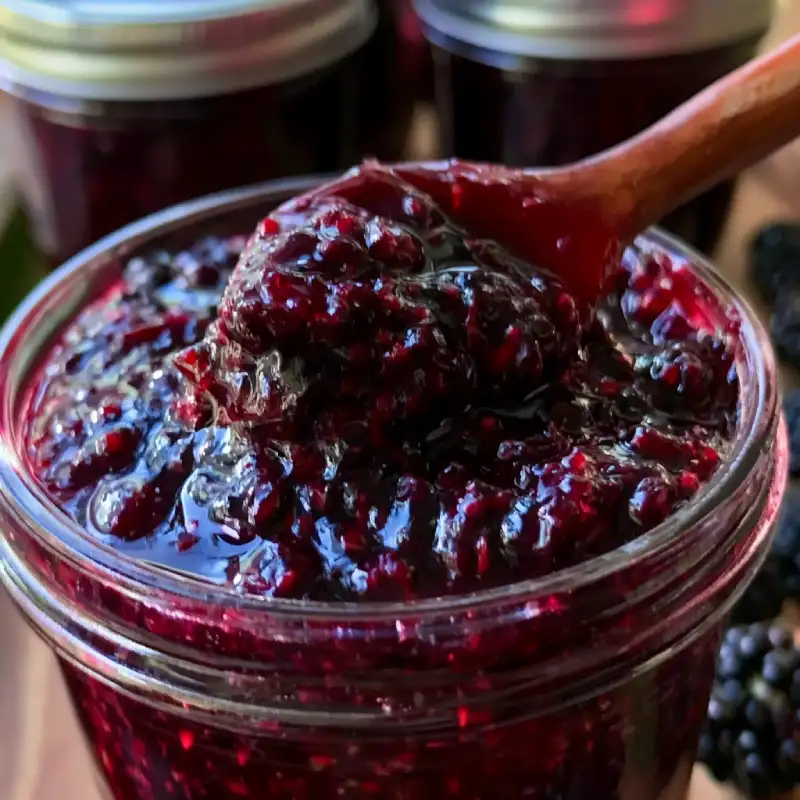
Imagine spreading a vibrant, jewel-toned jam onto your morning toast, its sweet-tart burst of flavor instantly transporting you to a sun-drenched berry patch. That’s the magic of homemade blackberry jam – a taste experience far superior to anything you’ll find in a store. The texture is silken, the fruit flavor intensely fresh, and the satisfaction of making it yourself? Absolutely priceless. Get ready to transform simple berries into a pantry staple that will brighten every meal!
Make Your Own Blackberry Jam: Easier Than You Think
There’s something incredibly rewarding about preserving the bounty of the season, and making homemade blackberry jam is one of the simplest and most delicious ways to do it. For me, it started with a childhood memory of picking wild blackberries with my grandmother, our fingers stained purple, the air thick with the scent of summer. We’d come home, and within hours, those thorny treasures would be bubbling on the stove, transforming into jars of pure joy. That tradition sparked a lifelong love for home canning, and I promise you, it’s far less intimidating than it sounds!
From Bush to Jar: My Favorite Jam Story
Every summer, I eagerly await blackberry season. Whether it’s a trip to a local farm or a lucky find on a country walk, gathering these dark, juicy berries is a ritual. There’s a particular patch near an old stone wall that consistently yields the most plump, sweet-tart blackberries. The anticipation of turning those fresh-picked gems into glistening jars of homemade blackberry jam is almost as good as the jam itself. It’s a connection to nature, to tradition, and to the simple pleasure of good food.
Why Homemade Jam Beats Store-Bought Every Time
Let’s be honest, store-bought jam often falls flat. It can be overly sweet, lacking in true fruit flavor, and sometimes even a bit gelatinous. When you make homemade blackberry jam, you control the quality of the ingredients, the level of sweetness, and the cooking time. This means a brighter, fresher, more intense blackberry flavor that truly shines. Plus, there are no artificial colors, flavors, or preservatives – just pure, unadulterated fruit goodness. Once you taste the difference, there’s no going back!
Why This Blackberry Jam Recipe Is Your New Go-To
- Perfect Pectin Balance for Ideal Set (No Runny Jams!): We’ve cracked the code for that perfect, spreadable consistency. No more watery jam or overly stiff jelly. This recipe guides you to a beautiful set every time.
- Bright, Unmuddled Blackberry Flavor – Like Picking It Fresh: Our method prioritizes preserving the vibrant, fresh taste of blackberries, ensuring your jam tastes like the fruit, not just sugar.
- Achievable Consistency for Both Beginners and Jam Pros: Whether you’re new to canning or a seasoned pro, the clear instructions and helpful tips will lead you to success.
- Scalable Recipe for Small Batches or Big Preserving Days: Easily adjust the quantities to make a small batch for immediate enjoyment or a large one to stock your pantry for months.
Essential Ingredients & Smart Substitutions for the Best Jam
Here is what you need and why:
Blackberries: Fresh vs. Frozen – When and Why Each Works: For the absolute best flavor, fresh, ripe blackberries are ideal. Look for plump, dark berries without mold. If fresh aren’t available or in season, frozen unsweetened blackberries work beautifully! Thaw them completely before using and drain any excess liquid, as this can affect the jam’s set.
Sugar: Granulated for Clarity, Less for Tartness: Granulated sugar is essential for both sweetness and its role in the gelling process with pectin. It also acts as a preservative. While you might be tempted to reduce sugar significantly, remember it’s crucial for the jam’s texture and shelf life. However, you can slightly adjust the amount to your taste – less sugar will result in a tarter jam, but ensure you’re still within safe canning guidelines if preserving.
Pectin: When to Use It (and How to Choose the Right Type): Blackberries are naturally low in pectin, so using added pectin is highly recommended for a reliable set. I prefer using a powdered fruit pectin designed for lower sugar recipes, as it allows the fruit flavor to shine without excessive sweetness. Always follow the specific instructions on your pectin package, as types can vary (e.g., regular vs. low-sugar pectin).
Lemon Juice: The Unsung Hero for Flavor and Set: Don’t skip the lemon juice! It’s not just for flavor; the acidity is vital for activating the pectin and ensuring a proper set. It also brightens the overall taste of the jam, preventing it from tasting flat. Always use fresh lemon juice for the best results.
Optional: A Touch of Butter for Foam Reduction: A small pat of butter added during cooking can help reduce foam on the surface of your jam. This isn’t strictly necessary for flavor or set, but it results in a clearer, more attractive finished product in the jar.
Your Step-by-Step Guide to Perfect Blackberry Jam (With Visual Cues)
Follow these step-by-step photos:
1. Prep Your Berries: Washing and Mashing for Flavor Release
Start by gently washing your fresh blackberries under cool running water. Remove any stems or leaves. If using frozen, thaw them completely. For a smoother jam, you can press the berries through a sieve to remove seeds, but I love the rustic texture of whole berries. Place the berries in a large, heavy-bottomed pot and mash them lightly with a potato masher. This helps release their juices and flavor. You want some crushed berries, but leaving some whole pieces adds wonderful texture.
2. Combine Ingredients: The Right Order Matters for Pectin Activation
In a separate bowl, whisk together your sugar and powdered pectin. This prevents the pectin from clumping when added to the fruit. Add the mashed blackberries, lemon juice, and the sugar-pectin mixture to your pot. Stir well to combine everything thoroughly. The pectin needs to be evenly distributed to activate properly.
3. The Boil: Hitting the Sweet Spot for Set and Flavor
Place the pot over high heat and bring the mixture to a full, rolling boil that cannot be stirred down. Stir constantly to prevent scorching. Once it reaches a full boil, add the optional butter (if using). Continue to boil vigorously, stirring, for about 1 minute. This rapid boil is crucial for activating the pectin and achieving the correct set. Don’t overcook, as this can degrade the pectin and result in a tough jam.
4. Testing for Doneness: The Wrinkle Test Explained
This is where the magic happens! Before you start cooking, place a few small plates in your freezer. To test for doneness, remove the jam from the heat and spoon a small amount onto one of the chilled plates. Let it sit for 1-2 minutes, then push it gently with your finger. If the surface wrinkles, your jam is ready! If it’s still runny, return it to the heat and boil for another minute, then retest with a fresh cold plate. This method is far more reliable than temperature readings alone.
5. Jarring Hot Jam: Sealing for Freshness and Shelf Life
Once your jam passes the wrinkle test, remove it from the heat. Ladle the hot jam into sterilized canning jars, leaving about 1/4 inch headspace. Wipe the rims clean with a damp cloth, center the lids, and screw on the bands until fingertip tight. Process the jars in a boiling water canner for 10 minutes (adjusting for altitude if necessary). Carefully remove the jars and let them cool undisturbed on a towel for 12-24 hours. You’ll hear the satisfying ‘pop’ as they seal! Learn more about safe canning practices here.
Expert Tips for Blackberry Jam Success Every Time
- Don’t Overcook: Preserve Fresh Flavor and Prevent Tough Texture: Overcooking can lead to a jam that’s too stiff, dark, and loses its vibrant fruit flavor. Stick to the recommended boiling times and rely on the wrinkle test.
- The Cold Plate Test: Your Best Friend for Jam Set: Seriously, this is the most reliable way to check for doneness. Don’t guess! Always have those plates chilling in the freezer.
- Sterilizing Jars: Essential for Safe Storage: Proper sterilization is non-negotiable for safe, shelf-stable jam. Wash jars and lids in hot soapy water, rinse well, and then either boil them for 10 minutes or run them through a hot dishwasher cycle.
- Troubleshooting: What to Do If Your Jam Doesn’t Set: If your jam doesn’t set after 24 hours, don’t despair! You can reprocess it. Reheat the jam, add a bit more pectin (mixed with a small amount of sugar), and re-boil, then re-jar and re-process. Alternatively, embrace it as a delicious blackberry syrup!
- Customizing Sweetness and Tartness: Adjusting to Your Taste: While the recipe provides a balanced ratio, feel free to slightly adjust the sugar or lemon juice to your preference. Just remember that significant reductions in sugar can impact the set and shelf life if you’re canning.
Beyond Toast: Creative Ways to Enjoy Your Blackberry Jam
Classic Pairings: Scones, Pancakes, and Yogurt
Of course, the classic way to enjoy your homemade blackberry jam is slathered generously on warm, buttery scones, fluffy pancakes, or crispy waffles. It’s also fantastic stirred into plain yogurt or oatmeal for a burst of fruity sweetness. A dollop on a slice of pound cake is pure heaven!
Savory Surprises: Glazes and Marinades
Don’t limit your jam to sweet applications! Blackberry jam makes an incredible glaze for roasted chicken or pork. Whisk it with a little balsamic vinegar, Dijon mustard, and a touch of garlic for a surprisingly delicious marinade or sauce. It adds a beautiful sheen and a complex sweet-tart note.
Dessert Enhancements: Fillings and Toppings
Elevate your desserts! Use your homemade blackberry jam as a filling for thumbprint cookies, a layer in a sponge cake, or swirled into cheesecake batter. Warm it slightly and drizzle over vanilla ice cream or panna cotta for an elegant finish. The possibilities are endless! See more easy recipes for dessert inspiration.
Storing Your Homemade Blackberry Jam: Maximize Freshness
Proper Sealing for Shelf Stability
For shelf-stable jam, proper water bath canning is key. Once processed and sealed, your jars of homemade blackberry jam can be stored in a cool, dark place for up to 1 year. Always check for a good seal (the lid should be concave and not flex when pressed) before storing.
Refrigeration After Opening: How Long Does It Last?
Once a jar of jam is opened, it must be refrigerated. It will typically last for 2-3 weeks in the refrigerator. Always use a clean spoon to scoop out jam to prevent contamination and extend its freshness.
Freezing Jam: An Alternative for Long-Term Storage
If you prefer not to water bath can, you can freeze your jam! Ladle the cooled jam into freezer-safe containers, leaving about 1/2 inch headspace to allow for expansion. It will keep beautifully in the freezer for up to 6 months. Thaw in the refrigerator before using.
Blackberry Jam Making: Your Questions Answered
Do I really need to use pectin?
Why did my jam not set?
Can I make this jam with other berries?
How do I know if my jars are properly sealed?
Is it okay to reduce the sugar in this recipe?
Homemade Blackberry Jam
- Total Time: 19 minute
- Yield: 5-6 (8 oz) jars
Description
Craft your own vibrant, sweet-tart blackberry jam with this easy-to-follow recipe. Enjoy the intense, fresh flavor of summer berries in every spoonful.
Ingredients
- 4 cups (about 2 lbs) fresh or frozen blackberries
- 1/4 cup fresh lemon juice
- 1 box (1.75 oz) powdered fruit pectin (e.g., Sure-Jell for Less or No Sugar Needed Recipes)
- 3–4 cups granulated sugar (adjust to taste, see notes)
- 1/2 teaspoon butter (optional, for foam reduction)
Instructions
- Prepare Jars: Sterilize 5-6 (8 oz) canning jars and lids. Keep them hot until ready to fill. Place several small plates in the freezer for testing jam set.
- Prepare Berries: Wash blackberries thoroughly. In a large, heavy-bottomed pot, mash berries lightly with a potato masher to release juices.
- Combine Ingredients: In a separate bowl, whisk together the granulated sugar and powdered pectin until well combined. Add the mashed blackberries, lemon juice, and the sugar-pectin mixture to the pot. Stir well.
- Boil Jam: Place the pot over high heat and bring the mixture to a full, rolling boil that cannot be stirred down. Stir constantly to prevent scorching. Add the optional butter (if using). Continue to boil vigorously for exactly 1 minute, stirring constantly.
- Test for Set: Remove the pot from heat. Spoon a small amount of jam onto one of the chilled plates from the freezer. Let it sit for 1-2 minutes, then push it gently with your finger. If the surface wrinkles, the jam is ready. If not, return to heat and boil for another minute, then retest with a fresh cold plate.
- Jar Jam: Once the jam passes the set test, remove any foam with a spoon (if not using butter). Ladle the hot jam into the hot, sterilized jars, leaving 1/4 inch headspace. Wipe rims clean, center lids, and screw on bands fingertip tight.
- Process Jars: Process jars in a boiling water canner for 10 minutes (adjust for altitude if necessary). Carefully remove jars and let cool undisturbed on a towel for 12-24 hours. Check seals before storing.
- Prep Time: 20 mins
- Cook Time: 10-15 mins