
Table of Contents
- Crafting the Perfect Mini Grilled Cheese Hawaiian Rolls
- Why This Recipe Delivers Unbeatable Flavor and Texture
- Ingredients: Understanding Each Component’s Role
- Step-by-Step: Assembling and Grilling Your Mini Masterpieces
- Expert Tips for Mini Grilled Cheese Success
- What to Serve With Your Mini Grilled Cheese Hawaiian Rolls
- Storing and Reheating Your Mini Rolls
- Mini Grilled Cheese Hawaiian Rolls FAQ
Prepare your taste buds for an explosion of sweet, savory, and utterly irresistible goodness! Today, we’re diving into the delightful world of Mini Grilled Cheese Hawaiian Rolls. Imagine a golden, buttery exterior giving way to a soft, sweet interior, perfectly cradling a molten, gooey center of savory cheese. These aren’t just snacks; they’re miniature culinary masterpieces that promise to become your go-to for parties, quick lunches, or simply when a craving for something truly special strikes. Get ready to elevate your grilled cheese game!
Crafting the Perfect Mini Grilled Cheese Hawaiian Rolls
There’s something undeniably magical about the combination of sweet and savory, and these Mini Grilled Cheese Hawaiian Rolls embody that balance perfectly. They take the classic comfort of grilled cheese and infuse it with an unexpected, delightful twist thanks to the beloved Hawaiian sweet roll. Forget your standard white bread; these rolls bring a unique flavor profile and an incredibly soft texture that makes every bite a dream.
Why These Rolls Will Be Your New Favorite Snack
From their convenient size to their addictive flavor, these mini grilled cheeses are designed for pure enjoyment. They’re quick to make, incredibly versatile, and universally loved. Whether you’re feeding a crowd or just yourself, these little bites are guaranteed to disappear fast!
Why This Recipe Delivers Unbeatable Flavor and Texture
- Sweet & Savory Harmony: The subtle sweetness of the Hawaiian rolls perfectly complements the salty, rich cheese, creating a flavor profile that’s both comforting and exciting.
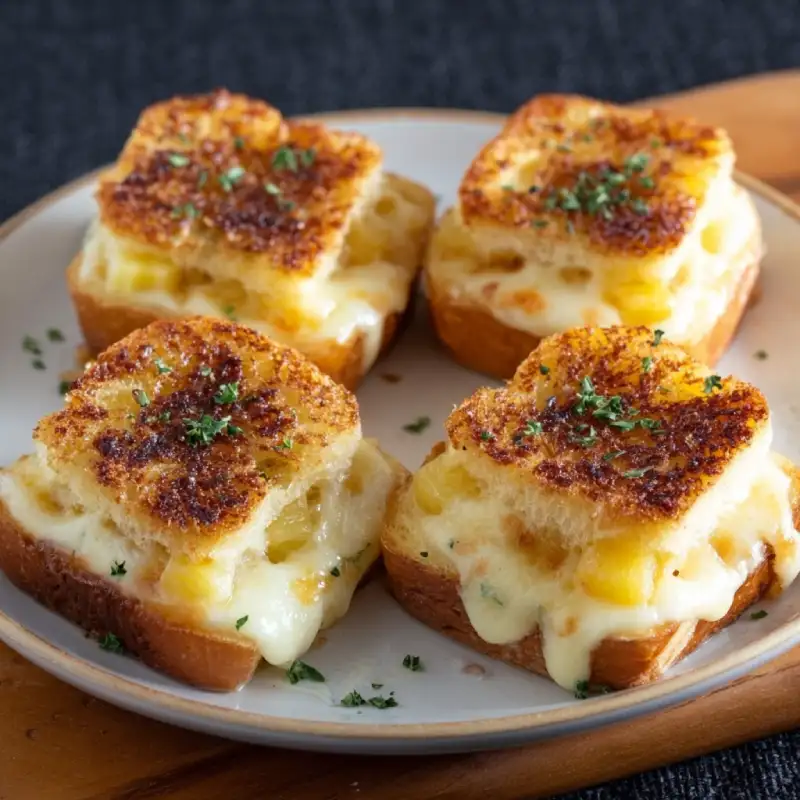
- Crispy Exterior, Fluffy Interior: A generous brushing of butter ensures a beautifully golden, crisp crust, while the interior remains wonderfully soft and tender.
- Effortless Melt: Our cheese selection and grilling technique guarantee a perfectly melted, gooey center every single time, without any dry or rubbery bits.
- Quick & Easy Preparation: This recipe is designed for maximum flavor with minimal fuss, making it perfect for any occasion.
Ingredients: Understanding Each Component’s Role
Here is what you need and why:
Hawaiian Sweet Rolls: The Foundation: These are non-negotiable for this recipe! Their signature sweetness and incredibly soft, fluffy texture are what make these mini grilled cheeses so unique and delicious. Don’t substitute with regular dinner rolls; you’ll miss out on that essential sweet-savory dynamic.
Cheese Choices: Why Certain Cheeses Melt Better: For the ultimate gooey factor, opt for good melting cheeses. Cheddar (sharp or mild) offers classic flavor and excellent melt. Monterey Jack is incredibly creamy and melts beautifully. For a slight tang, a good quality Gruyère is fantastic. Avoid hard, crumbly cheeses like Parmesan as they won’t give you that satisfying pull. A blend of two cheeses often yields the best results!
Butter: More Than Just Flavor: Unsalted butter is key here. It’s not just for flavor; it’s essential for achieving that perfect golden-brown, crispy exterior. It also helps conduct heat evenly, ensuring your cheese melts beautifully. Using unsalted butter allows you to control the overall saltiness of your dish.
Optional Add-ins: Elevating Your Rolls: Want to get creative? A sprinkle of garlic powder or onion powder mixed with the butter adds an extra layer of savory goodness. A thin slice of ham or turkey can turn these into mini sliders. For a touch of heat, a tiny dash of cayenne pepper or a thin slice of jalapeño can be a game-changer. Explore more grilled cheese variations here!
How to Make Mini Grilled Cheese Hawaiian Rolls
Follow these step-by-step instructions to create your perfect Mini Grilled Cheese Hawaiian Rolls:
1. Prep the Rolls: The Key to Even Cooking
Carefully slice each Hawaiian roll horizontally, creating a top and bottom half. The goal is to keep the roll intact as much as possible, like a tiny bun. This ensures even cooking and makes layering the cheese much easier. A serrated knife works best for this delicate task.
2. Layer the Cheese: Optimal Melt Strategy
Place a generous amount of your chosen cheese (or cheese blend) on the bottom half of each roll. Don’t be shy! For best results, ensure the cheese covers most of the surface area without spilling over the edges. If using two types of cheese, layer them for a more complex flavor and melt.
3. Butter the Rolls: Achieving Golden Perfection
Melt your butter in a small bowl. Using a pastry brush, generously butter the outside of both the top and bottom halves of each cheese-filled roll. This butter is crucial for developing that irresistible golden-brown crust and rich flavor. Don’t forget the sides!
4. Grill to Perfection: Low and Slow for the Win
Heat a non-stick skillet or griddle over medium-low heat. Place the buttered, cheese-filled rolls into the hot pan. Cook for 2-3 minutes per side, or until the rolls are golden brown and the cheese is completely melted and gooey. Press down gently with a spatula occasionally to ensure good contact with the pan and even browning. If the rolls are browning too quickly, reduce the heat.
Expert Tips for Mini Grilled Cheese Success
- Don’t Overcrowd the Pan: Cook in batches if necessary. Overcrowding lowers the pan temperature and can lead to uneven browning and soggy rolls.
- Monitor Heat Closely: Grilled cheese is best cooked over medium-low heat. Too high, and the bread burns before the cheese melts. Too low, and it takes too long and can dry out.
- The Power of a Lid: For an extra-gooey melt, cover the pan with a lid for the last minute or two of cooking. This traps heat and helps the cheese melt more thoroughly without over-browning the bread.
- Serving Immediately: These are best enjoyed fresh off the griddle when the cheese is at its most molten and the rolls are perfectly crisp.
- Use Quality Ingredients: A good quality cheese and fresh Hawaiian rolls truly make a difference in the final taste and texture.
What to Serve With Your Mini Grilled Cheese Hawaiian Rolls
Classic Tomato Soup: A Timeless Pairing
You can’t go wrong with a warm bowl of creamy tomato soup! The tangy, rich soup is the perfect counterpoint to the sweet and savory rolls, making for a comforting and satisfying meal. It’s a classic for a reason!
Fresh Salads: Balancing the Richness
For a lighter accompaniment, a crisp green salad with a vinaigrette dressing provides a refreshing contrast to the richness of the grilled cheese. A simple Caesar salad or a mixed greens salad with cherry tomatoes and cucumber would be delightful.
Dipping Sauces: Adding an Extra Kick
Elevate your dipping game! Beyond tomato soup, consider a sweet and spicy sriracha mayo, a tangy honey mustard, or even a simple marinara sauce for an Italian twist. See more easy recipes for dipping sauce ideas!
Storing and Reheating Your Mini Rolls
Cooling Properly for Storage
If you have any leftovers (a rare occurrence!), allow them to cool completely on a wire rack before storing. This prevents condensation, which can lead to sogginess.
Best Reheating Methods: Maintaining Crispness
To reheat, avoid the microwave if you want to maintain that crispy exterior. The best methods are:
- Oven/Toaster Oven: Place rolls on a baking sheet and reheat at 300°F (150°C) for 5-7 minutes, or until warmed through and crisp.
- Skillet: Reheat in a dry skillet over medium-low heat for a few minutes per side, until cheese is melted and rolls are crisp again.
Mini Grilled Cheese Hawaiian Rolls FAQ
Can I use different types of bread?
What other cheeses work well?
Can I make these ahead of time?
How do I prevent them from getting soggy?
Mini Grilled Cheese Hawaiian Rolls
- Total Time: 20 minutes
- Yield: 12 mini rolls
Description
These delightful Mini Grilled Cheese Hawaiian Rolls combine sweet and savory flavors for an irresistible snack or appetizer. Enjoy a golden, buttery crust with a perfectly melted, gooey cheese center.
Ingredients
- 12 King’s Hawaiian Sweet Rolls
- 6 slices (about 4-6 oz) good melting cheese (e.g., cheddar, Monterey Jack, or a blend), cut into quarters
- 3 tbsp unsalted butter, melted
- Optional: garlic powder, onion powder, or a pinch of cayenne pepper for butter
Instructions
- 1. Prepare Rolls: Carefully slice each Hawaiian roll horizontally, creating a top and bottom half.
- 2. Layer Cheese: Place 1-2 quarters of cheese on the bottom half of each roll, ensuring good coverage. Place the top half of the roll back on.
- 3. Butter Rolls: In a small bowl, melt the butter. If using, stir in optional seasonings. Using a pastry brush, generously butter the outside of both the top and bottom halves of each assembled roll.
- 4. Grill: Heat a non-stick skillet or griddle over medium-low heat. Place the buttered rolls in the hot pan. Cook for 2-3 minutes per side, or until golden brown and the cheese is completely melted. Press gently with a spatula occasionally.
- 5. Serve: Remove from pan and serve immediately while hot and gooey.
- Prep Time: 10 mins
- Cook Time: 10 mins