
Table of Contents
- Fuel Your Morning: Homemade Breakfast Protein Biscuits
- Why These Protein Biscuits Belong in Your Morning Routine
- Ingredients: What You Need & Why
- Step-by-Step: Baking Perfect Protein Biscuits
- Expert Tips for Biscuit Baking Success
- Serving Suggestions: What Pairs Well?
- Storing & Reheating Your Protein Biscuits
- Breakfast Protein Biscuits FAQ
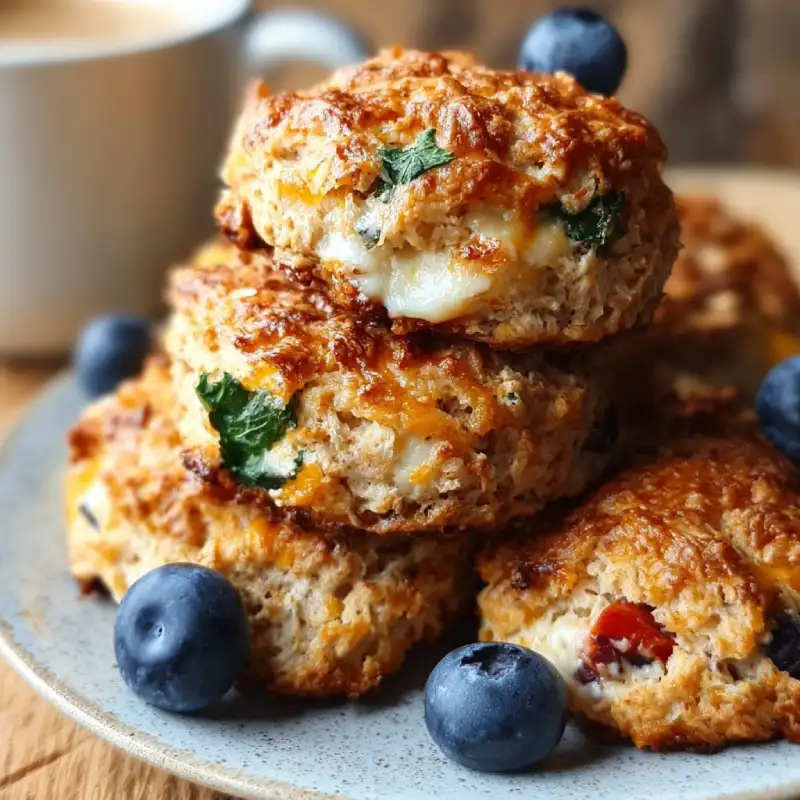
Fuel Your Morning: Homemade Breakfast Protein Biscuits
Imagine biting into a warm, fluffy biscuit that’s not only incredibly tender and flavorful but also secretly packed with the protein you need to kickstart your day. These Breakfast Protein Biscuits are a game-changer, offering that comforting, buttery goodness you crave, without the post-breakfast slump. They’re a delightful blend of savory and subtly sweet, with a texture that melts in your mouth, making them an instant favorite for busy mornings or leisurely brunches.
Why These Protein Biscuits Belong in Your Morning Routine
- Fluffy, tender texture, not dense or dry. We’ve cracked the code to protein biscuits that are light and airy, defying the common misconception that protein-packed baked goods must be heavy.
- Packed with sustaining protein, no afternoon crash. Say goodbye to mid-morning hunger pangs! The added protein keeps you feeling full and energized, preventing that dreaded sugar crash.
- Quick and easy, perfect for busy mornings. From mixing to baking, these biscuits come together surprisingly fast, making them an ideal solution for those hectic weekdays.
- Versatile and customizable to your taste. Whether you prefer savory with cheese and herbs or a touch of sweetness with fruit, these biscuits are a blank canvas for your culinary creativity.
Ingredients: What You Need & Why
Here is what you need and why:
All-purpose flour: This forms the structural base of our biscuits. While all-purpose is standard, you can experiment with a blend of whole wheat pastry flour for added fiber, though it might slightly alter the texture. For best results, use unbleached all-purpose flour.
Protein powder: The star of our Breakfast Protein Biscuits! I recommend using an unflavored or vanilla whey protein powder for the best results, as it blends seamlessly without imparting a strong ‘protein’ taste. Casein can also work, but may result in a slightly denser biscuit. Avoid plant-based protein powders unless specifically formulated for baking, as they can absorb liquid differently and lead to a dry texture. King Arthur Baking has some great tips on baking with protein powder.
Baking powder: This is our primary leavening agent, responsible for those beautiful, sky-high rises and fluffy interiors. Ensure your baking powder is fresh for optimal lift.
Salt: A crucial flavor enhancer that balances the sweetness and brings out the richness of the butter. Don’t skip it!
Cold butter: The secret to flaky biscuits! Using very cold, cubed butter creates pockets of steam during baking, resulting in those desirable flaky layers. The colder, the better!
Milk: This binds our dough together. Whole milk provides the richest flavor and tenderest crumb, but 2% milk works well too. For a dairy-free option, unsweetened almond milk or oat milk can be used, though the texture might be slightly less rich.
Optional Flavor Boosters: Get creative! Add shredded cheddar cheese and chives for a savory biscuit, a touch of sugar or maple syrup for a sweeter profile, or even some dried cranberries for a fruity twist.
Step-by-Step: Baking Perfect Protein Biscuits
Follow these step-by-step instructions to achieve perfect Breakfast Protein Biscuits:
1. Preparation: Preheat and Prep Baking Sheet
Preheat your oven to 425°F (220°C). Line a baking sheet with parchment paper or a silicone baking mat. This prevents sticking and ensures even browning on the bottom of your biscuits.
2. Mixing Dry Ingredients: The Initial Blend
In a large bowl, whisk together the all-purpose flour, protein powder, baking powder, and salt until thoroughly combined. This ensures that the leavening and seasoning are evenly distributed throughout the dough.
3. Incorporating Butter: Creating Flaky Layers
Add the very cold, cubed butter to the dry ingredients. Using a pastry blender, your fingertips, or two knives, cut the butter into the flour mixture until it resembles coarse crumbs with some pea-sized pieces of butter remaining. This is crucial for flakiness – resist the urge to overmix!
4. Adding Liquid: Bringing the Dough Together
Pour in the cold milk (and any optional liquid flavor boosters). Stir gently with a fork or your hands until the dough just comes together. It should be shaggy and slightly sticky, but not wet. Be careful not to overmix, as this develops gluten and can lead to tough biscuits.
5. Shaping the Biscuits: Methods for Cutting
Turn the dough out onto a lightly floured surface. Gently pat the dough into a rectangle about 3/4 to 1 inch thick. For classic round biscuits, use a 2-inch biscuit cutter, pressing straight down without twisting. For square biscuits, simply cut the rectangle into squares with a knife. Place the cut biscuits onto your prepared baking sheet, leaving about an inch between them for even baking.
6. Baking Process: Achieving Golden Perfection
Bake for 12-15 minutes, or until the biscuits are golden brown on top and bottom and have risen beautifully. The exact baking time may vary depending on your oven. A good indicator of doneness is when they sound hollow when tapped on the bottom. Let them cool slightly on a wire rack before serving.
Expert Tips for Biscuit Baking Success
- Keep ingredients cold: This is the golden rule for flaky biscuits. Cold butter creates steam pockets, and cold milk prevents the butter from melting too soon.
- Don’t overmix: Overmixing develops gluten, leading to tough, dense biscuits. Mix just until the dough comes together.
- Proper cutting technique: When using a biscuit cutter, press straight down and lift. Twisting the cutter seals the edges, preventing the biscuits from rising as high.
- Baking time adjustments: Ovens vary! Keep an eye on your biscuits, especially towards the end of the baking time. They should be golden brown and puffed up.
- Measure flour correctly: Spoon flour into your measuring cup and level it off with a straight edge, rather than scooping directly from the bag, which can compact the flour and lead to too much being used.
Serving Suggestions: What Pairs Well?
These versatile Breakfast Protein Biscuits are delicious on their own, but they truly shine when paired with other breakfast favorites. For a savory experience, serve them alongside scrambled eggs, crispy bacon or sausage, or smothered in a rich, creamy gravy. If you prefer a sweeter start to your day, slather them with your favorite fruit preserves, a drizzle of honey, or a dollop of Greek yogurt with fresh berries. They also make an excellent base for a breakfast sandwich, piled high with egg, cheese, and ham. The possibilities are endless for creating a complete and satisfying meal!
Storing & Reheating Your Protein Biscuits
To maintain their freshness, store your cooled Breakfast Protein Biscuits in an airtight container at room temperature for up to 2-3 days. For longer storage, they freeze beautifully! Wrap individual biscuits tightly in plastic wrap, then place them in a freezer-safe bag or container for up to 2 months. To reheat from frozen, you can warm them directly in a preheated oven at 300°F (150°C) for about 10-15 minutes, or until heated through. From room temperature, a quick zap in the microwave for 15-30 seconds will warm them up, but for the best texture, a few minutes in a toaster oven or conventional oven will restore their crisp exterior and tender interior.
Breakfast Protein Biscuits FAQ
Can I use different types of protein powder?
What if my biscuits turn out dry?
Can I make these ahead of time?
Are there gluten-free alternatives?
Breakfast Protein Biscuits
- Total Time: 30 minutes
- Yield: 8-10 biscuits
Description
These fluffy, tender biscuits are packed with protein to keep you fueled all morning. A delicious and easy way to enjoy a satisfying breakfast.
Ingredients
- 2 cups all-purpose flour
- 1/2 cup unflavored or vanilla whey protein powder
- 1 tbsp baking powder
- 1/2 tsp salt
- 1/2 cup (1 stick) unsalted butter, very cold and cubed
- 3/4 cup cold milk (dairy or non-dairy)
- Optional: 1/4 cup shredded cheese, 1 tbsp chopped chives, or 1 tbsp sugar
Instructions
- Preheat oven to 425°F (220°C). Line a baking sheet with parchment paper.
- In a large bowl, whisk together flour, protein powder, baking powder, and salt.
- Cut in the cold butter using a pastry blender or your fingertips until mixture resembles coarse crumbs with pea-sized butter pieces.
- Add cold milk (and optional add-ins) and stir gently until dough just comes together. Do not overmix.
- Turn dough onto a lightly floured surface and gently pat into a 3/4 to 1-inch thick rectangle.
- Cut biscuits using a 2-inch biscuit cutter or knife. Place on prepared baking sheet.
- Bake for 12-15 minutes, or until golden brown and risen.
- Cool slightly on a wire rack before serving.
- Prep Time: 15 mins
- Cook Time: 15 mins