


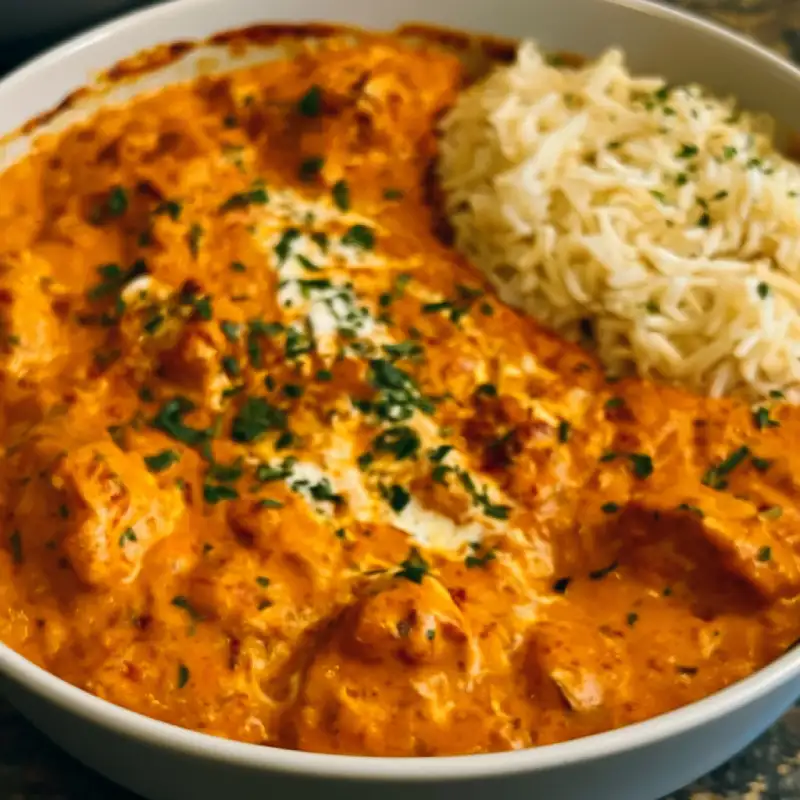
Introduction: Why My Butter Chicken Recipe Will Become Your Go-To
Oh, the sheer delight of a perfectly crafted Butter Chicken! That moment when the rich, creamy, and subtly spiced sauce coats your tongue, followed by the tender, succulent chicken – it’s pure culinary bliss. If you’ve ever yearned to recreate that restaurant-quality magic in your own kitchen, to banish bland takeout nights forever, then you’ve landed in the right place. This Homemade Butter Chicken recipe isn’t just another dish; it’s a journey from takeout dreams to a table laden with aromatic perfection. Get ready to impress yourself and everyone you cook for!
From Takeout to Table: The Journey to Perfect Homemade Butter Chicken
For years, Butter Chicken was my ultimate takeout indulgence. The thought of making it at home felt daunting, a secret guarded by professional chefs. But after countless experiments, tweaks, and a deep dive into the heart of Indian spices, I’ve cracked the code. This recipe brings that beloved restaurant flavor right into your home, making it accessible, enjoyable, and utterly delicious. Say goodbye to delivery fees and hello to homemade glory!
Banish Bland: Crafting Restaurant-Quality Flavor at Home
The secret to truly exceptional Butter Chicken lies in building layers of flavor. It’s not just about throwing ingredients into a pot; it’s about understanding how each component contributes to the symphony of taste. From the vibrant marinade to the slow-simmered sauce, every step in this recipe is designed to ensure a depth of flavor that will make your taste buds sing. No more bland, one-note dishes – prepare for a flavor explosion!
Why This Homemade Butter Chicken Recipe Stands Out
- Achieving Velvety Texture: The Secret to a Smooth Sauce: We’ll guide you through the techniques to create a sauce that’s incredibly smooth and luxurious, without any grittiness.
- Layered Flavor Profile: Building Depth with Spices and Marinade: Our method ensures every ingredient plays its part, from the initial marinade to the final simmer, creating an unparalleled depth of flavor.
- Tender Chicken Every Time: Preventing Dryness and Maximizing Juiciness: Learn the tricks to keep your chicken perfectly moist and tender, absorbing all the delicious flavors of the sauce.
- Simplicity Meets Sophistication: An Approachable Recipe for Impressive Results: While the flavors are complex, the steps are straightforward, making this an achievable masterpiece for any home cook.
Essential Ingredients & Smart Substitutions for the Best Butter Chicken
Here is what you need and why:
Chicken Thighs vs. Breast: Why Dark Meat Delivers on Flavor and Moisture: For the most succulent and flavorful Homemade Butter Chicken, boneless, skinless chicken thighs are my absolute go-to. Their higher fat content means they stay incredibly moist and tender during cooking, absorbing all the delicious marinade flavors. While you can use chicken breast, be mindful that it cooks faster and can dry out if overcooked. If using breast, cut it into slightly larger pieces and keep a close eye on it.
The Marinade Must-Haves: Yogurt’s Role in Tenderization and Flavor Infusion: Our marinade is the first crucial step to flavor town! Full-fat plain yogurt is essential here. Its acidity helps tenderize the chicken, while its creamy texture acts as a carrier for the spices, ensuring they penetrate deep into the meat. Don’t skip the ginger-garlic paste, turmeric, red chili powder, and garam masala – these are the foundational aromatics that build the initial flavor profile.
Tomato Base Breakdown: Canned vs. Fresh for Depth and Sweetness: For a consistently rich and deep tomato flavor, I highly recommend using canned crushed tomatoes or tomato purée. They offer a concentrated sweetness and acidity that’s hard to achieve with fresh tomatoes alone, especially out of season. If you prefer fresh, use ripe Roma tomatoes, blanch, peel, and purée them, but you might need to adjust for sweetness and acidity later.
Butter & Cream: Balancing Richness for a Silky Finish: It wouldn’t be Butter Chicken without butter and cream! Unsalted butter is preferred so you can control the seasoning. Heavy cream (or whipping cream) is what gives the sauce its signature luxurious, silky texture and mellows the spices. For a slightly lighter version, you can use half-and-half, but the richness will be less pronounced.
Spice Rack Essentials: Understanding the Impact of Each Aromatic: Beyond the marinade spices, we’ll use cumin, coriander, and a touch more red chili powder in the sauce base. Cumin adds an earthy warmth, coriander a citrusy note, and chili powder provides a gentle heat and vibrant color. Don’t be afraid to adjust the chili powder to your spice preference.
Garam Masala: Your Flavor Shortcut and When to Add It: Garam Masala is a blend of ground spices, and it’s a powerhouse of flavor. We use it in both the marinade and at the end of cooking. Adding it at the end preserves its delicate, aromatic notes, giving the dish a fresh burst of warmth. A good quality garam masala makes all the difference!
Optional Add-ins: Fenugreek Leaves (Kasuri Methi) and Their Aromatic Contribution: If you want to elevate your Homemade Butter Chicken to truly authentic levels, seek out kasuri methi (dried fenugreek leaves). Crushed between your palms and added at the very end, they impart a unique, slightly bitter, and incredibly aromatic flavor that is characteristic of restaurant-style Butter Chicken. It’s a game-changer!
Step-by-Step: Your Visual Guide to Homestyle Butter Chicken Perfection
Follow these step-by-step instructions:
1. Marinating for Maximum Flavor: Don’t Skip This Step
In a large bowl, combine your cubed chicken thighs with plain yogurt, ginger-garlic paste, turmeric, red chili powder, and half of the garam masala. Mix well, ensuring every piece of chicken is coated. Cover and refrigerate for at least 30 minutes, but ideally 2-4 hours, or even overnight. This step is non-negotiable for tender, flavorful chicken!
2. Browning the Chicken: Developing a Flavorful Crust
Heat a tablespoon of oil or butter in a large, heavy-bottomed pan or Dutch oven over medium-high heat. Working in batches if necessary to avoid overcrowding, add the marinated chicken pieces and sear them until beautifully browned on all sides. They don’t need to be cooked through, just get a nice crust. Remove the chicken and set aside.
3. Building the Sauce Base: Sautéing Aromatics to Release Fragrance
In the same pan, melt 2 tablespoons of butter over medium heat. Add finely chopped onions and sauté until softened and translucent, about 5-7 minutes. Stir in the remaining ginger-garlic paste and cook for another minute until fragrant. Add the ground cumin, coriander, and a pinch more red chili powder. Cook for 30 seconds, stirring constantly, until the spices are aromatic. This blooming of spices is key to depth!
4. Simmering for Depth: Allowing Flavors to Meld
Pour in the crushed tomatoes (or purée) and stir well. Add a tablespoon of tomato paste (this intensifies the tomato flavor and color) and cook, stirring occasionally, for 5-7 minutes until the sauce darkens slightly and the oil begins to separate. This step cooks out the raw tomato flavor. Add about 1/2 cup of water or chicken broth, bring to a simmer, then reduce heat to low, cover, and let it gently cook for 15-20 minutes, allowing all the flavors to meld beautifully.
5. The Creamy Finish: Incorporating Butter and Cream Correctly
Remove the sauce from heat. For a truly smooth, restaurant-style sauce, carefully transfer the sauce to a blender and blend until completely smooth. (Alternatively, use an immersion blender directly in the pot). Return the smooth sauce to the pan. Stir in the browned chicken, the remaining butter, and the heavy cream. Gently heat through over low heat, stirring occasionally, until the chicken is cooked through and the sauce is warmed. Do not boil after adding cream.
6. Final Adjustments: Balancing Sweetness, Acidity, and Spice
Stir in the remaining garam masala and the crushed kasuri methi (if using). Taste and adjust seasonings. This is where you fine-tune! Add a pinch of sugar or honey if you prefer a sweeter sauce, a squeeze of lemon juice or a splash of white vinegar for brightness and acidity, or more red chili powder for extra heat. Serve immediately and bask in the glory of your perfect Homemade Butter Chicken!
Expert Tips for Unforgettable Homemade Butter Chicken
- Don’t Rush the Marinade: Time is Your Flavor Friend: The longer the chicken marinates, the more tender and flavorful it will be. Aim for at least 2 hours, but overnight is truly transformative.
- Cook Your Tomato Paste: Eliminating Raw Acidity: When you add the tomato paste, cook it for a minute or two, stirring constantly, before adding the crushed tomatoes. This deepens its flavor and removes any raw, metallic taste.
- Blend for Smoothness: Achieving a Restaurant-Style Sauce Consistency: For that velvety, luxurious texture, blending the sauce after simmering is crucial. An immersion blender works wonders, or carefully transfer to a regular blender.
- Temper Your Cream: Preventing Curdling for a Silky Texture: To prevent the cream from curdling, especially if your sauce is very hot, take a small ladleful of the hot sauce and stir it into the cream in a separate bowl before adding the cream mixture back to the main pot. Always add cream off the heat or over very low heat, and don’t boil it.
- Balance is Key: Adjusting for Sweetness (Sugar/Honey) and Acidity (Lemon/Vinegar): Butter Chicken is all about balance. If it tastes flat, it might need a pinch of sugar or honey to enhance sweetness, or a squeeze of lemon juice or a tiny splash of white vinegar to brighten the flavors. Taste and adjust until it sings!
What to Serve with Your Delicious Butter Chicken
Classic Pairings: Basmati Rice and Naan Bread Explained
No Homemade Butter Chicken experience is complete without its classic companions! Fluffy, aromatic basmati rice is perfect for soaking up every last drop of that incredible sauce. And warm, pillowy naan bread? It’s practically mandatory for scooping, dipping, and savoring. You can find excellent ready-made naan in most grocery stores, or if you’re feeling adventurous, try making your own! This recipe from Food Network is a great place to start.
Vegetable Sides: Complementary Flavors and Textures
To round out your meal, consider a simple side of steamed green beans, sautéed spinach with garlic, or a fresh cucumber and tomato salad. The freshness and slight crunch of vegetables provide a lovely contrast to the rich butter chicken.
Garnishes: Fresh Herbs and Cream for Presentation and Freshness
A sprinkle of fresh cilantro leaves not only adds a pop of color but also a burst of fresh, herbaceous flavor. A swirl of extra heavy cream or a dollop of plain yogurt can also be added just before serving for an extra touch of elegance and creaminess.
Storing & Reheating Your Homemade Butter Chicken Like a Pro
Refrigeration: Safe Storage for Optimal Flavor
Your delicious Homemade Butter Chicken will taste even better the next day as the flavors continue to meld! Store any leftovers in an airtight container in the refrigerator for up to 3-4 days. Ensure it cools completely before refrigerating.
Freezing for Future Meals: Best Practices for Quality
Butter Chicken freezes beautifully! Once completely cooled, transfer it to freezer-safe containers or heavy-duty freezer bags, leaving a little headspace. It can be frozen for up to 2-3 months. Thaw overnight in the refrigerator before reheating.
Reheating Techniques: Maintaining Texture and Preventing Dryness
To reheat, gently warm the butter chicken in a saucepan over low to medium heat, stirring occasionally. If the sauce seems too thick, add a splash of water or chicken broth to reach your desired consistency. Avoid high heat, which can cause the cream to separate or the chicken to dry out. You can also reheat individual portions in the microwave, stirring halfway through.
Frequently Asked Questions
Can I make this recipe in a slow cooker / Instant Pot?
Is homemade butter chicken spicy?
Can I make it dairy-free?
What if my sauce is too thin/thick?
Why is my chicken tough?
Delicious Homemade Butter Chicken
- Total Time: 1 hour 15 minutes
- Yield: 4-6 servings
Description
Discover the best flavor of Homemade Butter Chicken with this step-by-step recipe. Easy to make and incredibly satisfying!
Ingredients
- 1.5 lbs boneless, skinless chicken thighs, cut into 1-inch cubes
- 1 cup plain full-fat yogurt
- 2 tbsp ginger-garlic paste (divided)
- 1 tsp turmeric powder
- 1–2 tsp red chili powder (adjust to taste)
- 1.5 tsp garam masala (divided)
- 3 tbsp unsalted butter (divided)
- 1 tbsp neutral oil (like canola or vegetable)
- 1 large onion, finely chopped
- 1 (28 oz) can crushed tomatoes or tomato purée
- 1 tbsp tomato paste
- 1/2 cup water or chicken broth
- 1/2 cup heavy cream
- 1 tsp kasuri methi (dried fenugreek leaves), crushed (optional)
- Salt to taste
- Pinch of sugar or honey (optional, for balance)
- Squeeze of lemon juice or splash of white vinegar (optional, for balance)
- Fresh cilantro, chopped, for garnish
Instructions
- 1. Marinate the Chicken: In a large bowl, combine chicken, yogurt, 1 tbsp ginger-garlic paste, turmeric, red chili powder, and 1 tsp garam masala. Mix well. Cover and refrigerate for at least 30 minutes, or up to overnight.
- 2. Sear the Chicken: Heat oil and 1 tbsp butter in a large pan over medium-high heat. Sear marinated chicken in batches until browned on all sides. Remove and set aside.
- 3. Build the Sauce Base: In the same pan, melt 2 tbsp butter. Sauté chopped onion until translucent (5-7 mins). Add remaining 1 tbsp ginger-garlic paste and cook for 1 minute until fragrant. Stir in ground cumin, coriander, and a pinch more red chili powder; cook for 30 seconds.
- 4. Simmer the Sauce: Add crushed tomatoes and tomato paste. Cook, stirring, for 5-7 minutes until sauce darkens. Stir in water/broth, bring to a simmer, then reduce heat, cover, and cook for 15-20 minutes.
- 5. Blend and Finish: Remove from heat. Carefully blend the sauce until smooth (using an immersion blender or regular blender). Return to pan. Stir in browned chicken, remaining 1 tbsp butter, and heavy cream. Gently heat over low heat until warmed through; do not boil.
- 6. Adjust and Serve: Stir in remaining 1/2 tsp garam masala and crushed kasuri methi (if using). Taste and adjust for salt, sweetness (sugar/honey), and acidity (lemon/vinegar). Garnish with fresh cilantro and serve hot with basmati rice and naan.
- Prep Time: 30 mins (plus 30 mins-overnight marinating)
- Cook Time: 45 mins