
Table of Contents
- Master the Japanese Egg Sandwich: Your New Go-To Meal
- Why This Japanese Egg Sandwich Recipe Triumphs
- Ingredients & Intent: Building Your Tamago Sando
- Step-by-Step: Crafting Your Perfect Japanese Egg Sandwich
- Expert Tips for Tamago Sando Success
- Pairing Your Japanese Egg Sandwich
- Storing and Reheating Your Tamago Sando
- Frequently Asked Questions About Japanese Egg Sandwiches
Master the Japanese Egg Sandwich: Your New Go-To Meal
Imagine a sandwich so utterly perfect, so impossibly creamy, and so deceptively simple that it instantly transports you to a bustling Tokyo convenience store, even if you’re just in your own kitchen. That, my friends, is the magic of the Japanese egg sandwich, or Tamago Sando. For years, I chased that elusive, melt-in-your-mouth texture, that delicate balance of sweet and savory, that pillowy soft bread. My journey involved countless experiments, a few eggy disasters, and a deep dive into the nuances of Japanese culinary philosophy. What I discovered, and what I’m thrilled to share with you today, is a recipe that doesn’t just replicate the iconic Tamago Sando – it perfects it. Get ready, because this Japanese egg sandwich recipe is about to become your new obsession, your go-to comfort food, and your secret weapon for impressing everyone you know. See more easy recipes.
Why This Japanese Egg Sandwich Recipe Triumphs
- Creamy Filling, Not Crumbly: The secret to that silky texture lies in a precise cooking method for the eggs and a specific mixing technique that ensures every bite is smooth and luxurious, never dry or chunky.
- Balanced Flavor Profile: We achieve a harmonious blend of sweet, savory, and perfectly tangy notes, thanks to the unique properties of Japanese mayonnaise and a touch of sugar that elevates the egg’s natural richness.
- Pillowy Soft Bread: The essential canvas for a stellar sandwich is non-negotiable. We’ll discuss why Shokupan (Japanese milk bread) is ideal and how to achieve that cloud-like softness even with readily available alternatives.
- Effortless Elegance: This recipe looks gourmet and sophisticated, yet it takes minimal fuss to prepare. It’s the ultimate example of simple ingredients yielding extraordinary results.
Ingredients & Intent: Building Your Tamago Sando
Here is what you need and why:
Eggs (Large, Fresh): The foundation of our Japanese egg sandwich. Freshness matters immensely here. Fresher eggs tend to peel more cleanly after boiling, and their yolks are richer, contributing to a better texture and taste in your egg salad. Aim for organic, free-range if possible for superior flavor.
Mayonnaise (Japanese QP Recommended): This is the binder and the flavor powerhouse. Japanese mayonnaise, particularly Kewpie (often abbreviated as QP), is distinct and crucial. It’s made with only egg yolks (not whole eggs), rice vinegar, and a touch of MSG, giving it a richer, tangier, and umami-packed flavor that American mayo simply can’t replicate. It’s thicker and creamier, making a huge difference in the final texture of your egg salad.
Milk or Cream (Whole Milk preferred): For unparalleled creaminess. A small splash of whole milk or heavy cream enhances the custard-like consistency of the egg salad, making it even more luxurious and preventing it from becoming too dense. It also helps to bind the mixture without making it overly thick.
Sugar (Granulated): A touch of sweetness is key to balancing the savory notes in a traditional Tamago Sando. It’s not meant to make the sandwich overtly sweet, but rather to round out the flavors and add that subtle, addictive quality.
Salt & White Pepper: Essential seasoning. Salt brings out the natural flavors of the egg, while white pepper is preferred over black pepper for aesthetic reasons (no black flecks) and its slightly milder, more subtle heat that complements the delicate egg flavor without overpowering it.
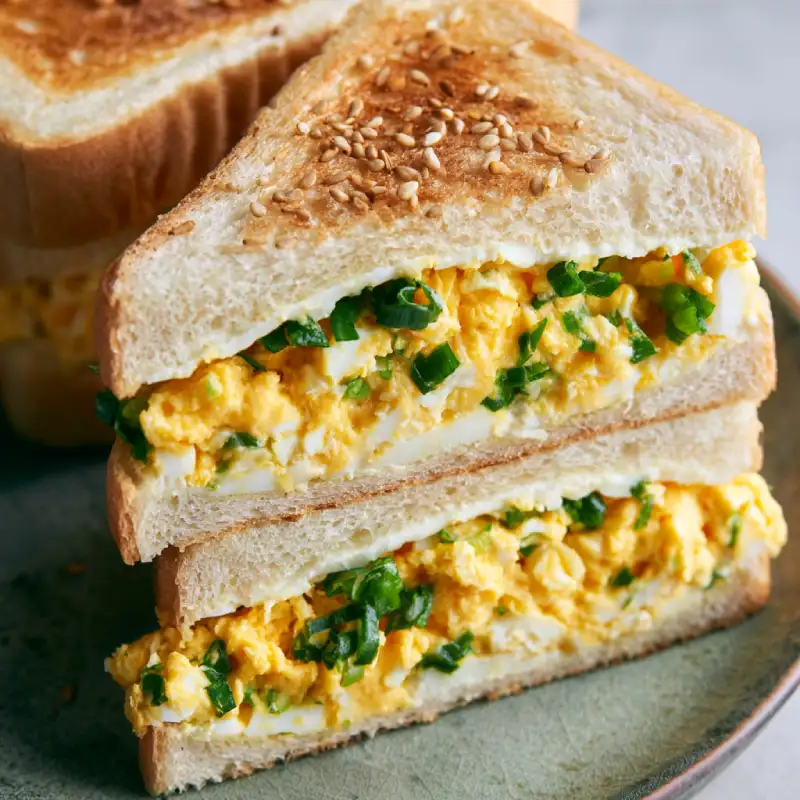
Shokupan (Milk Bread) or High-Quality White Bread: The fluffy vessel. Shokupan, Japanese milk bread, is renowned for its incredibly soft, pillowy texture and slight sweetness. It’s the ideal canvas for a Tamago Sando. If you can’t find Shokupan, opt for the softest, freshest, high-quality white bread you can find, like a brioche loaf or a good quality Pullman loaf. Avoid dense, crusty breads.
Optional: Butter (Unsalted): For a richer toast. While not strictly traditional for the classic convenience store style, a thin spread of unsalted butter on the bread before adding the filling can add an extra layer of richness and prevent the bread from getting soggy, especially if you’re making them ahead. Use it if you desire a more decadent sandwich.
Step-by-Step: Crafting Your Perfect Japanese Egg Sandwich
Follow these step-by-step instructions to create your perfect Tamago Sando:
1. Achieving Perfectly Cooked Eggs
For the ideal creamy texture, we’re aiming for eggs that are just past soft-boiled, with yolks that are still slightly jammy but firm enough to mash. Bring a pot of water to a rolling boil. Carefully lower your eggs into the boiling water. Cook for exactly 7-8 minutes for large eggs. Immediately transfer them to an ice bath to stop the cooking process. This also helps with easier peeling. Once cooled, gently peel the eggs under cold running water.
2. Preparing the Creamy Egg Salad
Place the peeled, still-warm eggs into a medium bowl. Using a fork or a potato masher, gently mash the eggs. You want a mix of finely mashed and some slightly larger pieces for textural interest, but avoid making it completely smooth. Add the Japanese mayonnaise, milk or cream, sugar, salt, and white pepper. Mix gently until just combined. Be careful not to overmix, as this can make the egg salad gluey. Taste and adjust seasoning if necessary – remember, balance is key!
3. Assembling the Sandwich
Take two slices of your soft Shokupan or white bread. If using, lightly butter one side of each slice. Spread a generous amount of the creamy egg salad evenly from edge-to-edge on one slice of bread. The key here is a thick, even layer. Place the second slice of bread on top, gently pressing down to ensure the filling adheres. Don’t press too hard, or you’ll squish the bread.
4. The Crucial Chilling Stage
This step is non-negotiable for an authentic Tamago Sando experience. Wrap each assembled sandwich tightly in plastic wrap. Place them in the refrigerator for at least 30 minutes, or ideally 1-2 hours. Chilling allows the flavors to meld beautifully, the bread to slightly firm up, and the egg salad to set, making for cleaner cuts and a more cohesive sandwich.
5. Perfect Slicing
Once chilled, unwrap the sandwiches. Using a very sharp, serrated knife, carefully trim off all the crusts. This is essential for the signature aesthetic and soft texture. Then, slice each sandwich in half, either diagonally or straight down the middle, to create two perfect rectangles or triangles. Serve immediately and marvel at your creation!
Expert Tips for Tamago Sando Success
- Don’t Overcook Your Eggs: The difference between jammy and crumbly is just a minute or two. Overcooked yolks will result in a dry, chalky egg salad. Aim for that perfect 7-8 minute mark for large eggs.
- Warm Eggs, Cold Mayo: Mashing the eggs while they are still warm helps them break down more easily and absorb the mayonnaise better, leading to a creamier texture. However, ensure your mayonnaise is cold from the fridge to maintain its emulsification and prevent the mixture from becoming oily.
- Crust Removal is Non-Negotiable: This isn’t just for aesthetics; it’s crucial for the textural experience. The soft, crustless bread is a hallmark of the Japanese egg sandwich.
- Gentle Pressure, Sharp Knife: When slicing, use a very sharp, serrated knife and apply gentle, sawing pressure. This prevents squishing the delicate bread and ensures clean, precise cuts.
- Chill Time is Mandatory: This isn’t just a suggestion! Chilling allows the flavors to meld, the egg salad to set, and the bread to firm up slightly, making for a much more enjoyable and authentic experience.
Pairing Your Japanese Egg Sandwich
The delicate flavors of a Japanese egg sandwich pair wonderfully with:
- Light Soups: A simple miso soup or a clear vegetable broth provides a comforting and complementary side.
- Green Tea: Hot or iced, green tea offers a refreshing and traditional beverage pairing that cleanses the palate.
- Simple Salad: A crisp, lightly dressed green salad or a small cucumber salad can add a refreshing contrast to the creamy sandwich.
Storing and Reheating Your Tamago Sando
Best Practices for Freshness: To keep your Japanese egg sandwich fresh, wrap each sandwich tightly in plastic wrap or place them in an airtight container. Store them in the refrigerator. They are best enjoyed within 1-2 days of preparation. The bread can start to dry out and the filling can lose its optimal texture if stored for too long.
The Truth About Reheating: This sandwich is truly best served cold or at room temperature. Reheating a Tamago Sando, especially in a microwave, will alter the delicate texture of both the bread and the egg salad, making the bread soggy and the egg salad rubbery. Embrace the chilled perfection!
Frequently Asked Questions About Japanese Egg Sandwiches
Why Japanese mayo? Is it really that different?
Can I use whole wheat bread?
How long do Japanese egg sandwiches last in the fridge?
What’s the best way to cut the crusts off?
Can I add other ingredients to the egg salad?
Japanese Egg Sandwich: Delicious Recipe Guide
- Total Time: 23 minutes
- Yield: 2 sandwiches
Description
Discover how to make a delicious Japanese egg sandwich with this step-by-step easy to bake recipe. Learn the secrets to best flavor!
Ingredients
- 4 large fresh eggs
- 4 tbsp Japanese mayonnaise (Kewpie recommended)
- 1 tbsp whole milk or heavy cream
- 1/2 tsp granulated sugar
- 1/4 tsp salt (or to taste)
- Pinch of white pepper
- 4 slices Shokupan (Japanese milk bread) or high-quality soft white bread
- Optional: 1 tsp unsalted butter, softened
Instructions
- Step 1: Cook the Eggs: Bring a pot of water to a rolling boil. Carefully lower eggs into boiling water and cook for 7-8 minutes. Immediately transfer to an ice bath to cool completely, then peel.
- Step 2: Prepare Egg Salad: Place peeled, still-warm eggs in a bowl. Mash with a fork until desired consistency (some chunks are good!). Add Japanese mayonnaise, milk/cream, sugar, salt, and white pepper. Mix gently until just combined.
- Step 3: Assemble Sandwiches: Lightly butter one side of each bread slice if using. Spread a generous, even layer of egg salad on two slices of bread, extending to the edges. Top with the remaining bread slices, pressing gently.
- Step 4: Chill: Wrap each sandwich tightly in plastic wrap. Refrigerate for at least 30 minutes, or up to 2 hours, to allow flavors to meld and the sandwich to set.
- Step 5: Slice and Serve: Unwrap chilled sandwiches. Using a very sharp, serrated knife, carefully trim off all crusts. Slice each sandwich in half diagonally or straight down the middle. Serve immediately.
- Prep Time: 15 mins
- Cook Time: 8 mins