


Table of Contents
- Your New Go-To for Crowd-Pleasing Sliders
- Why This Recipe Delivers Big Flavor and Texture
- Essential Ingredients & Smart Swaps
- Step-by-Step: Crafting Your Maple Chicken and Bacon Sliders
- Expert Tips for Slider Success
- What to Serve Alongside Your Sliders
- Storing and Reheating Your Sliders
- Maple Chicken and Bacon Sliders: FAQ
Your New Go-To for Crowd-Pleasing Sliders
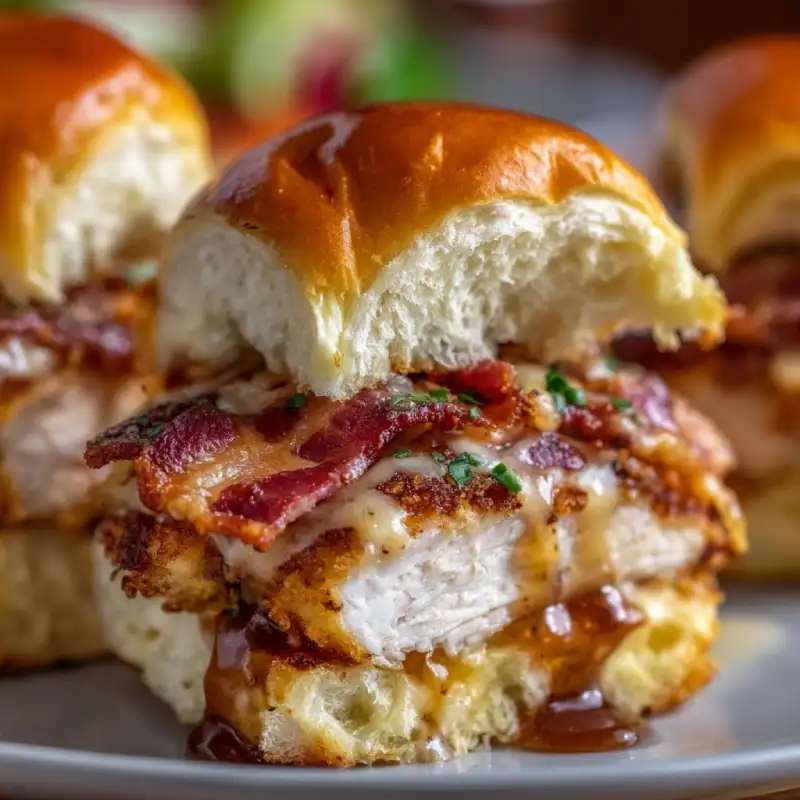
Get ready to experience a flavor explosion that will have everyone begging for the recipe! These Maple Chicken and Bacon Sliders are the ultimate combination of sweet, savory, and utterly irresistible. Imagine tender, juicy chicken, crispy, smoky bacon, and a hint of sweet maple, all nestled in soft, buttery slider buns with gooey melted cheese. It’s a symphony of textures and tastes that makes them perfect for game day, a casual get-together, or even a fun family dinner. Trust me, once you try these, they’ll become a staple in your entertaining repertoire!
Why I Love Maple Chicken and Bacon Sliders
I’m a firm believer that food should be both delicious and approachable, and these sliders hit every mark. They’re incredibly satisfying, yet surprisingly easy to make. The sweet and savory dynamic is just addictive, and the individual portions make them ideal for sharing. Plus, they look impressive without requiring hours in the kitchen. It’s a win-win-win!
Why This Recipe Delivers Big Flavor and Texture
- The Magic of Sweet & Savory Harmony: The natural sweetness of real maple syrup perfectly complements the smoky, salty bacon and savory chicken, creating a balanced and incredibly addictive flavor profile.
- Perfectly Balanced Textures: From the crispy bacon to the tender chicken, the soft slider buns, and the gooey melted cheese, every bite offers a delightful textural contrast that keeps you coming back for more.
- Effortless Assembly for Maximum Impact: This recipe is designed for ease. With a few simple steps, you can create a dish that looks and tastes like you spent hours in the kitchen, making it perfect for entertaining.
- Uses melted butter for moisture: Brushing the buns with melted butter not only adds richness but also helps them toast beautifully and prevents them from drying out.
Essential Ingredients & Smart Swaps
Here is what you need and why:
Chicken: Best Cuts and How to Prep: For these sliders, I highly recommend using boneless, skinless chicken breasts or thighs. Thighs will offer a bit more moisture and flavor, but breasts work beautifully if you’re careful not to overcook them. Cut them into small, bite-sized pieces (about 1/2-inch cubes) so they cook quickly and fit perfectly into the slider buns.
Bacon: Don’t Skimp on Quality (or Cook Time!): This is a star ingredient, so choose a good quality, thick-cut bacon if possible. The smoky flavor is crucial. Cook it until it’s perfectly crispy – not burnt, but definitely not chewy. This provides that essential textural contrast.
Maple Syrup: Go for Real Maple, Not Pancake Syrup: This is non-negotiable! Real maple syrup (Grade A Amber or Dark, Robust Taste) offers a complex, natural sweetness that imitation pancake syrup simply can’t replicate. It’s worth the investment for the depth of flavor it brings.
Slider Buns: The Importance of a Soft Base: Hawaiian sweet rolls are my absolute favorite for these sliders. Their slight sweetness and incredibly soft texture are ideal. If you can’t find them, any soft dinner roll or small brioche bun will work well. The key is a bun that can absorb the flavors without becoming too dense.
Cheese: Melty Goodness Explained: Provolone, Monterey Jack, or a mild cheddar are excellent choices. They melt beautifully and add a creamy, savory layer without overpowering the other flavors. Avoid cheeses that are too strong or don’t melt well.
Flavor Boosters: Onion, Garlic, and Herbs: A little finely diced onion and minced garlic sautéed with the chicken add a foundational layer of savory flavor. Fresh chives or parsley sprinkled on top after baking can add a lovely fresh finish.
Optional Add-ins for Extra Zing: Want to kick it up a notch? A pinch of red pepper flakes with the chicken, a dash of smoked paprika, or even a tiny bit of Dijon mustard mixed into the maple glaze can add extra complexity. For a touch of tang, a few bread and butter pickle slices inside the slider are surprisingly delicious!
How to Make Maple Chicken and Bacon Sliders
Follow these step-by-step photos:
1. Prep Your Ingredients: A Smooth Start
Start by gathering and preparing all your ingredients. Dice the chicken into small, uniform pieces. Chop your bacon into lardons or small strips. Finely mince your onion and garlic. This mise en place makes the cooking process much smoother and more enjoyable. Preheat your oven to 375°F (190°C) and have a 9×13 inch baking dish ready.
2. Cook the Bacon: Crispy Perfection is Key
In a large skillet over medium heat, cook the chopped bacon until it’s beautifully crispy. This usually takes about 7-10 minutes. Remove the bacon with a slotted spoon, transferring it to a plate lined with paper towels to drain. Reserve about 1-2 tablespoons of the bacon fat in the skillet – this will add incredible flavor to your chicken!
3. Sear the Chicken: Building Flavor Layers
Add the diced chicken to the skillet with the reserved bacon fat. Season with a pinch of salt and pepper. Cook over medium-high heat, stirring occasionally, until the chicken is cooked through and lightly golden brown, about 5-7 minutes. Stir in the minced onion and garlic during the last 2-3 minutes of cooking until fragrant. Remove from heat.
4. Assemble the Sliders: The Layering Strategy
Carefully slice your slider buns horizontally, keeping the tops and bottoms intact. Place the bottom halves of the buns in your prepared baking dish. Layer half of the cheese slices over the bottom buns. Evenly distribute the cooked chicken mixture over the cheese. Sprinkle the crispy bacon over the chicken. Drizzle generously with real maple syrup. Top with the remaining cheese slices, then place the top halves of the buns over everything. In a small bowl, melt 2 tablespoons of butter and brush it evenly over the tops of the buns.
5. Bake to Golden Perfection: Achieving Melty Bliss
Cover the baking dish loosely with aluminum foil. Bake for 15 minutes. Remove the foil and continue baking for another 5-10 minutes, or until the cheese is bubbly and melted, and the tops of the buns are golden brown. Let the sliders rest for a few minutes before slicing and serving. This allows the cheese to set slightly and prevents everything from sliding apart.
Expert Tips for Slider Success
- Pre-cook Chicken Ahead of Time (Meal Prep Hack!): To save time on busy days, you can cook the chicken and even the bacon a day in advance. Store them separately in airtight containers in the refrigerator.
- Don’t Overcrowd the Pan When Cooking Bacon: Cook bacon in batches if necessary. Overcrowding will steam the bacon instead of crisping it, and we want that perfect crunch!
- Brush Buns with Melted Butter for Extra Richness: This step is crucial! It adds a beautiful golden color, a rich flavor, and helps keep the buns soft and moist during baking.
- Customize Your Toppings: Make Them Your Own: Feel free to add a sprinkle of sesame seeds to the buttered tops of the buns before baking, or a dash of everything bagel seasoning for extra flavor and texture.
- The Power of a Gentle Press: After assembling but before baking, gently press down on the top buns to help compact the layers. This makes them easier to slice and eat.
Storing and Reheating Your Sliders
Best Practices for Leftovers: If you happen to have any leftover Maple Chicken and Bacon Sliders (a rare occurrence!), store them in an airtight container in the refrigerator for up to 2-3 days. For best results, separate the sliders before storing.
Reheating for Optimal Taste and Texture: To reheat, place the sliders on a baking sheet and warm them in a preheated oven at 300°F (150°C) for about 10-15 minutes, or until heated through and the cheese is re-melted. You can also microwave them, but the buns might become a bit softer, and the bacon less crispy. For a quick crisp-up, a few minutes in an air fryer at 325°F (160°C) works wonders!
What to Serve Alongside Your Sliders
These Maple Chicken and Bacon Sliders are hearty enough to be a meal on their own, but they also pair beautifully with a variety of sides.
Classic Side Dish Pairings
- Crispy French Fries or Sweet Potato Fries: A classic for a reason!
- Coleslaw: A creamy, tangy coleslaw provides a refreshing contrast.
- Potato Salad: A hearty and satisfying side.
Lighter Options for Balance
- Simple Green Salad: A light vinaigrette dressing would be perfect.
- Roasted Asparagus or Broccoli: Healthy and delicious.
- Fruit Salad: A fresh fruit salad adds a lovely sweetness.
Drinks That Complement the Flavors
- Iced Tea or Lemonade: Refreshing and classic.
- Craft Beer: A crisp lager or a pale ale would be excellent.
- Hard Cider: The apple notes complement the maple and bacon beautifully.
Frequently Asked Questions
Can I use turkey bacon?
What’s the best cheese for these sliders?
Can I assemble these ahead of time?
How do I prevent the buns from getting soggy?
Can I make these in an air fryer?
For more delicious and easy recipes, be sure to check out mycakesrecipes.com!
Maple Chicken and Bacon Sliders
- Total Time: 40 minutes
- Yield: 12 servings
Description
These irresistible sliders combine tender chicken, crispy bacon, and sweet maple syrup on soft buns with gooey cheese. Perfect for parties or a fun family meal.
Ingredients
- 1.5 lbs boneless, skinless chicken breasts or thighs, diced into 1/2-inch pieces
- 8–10 slices thick-cut bacon, chopped
- 1/2 cup real maple syrup (Grade A Amber or Dark, Robust Taste)
- 1/4 cup finely diced yellow onion
- 2 cloves garlic, minced
- 12 Hawaiian sweet rolls or slider buns
- 8–10 slices provolone, Monterey Jack, or mild cheddar cheese
- 2 tbsp unsalted butter, melted
- Salt and freshly ground black pepper to taste
- Optional: Fresh chives or parsley for garnish
Instructions
- 1. Prepare Ingredients & Preheat Oven: Dice chicken and bacon. Mince onion and garlic. Preheat oven to 375°F (190°C). Have a 9×13 inch baking dish ready.
- 2. Cook Bacon: In a large skillet over medium heat, cook chopped bacon until crispy (7-10 mins). Remove bacon to a paper towel-lined plate, reserving 1-2 tbsp bacon fat in the skillet.
- 3. Cook Chicken: Add diced chicken to the skillet with bacon fat. Season with salt and pepper. Cook over medium-high heat until cooked through and lightly golden (5-7 mins). Stir in onion and garlic for the last 2-3 minutes until fragrant. Remove from heat.
- 4. Assemble Sliders: Slice slider buns horizontally, keeping tops and bottoms intact. Place bottom halves in the baking dish. Layer half the cheese, then the chicken mixture, crispy bacon, and a generous drizzle of maple syrup. Top with remaining cheese, then the top bun halves.
- 5. Bake: Brush melted butter over the tops of the buns. Cover loosely with foil and bake for 15 minutes. Remove foil and bake for another 5-10 minutes, or until cheese is bubbly and buns are golden. Let rest a few minutes before slicing and serving. Garnish with fresh herbs if desired.
- Prep Time: 15 mins
- Cook Time: 25 mins