
Table of Contents
- Unlock Grilled Potato Perfection: Tender Hasselback Style
- Why This Recipe Delivers Unbeatable Flavor and Texture
- Ingredients & Intent: What You Need and Why
- Step-by-Step: Grilling Tender Hasselback Potatoes
- Expert Tips for Hasselback Potato Success
- Perfect Pairings: What to Serve With Grilled Hasselback Potatoes
- Storing & Reheating Your Delicious Leftovers
- Grilled Hasselback Potatoes FAQ
Unlock Grilled Potato Perfection: Tender Hasselback Style
Prepare to elevate your side dish game with these incredible Tender Grilled Hasselback Potatoes! Imagine potatoes that are crispy on the outside, impossibly creamy on the inside, and bursting with savory flavor in every single crevice. This isn’t just a side dish; it’s a culinary experience that will have everyone asking for your secret. Forget boring baked potatoes – the Hasselback technique, combined with the magic of the grill, transforms humble spuds into a show-stopping accompaniment for any meal. Get ready to impress!
Why This Recipe Delivers Unbeatable Flavor and Texture
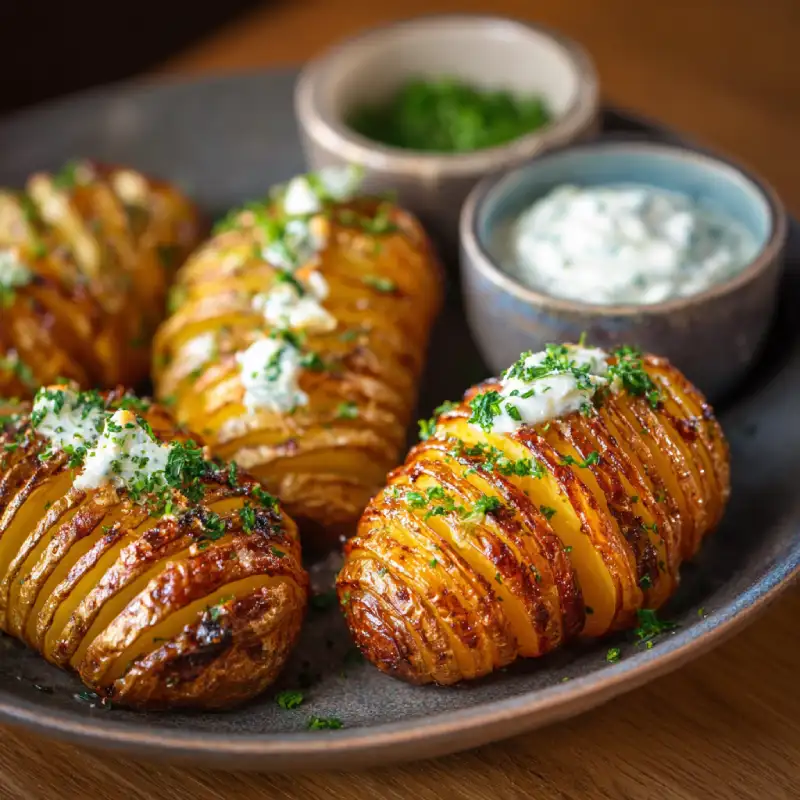
- Crispy Edges, Creamy Interiors: How the Cuts Work: The signature Hasselback slices aren’t just for show! They create dozens of thin layers that crisp up beautifully on the grill, while the protected interior remains wonderfully soft and tender. It’s the best of both worlds in every bite.
- Flavor Infusion: Maximizing Taste with Every Crevice: Those same cuts act as perfect little pockets, allowing butter, oil, and seasonings to seep deep into the potato. This means maximum flavor penetration, ensuring no bland bites here!
- Efficiency: Why Grilling is Your Secret Weapon: Grilling adds an unparalleled smoky depth that baking simply can’t replicate. Plus, it frees up oven space, making it ideal for entertaining or when you’re cooking multiple dishes. The direct heat also helps achieve that coveted crispy exterior faster.
- Perfectly Cooked Every Time: Our method ensures even cooking, preventing those frustrating raw centers or burnt outsides.
Ingredients & Intent: What You Need and Why
Here is what you need and why:
The Right Potato: Size and Starch for Success: For Tender Grilled Hasselback Potatoes, we’re looking for medium to large russet or Yukon Gold potatoes. Russets are starchy, which gives you that fluffy, creamy interior, while Yukon Golds offer a slightly waxier texture that holds up beautifully and has a naturally buttery flavor. Aim for potatoes of similar size for even cooking.
Fat Matters: Choosing Your Oil for Flavor and Grill Performance: A good quality olive oil is essential here. It not only helps crisp the potato skin but also acts as a carrier for our seasonings. You can also use melted butter for an even richer flavor, or a combination of both. The fat helps prevent sticking and promotes browning.
Seasoning Strategy: Building Layers of Taste: Salt and freshly ground black pepper are your foundational flavors. Don’t be shy! Potatoes love salt. Garlic powder and onion powder add a savory depth without the risk of fresh garlic burning on the grill. Paprika (smoked or sweet) adds color and a subtle smoky note. Feel free to experiment with other herbs like dried rosemary or thyme.
Flavor Boosters: Elevating the Experience: A sprinkle of fresh chopped parsley or chives at the end adds a pop of color and freshness. For an extra kick, consider a dash of red pepper flakes or a squeeze of lemon juice after grilling to brighten the flavors. A little grated Parmesan cheese sprinkled on during the last few minutes of grilling is also a game-changer!
Step-by-Step: Grilling Tender Hasselback Potatoes
Follow these step-by-step instructions to achieve perfect Tender Grilled Hasselback Potatoes:
1. Preparation: Mastering the Hasselback Slice (The Easy Way)
Wash and scrub your potatoes thoroughly. To create the Hasselback slices, place a potato between two wooden spoons or chopsticks. This clever trick prevents you from cutting all the way through the potato. Using a sharp knife, make thin, even slices about 1/8 to 1/4 inch apart, cutting down until your knife hits the spoons. Repeat for all potatoes. This creates those beautiful fanned layers.
2. Seasoning: Ensuring Even Flavor Distribution
In a small bowl, whisk together your olive oil (or melted butter), salt, black pepper, garlic powder, onion powder, and paprika. Place the sliced potatoes in a large bowl or on a baking sheet. Drizzle the seasoned oil generously over each potato, making sure to gently open the slices and brush the oil mixture into every crevice. This is key for maximum flavor infusion. Use your hands to really work it in!
3. Prepping the Grill: Achieving Optimal Heat
Preheat your grill to medium-high heat (around 400-425°F or 200-220°C). Clean the grill grates thoroughly with a wire brush and then lightly oil them to prevent sticking. This initial high heat will help get a nice sear and crispness on the outside of your Tender Grilled Hasselback Potatoes.
4. Grilling Process: Timing and Techniques for Tenderness
Place the seasoned potatoes directly on the preheated grill grates. Close the lid and grill for 15-20 minutes, turning occasionally, until the outsides are nicely browned and slightly crispy. Then, reduce the heat to medium-low (or move the potatoes to a cooler part of the grill) and continue to grill, covered, for another 20-30 minutes, or until the potatoes are fork-tender all the way through. The total cooking time will depend on the size of your potatoes. You can also par-boil them for 10-15 minutes before grilling to speed up the process.
5. The Finishing Touch: Adding Freshness and Zing
Once the potatoes are perfectly tender and beautifully browned, remove them from the grill. Transfer them to a serving platter. Immediately sprinkle with fresh chopped parsley or chives. A squeeze of fresh lemon juice can also brighten the flavors beautifully. Serve hot and enjoy your perfectly Tender Grilled Hasselback Potatoes!
Expert Tips for Hasselback Potato Success
- Knife Skills: The Chopstick Trick for Perfect Slices: As mentioned, placing two wooden spoons or chopsticks parallel to the potato on either side is a foolproof way to ensure you don’t cut all the way through. This creates the perfect base for your Hasselback fanning.
- Oil Application: Don’t Skimp, But Don’t Drown: Be generous with your seasoned oil, making sure to get it into all the crevices. However, avoid completely drenching them, as this can lead to soggy rather than crispy potatoes. A good brush helps distribute it evenly.
- Grill Temperature: Avoiding Burned Exteriors, Raw Interiors: Start with medium-high heat for initial crisping, then reduce to medium-low or indirect heat to allow the potatoes to cook through without burning the outside. Patience is key here!
- Doneness Test: How to Know When They’re Perfect: The best way to test for doneness is to gently insert a thin skewer or fork into the thickest part of the potato. It should slide in with very little resistance. If it feels firm, they need more time.
- Par-boiling for Speed: If you’re short on time, par-boil your whole potatoes for 10-15 minutes before slicing and grilling. This significantly reduces grilling time.
Perfect Pairings: What to Serve With Grilled Hasselback Potatoes
These Tender Grilled Hasselback Potatoes are incredibly versatile and pair beautifully with a wide array of dishes:
- Protein Power: Complementary Main Dishes: They are a dream alongside grilled steak, roasted chicken, pan-seared salmon, or even a hearty veggie burger. The smoky flavor of the potatoes complements almost any grilled protein.
- Vegetable Companions: Rounding Out the Meal: Serve them with a fresh green salad, grilled asparagus, roasted broccoli, or sautéed green beans for a complete and balanced meal.
- Sauce Sensations: Dips and Toppings That Elevate: A dollop of sour cream or Greek yogurt, a sprinkle of crispy bacon bits, a drizzle of cheese sauce, or a fresh herb pesto can take these potatoes to the next level. Don’t forget a classic ketchup or a spicy aioli!
Storing & Reheating Your Delicious Leftovers
Don’t let any of these delicious Tender Grilled Hasselback Potatoes go to waste!
- Cooling Safely: Preventing Moisture Buildup: Allow any leftover potatoes to cool completely at room temperature before storing. This prevents condensation from forming, which can make them soggy.
- Optimal Storage: Maintaining Texture: Store cooled potatoes in an airtight container in the refrigerator for up to 3-4 days.
- Best Reheating Methods: Bringing Them Back to Life: For the best results, reheat them in a preheated oven or air fryer at 375°F (190°C) for 10-15 minutes, or until heated through and re-crisped. Microwaving is an option for speed, but it will soften the texture.
Grilled Hasselback Potatoes FAQ
Can I bake them instead of grill?
What’s the best type of potato for Hasselback?
How do I prevent them from drying out?
Can I prep them ahead of time?
Tender Grilled Hasselback Potatoes
- Total Time: 15 minute
- Yield: 4 servings
Description
Unlock the secret to perfectly crispy, creamy, and flavorful potatoes with this easy-to-follow grilled Hasselback recipe. It’s the ultimate side dish that will impress everyone at your next meal.
Ingredients
- 4 medium-large Russet or Yukon Gold potatoes
- 3 tablespoons olive oil (or melted butter)
- 1 teaspoon sea salt
- 1/2 teaspoon black pepper
- 1/2 teaspoon garlic powder
- 1/2 teaspoon onion powder
- 1/4 teaspoon paprika (smoked or sweet)
- 2 tablespoons fresh parsley or chives, chopped (for garnish)
Instructions
- 1. Prepare Potatoes: Wash and scrub potatoes. Place each potato between two wooden spoons or chopsticks and make thin, even slices about 1/8 to 1/4 inch apart, cutting down until the knife hits the spoons.
- 2. Season: In a small bowl, whisk together olive oil, salt, pepper, garlic powder, onion powder, and paprika. Drizzle generously over the sliced potatoes, ensuring the mixture gets into all the crevices.
- 3. Preheat Grill: Preheat your grill to medium-high heat (400-425°F / 200-220°C). Clean and lightly oil the grates.
- 4. Grill: Place potatoes directly on the grill. Grill, covered, for 15-20 minutes, turning occasionally, until browned. Reduce heat to medium-low and continue grilling, covered, for another 20-30 minutes, or until fork-tender.
- 5. Garnish & Serve: Remove from grill, sprinkle with fresh parsley or chives, and serve hot.
- Prep Time: 15 mins
- Cook Time: 40-50 mins