
Table of Contents
- From Pantry to Perfection: Your Easiest Strawberry Cheesecake Dump Cake
- Why This Recipe Delivers Big on Flavor and Ease
- Essential Ingredients & Smart Substitutions
- Your Step-by-Step Guide to Dump Cake Bliss
- Expert Tips for a Flawless Strawberry Cheesecake Dump Cake
- Serving Suggestions: Elevate Your Dessert
- Storing & Reheating for Lasting Enjoyment
- Strawberry Cheesecake Dump Cake FAQ
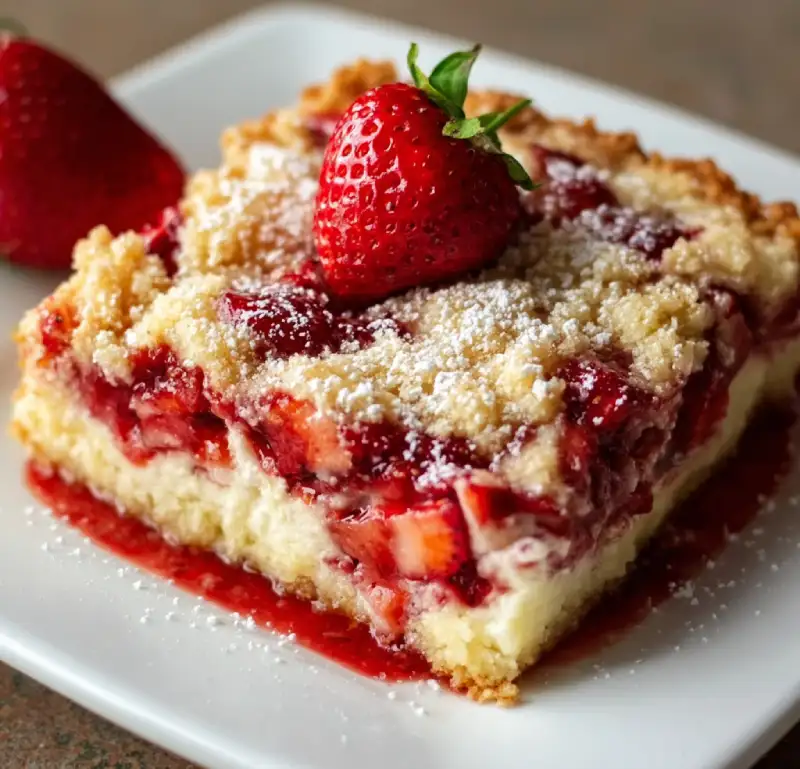
Imagine a dessert that delivers the creamy tang of cheesecake, the sweet burst of strawberries, and a golden, buttery crumb topping – all with minimal effort. That, my friends, is the magic of the Strawberry Cheesecake Dump Cake. This isn’t just a recipe; it’s a revelation for anyone who loves baking but craves simplicity. Each spoonful offers a delightful contrast: the soft, warm fruit, the rich, smooth cheesecake layer, and that irresistible crunchy cake topping. It’s a dessert that tastes like you spent hours in the kitchen, but in reality, it comes together in minutes, making it an absolute game-changer for busy weeknights, impromptu gatherings, or simply satisfying that sweet tooth craving.
From Pantry to Perfection: Your Easiest Strawberry Cheesecake Dump Cake
This Strawberry Cheesecake Dump Cake isn’t just easy; it’s revolutionary. It’s the kind of dessert that makes you feel like a culinary genius without breaking a sweat. Forget complicated steps and endless dishes – this recipe is designed for maximum flavor with minimum fuss.
Why This Dessert is a Game-Changer
In the world of baking, finding a recipe that consistently delivers on taste, texture, and ease is like striking gold. This dump cake does exactly that. It leverages pantry staples to create a dessert that’s both comforting and impressive. It’s perfect for those moments when you need a show-stopping treat but are short on time or energy. The beauty lies in its layered simplicity, allowing each component to shine while harmonizing into a truly delectable experience.
My Go-To for Effortless Comfort
Whenever I need a dessert that feels like a warm hug, but I don’t want to spend all day in the kitchen, this Strawberry Cheesecake Dump Cake is my absolute go-to. It’s the perfect blend of sweet, tangy, and rich, with a delightful textural contrast that keeps everyone coming back for more. It’s comfort food at its finest, made incredibly accessible.
Why This Recipe Delivers Big on Flavor and Ease
- Effortless Layering: The ‘dump’ method means no mixing bowls for the cake or cheesecake layers – just pour and spread!
- Perfect Texture Every Time: The butter melts through the cake mix, creating a wonderfully crisp, golden crust over a tender, moist cake.
- Balanced Sweetness: The tang of the cheesecake and strawberries perfectly cuts through the sweetness of the cake mix, creating a harmonious flavor profile.
- Minimal Cleanup: With just one baking dish and a few measuring tools, your post-dessert cleanup is a breeze.
The ‘Dump Cake’ Advantage: Layers of Pure Magic
The genius of a dump cake lies in its name – you literally ‘dump’ the ingredients into a pan. But don’t let the simplicity fool you; the magic happens in the oven as the butter melts, the cake mix transforms into a golden crust, and the fruit and cheesecake layers meld into a gooey, delicious filling. It’s a testament to how incredible flavors can emerge from the simplest assembly.
Texture: Creamy, Fruity, and Crumbly Perfection
Prepare for a textural symphony! You’ll get the soft, yielding warmth of the strawberry pie filling, the smooth, luscious creaminess of the cheesecake layer, and the irresistible, buttery crunch of the golden cake topping. It’s a delightful dance of sensations in every bite.
Flavor Profile: Sweet, Tangy, and Rich
This Strawberry Cheesecake Dump Cake hits all the right notes. The sweetness from the strawberries and cake mix is beautifully balanced by the subtle tang of the cheesecake. It’s rich without being overly heavy, making it incredibly satisfying and utterly addictive.
Minimal Effort, Maximum Impact
This is the ultimate dessert for impressing guests or treating yourself without spending hours in the kitchen. The preparation is so straightforward, yet the result is a dessert that looks and tastes like it came from a gourmet bakery. It’s proof that sometimes, the simplest methods yield the most spectacular results.
Essential Ingredients & Smart Substitutions
Here is what you need and why:
Canned Pie Filling: The Sweet & Fruity Base (Why not fresh?) For this recipe, canned strawberry pie filling is your best friend. It provides the perfect consistency and sweetness, ensuring a gooey, flavorful fruit layer without the need for extra thickeners or sugar. While fresh strawberries are wonderful, they release too much liquid during baking for a dump cake, potentially making the bottom soggy. The pre-thickened pie filling is key to the dump cake’s success.
Cheesecake Filling Mix: Instant Creaminess (Powder vs. Block Cream Cheese) A box of no-bake cheesecake filling mix (like Jell-O brand) is what gives us that signature creamy, tangy cheesecake layer with zero fuss. This powdered mix, when combined with milk, creates a smooth, stable layer that bakes beautifully. Using block cream cheese would require additional steps like softening, whipping, and adding sugar, which goes against the ‘dump cake’ ethos of ultimate simplicity.
Dry Cake Mix: The Golden Crumbly Topping (Yellow vs. White Cake Mix) A box of dry yellow cake mix is ideal here. It creates a rich, buttery, and slightly vanilla-flavored crumb topping when combined with melted butter. While white cake mix can work, yellow often provides a slightly richer flavor and a more appealing golden hue to the crust. Avoid cake mixes with pudding in the mix, as they can sometimes result in a denser, less crumbly topping.
Butter: The Browning & Binding Agent (Melted vs. Cubed) Unsalted butter is crucial for both flavor and texture. We’ll be using it melted, which allows it to seep evenly through the dry cake mix, creating that irresistible golden-brown, crisp topping. Cubed butter, while common in other crumb toppings, wouldn’t distribute as effectively in a dump cake, potentially leaving dry spots of cake mix.
Optional: A Touch of Vanilla (Enhancing Depth) A teaspoon of good quality vanilla extract can be added to the cheesecake layer for an extra layer of aromatic depth. It’s not strictly necessary but elevates the flavor profile beautifully.
Your Step-by-Step Guide to Dump Cake Bliss
Follow these simple steps to create your perfect Strawberry Cheesecake Dump Cake:
1. Prep Your Pan
Preheat your oven to 350°F (175°C). Lightly grease a 9×13 inch baking dish with butter or non-stick cooking spray. This ensures your delicious dump cake slides out easily for serving.
2. The Fruitful Foundation
Evenly spread both cans of strawberry pie filling across the bottom of your prepared baking dish. Make sure it covers the entire base. This is your sweet, fruity layer that will bubble up beautifully.
3. The Cheesecake Swirl
In a medium bowl, whisk together the cheesecake filling mix and the cold milk until smooth and slightly thickened. Pour this creamy mixture over the strawberry pie filling. You can gently swirl it with a knife if you like, but don’t mix it completely into the strawberries.
4. The Dry Cake Mix Sprinkle
Evenly sprinkle the entire box of dry yellow cake mix over the cheesecake layer. Try to get an even coating across the whole surface. Do not stir! This dry layer will absorb the butter and become your golden crust.
5. The Butter Drizzle
Pour the melted butter evenly over the dry cake mix. Ensure as much of the cake mix as possible is covered by the butter. This is crucial for a golden, crispy topping. Again, do not stir!
6. Bake Until Golden and Bubbly
Bake for 45-55 minutes, or until the top is golden brown and the fruit filling is bubbly around the edges. The exact time can vary depending on your oven, so keep an eye on it.
7. Cooling Perfection
Remove from the oven and let the dump cake cool on a wire rack for at least 15-20 minutes before serving. This allows the layers to set slightly, making it easier to scoop and enjoy.
Expert Tips for a Flawless Strawberry Cheesecake Dump Cake
- Don’t Stir the Layers – Trust the Process! This is the golden rule of dump cakes. Each layer is designed to cook and meld on its own. Stirring will disrupt the distinct layers and prevent the cake mix from forming that perfect crumbly topping.
- Even Distribution of Cake Mix is Key: Take a moment to sprinkle the dry cake mix as evenly as possible over the cheesecake layer. This ensures a consistent crust texture across the entire dessert.
- Butter Coverage: Why It Matters for Texture: Make sure the melted butter covers as much of the dry cake mix as possible. The butter is what transforms the dry mix into a delicious, golden, and slightly crisp topping. Any dry spots will remain powdery.
- Recognizing ‘Done’: Golden Brown & Bubbly Edges: Your dump cake is ready when the top is beautifully golden brown and you can see the fruit filling bubbling up around the edges of the pan. A toothpick inserted into the cakey parts should come out mostly clean.
- Cooling Time: The Secret to Structure: While tempting to dig in immediately, allowing the dump cake to cool for at least 15-20 minutes (or even longer) helps the layers set. This makes for cleaner scoops and a more enjoyable texture.
Serving Suggestions: Elevate Your Dessert
Classic Pairings: Whipped Cream or Ice Cream
A warm slice of Strawberry Cheesecake Dump Cake is absolutely divine on its own, but a dollop of freshly whipped cream or a scoop of vanilla bean ice cream takes it to another level. The cool, creamy additions provide a wonderful contrast to the warm, fruity cake.
Fresh Fruit Garnish: A Pop of Color and Freshness
For an extra touch of elegance and a burst of fresh flavor, garnish your servings with a few fresh strawberry slices or a sprinkle of mint leaves. It adds a beautiful pop of color and a hint of brightness.
Coffee or Tea: The Perfect After-Dinner Treat
This rich and satisfying dessert pairs wonderfully with a hot cup of coffee or a comforting mug of tea. It’s the ideal way to end a meal or enjoy a cozy afternoon treat. For more delightful baking ideas, check out mycakesrecipes.com!
Storing & Reheating for Lasting Enjoyment
Room Temperature vs. Refrigeration: When and Why
Because this Strawberry Cheesecake Dump Cake contains dairy (from the cheesecake mix and milk), it’s best to refrigerate any leftovers. While it can sit at room temperature for a couple of hours, for longer storage and food safety, transfer it to the fridge once it has cooled completely.
Best Practices for Air-Tight Storage
To keep your dump cake fresh and prevent it from drying out or absorbing fridge odors, store it in an airtight container or cover the baking dish tightly with plastic wrap. It will stay delicious in the refrigerator for up to 3-4 days.
Reheating Methods: Oven or Microwave?
For a warm, gooey experience, you can reheat individual servings in the microwave for 30-60 seconds, or until warmed through. If you’re reheating a larger portion or the entire cake, cover it loosely with foil and warm it in a preheated oven at 300°F (150°C) for 15-20 minutes, or until heated through. This helps maintain the crispness of the topping.
Strawberry Cheesecake Dump Cake FAQ
Can I use fresh strawberries?
What if I don’t have cheesecake filling mix?
Can I make this ahead of time?
Is this dessert freezer-friendly?
Why is it called a ‘dump cake’?
Strawberry Cheesecake Dump Cake
- Total Time: 1 hour
- Yield: 12 servings
Description
An incredibly easy and delicious dessert featuring layers of sweet strawberry pie filling, creamy cheesecake, and a golden, buttery cake topping. Perfect for a quick treat or effortless entertaining.
Ingredients
- 2 (21 ounce) cans strawberry pie filling
- 1 (3.4 ounce) box no-bake cheesecake filling mix
- 1 ½ cups cold milk (for cheesecake mix)
- 1 (15.25 ounce) box yellow cake mix (dry)
- 1 cup (2 sticks) unsalted butter, melted
- Optional: 1 teaspoon vanilla extract
Instructions
- 1. Prepare Oven and Pan: Preheat oven to 350°F (175°C). Lightly grease a 9×13 inch baking dish.
- 2. Layer Strawberry Filling: Spread both cans of strawberry pie filling evenly across the bottom of the prepared baking dish.
- 3. Make Cheesecake Layer: In a medium bowl, whisk together the cheesecake filling mix and cold milk until smooth and slightly thickened. Pour this mixture over the strawberry pie filling.
- 4. Add Dry Cake Mix: Evenly sprinkle the entire box of dry yellow cake mix over the cheesecake layer. Do not stir.
- 5. Drizzle with Butter: Pour the melted butter evenly over the dry cake mix, ensuring good coverage. Do not stir.
- 6. Bake: Bake for 45-55 minutes, or until the top is golden brown and the fruit filling is bubbly around the edges.
- 7. Cool and Serve: Remove from oven and let cool on a wire rack for at least 15-20 minutes before serving. Enjoy warm with whipped cream or ice cream!
- Prep Time: 10 mins
- Cook Time: 50 mins